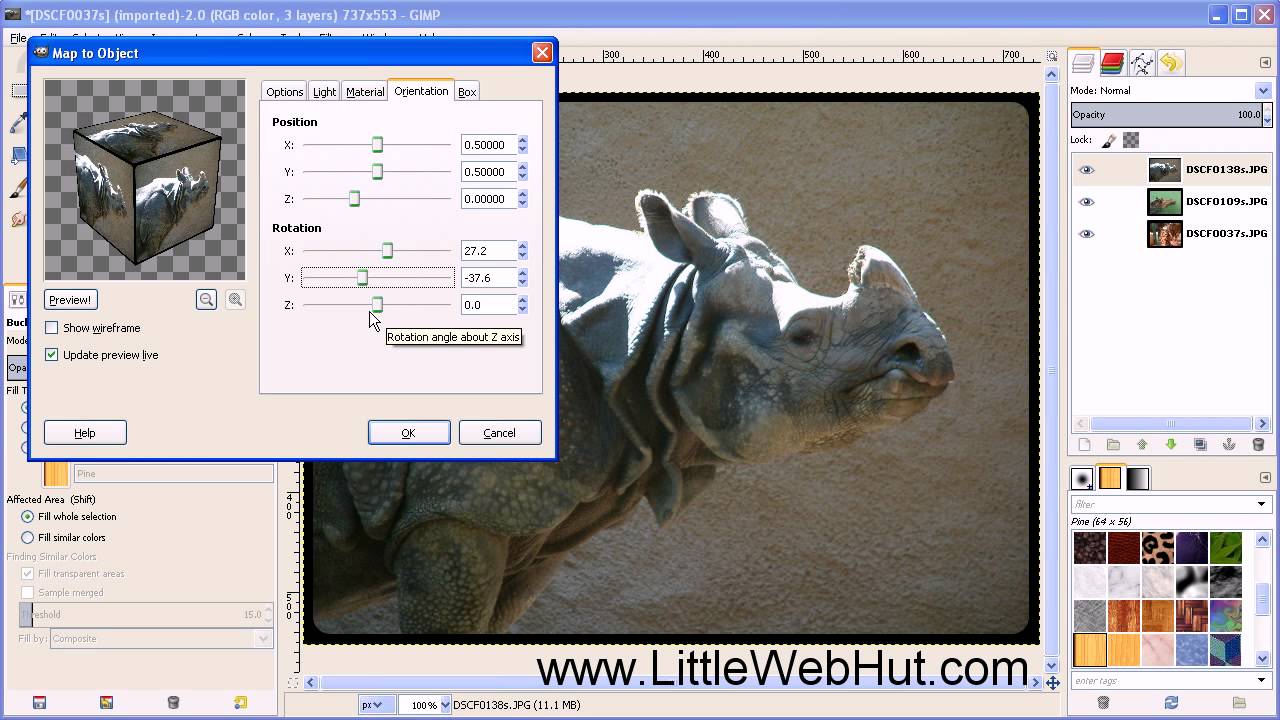
GIMP 2.8 Tutorial - Photos on a Cube

preview_player
Показать описание
This GIMP tutorial demonstrates how to put 3 photographs on a cube. GIMP version 2.8.0 was used for this video. This is a good tutorial for beginners.

GIMP website
Рекомендации по теме
Комментарии
Автор

Your voice is nice and clear and loud enough. You are explaining very well!

DeAthabasca
Автор

This is very clear, step by step and very useful tutorial, the presentation is a kind of professional material.

tanincharoenpanich
Автор

Excellent tutorials. I really appreciate how detailed they are. Works well for us newbies. I can't wait to give this cube effect a try. Again, thanks for another excellent tutorial.

frasiersmith
Автор

shows how much gimp can do in just few clicks. you are really good.

insolveit
Автор

I'm a beginner using GIMP and I have subscribed to your youtube page.  Pretty sure I'll learn from your tutorials quite a great deal since I love it.  Thanks so much. 

edn
Автор

When I tried this, after the step where I map the images to a box, the layer with the box is no longer visible. How do I fix this?

pumbaboi
Автор

hey great video i finaly found gimp videos that are clear and easy step by step im still learning gimp and it gets very fustrating when u cant do things im going to stat by trying this one thanks again

NFgreeneyegirl
Автор

That was very helpful. Gimp does a lot, but graphics programs are not exactly intuitive since they have so many complex features. Thanks for taking the time to put together a video and post it.

VersinKettorix
Автор

Thanks for a great tutorial. I found your tutorial to be very helpful and I have learnt a great deal from the lucid and clear instructions.

BrianCollinsastrology
Автор

excellent ... thank you so very much for all your very clear videos and at a slow pace for me to comprehend easily :) You have taught me so much since I started using gimp 4 years ago. Well done and keep them coming :D

khbengels
Автор

at 5:31, where the corners were bring rounded, i found a simpler way of doing that:
select the transparent area with the fuzzy select tool and clip the tab for it.
then, select the check box for feather edges and adjust the radius accordingly.
then, hit the delete button on your keyboard and it makes all the corners nice and smooth.
to finish up, you can either go to the select menu and click select none or you can Ctrl+Shift+A to select none as a shortcut.

xjfriday
Автор

Thanks the video was short sweet and to the point and very easy to follow great job!

sbret
Автор

May I give the Trophy for the best Tutorials online! Thank you and I've subscribed :D

ningrat
Автор

Thank you for the wonderful, yet simple to follow, tutor video. Great job!!! Do you have any other GIMP tutor videos? Again, thanks!

wayneshi
Автор

Thank you very much for your very excellent tutorials, learning a huge amount of very useful things.

BlenderZen
Автор

thank you for this video and best regards from hamburg!

guhgelhupf
Автор

Awesome tutorial would have never known you could do this :).

aguynamedbprod
Автор

Tyvm for your tutorials, as always very well explained and easy to understand. =)

fabioshinichi
Автор

Thanks for to shre yours tutorials, , , I putted a gradient.. looks great!!

Endy
Автор

If you load the largest image first then none of the images will be clipped. Of course you will need to load the 3 images one at a time to do this. The box filter will then resize the images to fit the cube. Also, the size of the final cube will correlate to the size of the image that is on the top layer. So before running the box filter, move the largest image to the top for best results.

tutoru