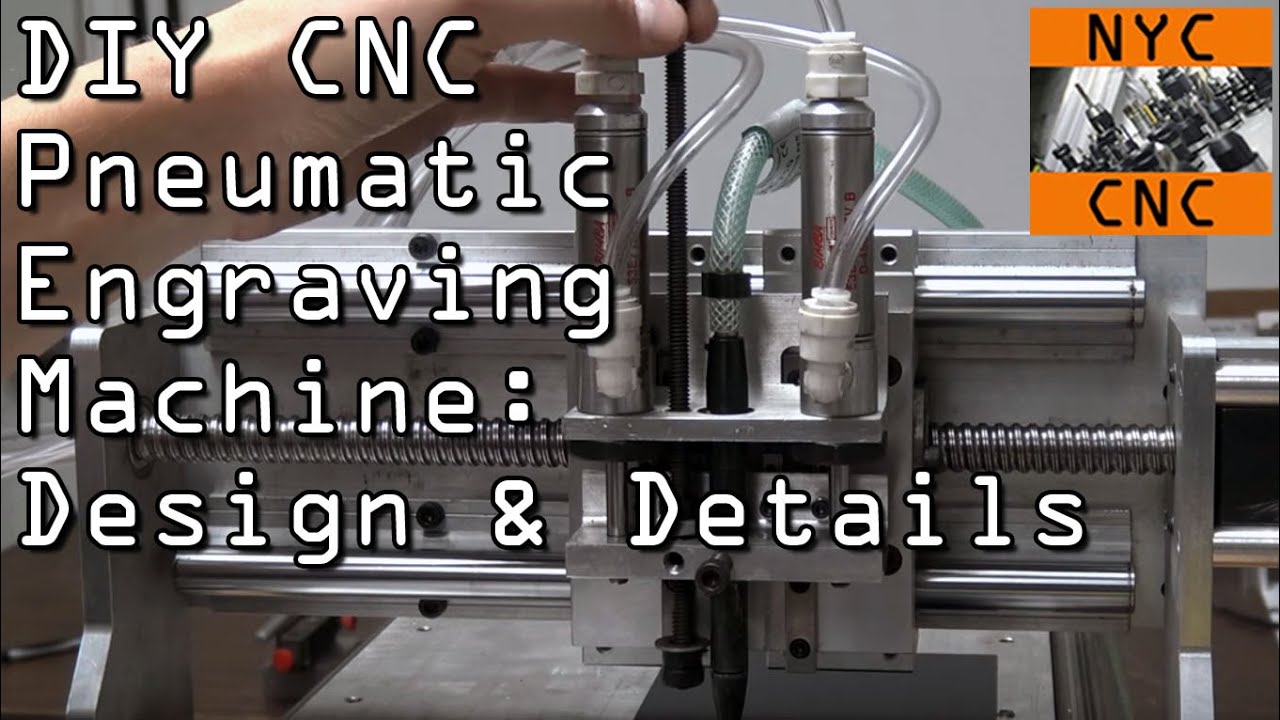
DIY CNC Engraving Machine Details & Design

preview_player
Показать описание
How to build a DIY TinyG & Arduino powered DIY CNC Machine from scratch with linear rails, ball screws and more!
~~~~~~~~~~~~~~~~~~~~~~~~~~~~
Links for this video
~~~~~~~~~~~~~~~~~~~~~~~~~~~~
Reach us / CNC Info:

Рекомендации по теме
Комментарии
Автор

You and your subscribers are awesome. So many smart people here its great to read everyone's ideas. I'd love to repair one of the tiny g's if no one else has already asked.

scollaroful
Автор

I worked with pneumatic in high school robotics, so I have tackled similar problems, and I have a few tips:
1. As far as using air pressure to keep the engraver tracking the part, you will need much lower pressure or much smaller cylinders, with 3/4" cylinders and 60 Psi (but assumptions but I assume they're about right) you will be pressing down on that tip with 50 pounds. I would regulate down to maybe 10 psi to get a more effective tracking.
2. The activation speed of your cyliders is quite high for this sort of application, they make flow regulating 90 degree connectors that could replace the ones that you are currently using and a buck or 2 a pop and they will give you the ability to limit how fast air is exhausted (thus slowing down the cylinder).This may also help you achieve the 'air ride ' you are looking for.

skolmnvikes
Автор

John
did you try to use low air pressure for the cylinders? I would just regulate the air down to the point where it has just enough force to engrave with minimuml drag.

sharpx
Автор

Thanks for these DIY CNC videos, I have learned a lot and you are enabling people like me with limited DIY budget to get started.

chrishartley
Автор

Hey John, glad to see you got back to the engraver!

I know how you feel about keeping voltage away from the TinyG - I fried mine and after that put opto-isolators on all the inputs. I love that they work as simple as a relay but have no physical connection from one side to the other.

If you are still looking for limit switches, I've rescued some nice (new!) PHD and Bimba hall effect and reed switches from the junk bin at work. Send me a PM if you want some - I'm sure I can part with a few!

ChrisDePrisco
Автор

A simpler way to interface the 5v beefcake relay to the tinyg board is to use an optoisolator. Along with the voltage level shift, this also will provide protection to the tinyg board. The way it is now an event is likely to take out both the arduino and the tinyg. A 4n25 is a common opto but most will work. You will also need a resistor in series to limit the current to the led in the opto, a 220 resistor will give 10milliamps which should work fine.

brunsrtws
Автор

For the z you could try looking into regulating the pressure to the cylinders to a lower psi. My thinking is it would allow the engraver to sort of float along the surface, adjusting to height variations, while pushing down with a small constant force. You could then adjust the pressure to change depth of cut or for different materials being engraved. You might also look into valves for the exhaust to tune how hard the cylinders are hitting the end of travel. It could be the mic, but it sounded a little jarring in the video.

mcg
Автор

You'll be getting a YouTube play button soon! Awesome content as always.

supermanhills
Автор

It's looking good John!

Yes, anti-static bags conduct....that's how they work....they conduct the static charges so the parts don't have to. It's metal that gives them the silver color. They aren't guaranteed to protect your parts in all cases either...use a wrist strap. Even if you don't kill a part outright, you can do enough damage to make it flakey or to reduce the life expectancy.

I'm wondering if the speed issues result from using a slower, lower power CPU? Maybe it's pumping pulses to the steppers as fast as it can? If so, you'll need to go to a faster or more powerful processor, or use several, or helper circuits, to do the stepping. I.e. The Arduino says, "spin at rate X" and another Arduino, or a dedicated circuit, starts putting out stepper pulses at the required rate to do that. I'm not an EE, but I'd guess that a voltage controlled oscillator might be a starting point for something like that. Just a thought.

-- Mike

BigMjolnir
Автор

I like your "follower" idea. A cheap test valve would be an air ride suspension auto leveling valve which can be had at the auto parts store. Use a probe down to the work surface and the out-put to regulate the spindle height.
This way you would maintain the ability to adjust air pressure to change the tool pressure for different materials or depth of cut.
With a small carbide indicator tip you could get the probe very close to the engraver tip. These valves only require 2-3 inch pounds to actuate so the probe arm could be quite small, an indicator stand rod for example.

thething
Автор

It would be my pleasure to try and fix the Tiny G boards.
Would controlling the air pressure provide the pressure control to the engraving tool you need?

repalmore
Автор

spring load the dead stop looks like an approach simple enough to try. I've done it with a spare 3D printer converted to an engraver with good results.

tbird
Автор

I left a comment on the first belt actuated machine. This looks feasible for my purpose of turning a manual knee mill into a CNC machine. From just looking at the price the motors are less than $15, but are they strong enough to run a full size Bridgeport cloned mill? Also can 2 of these motors be coupled together for the X and Y axis? Or can the same other components be used with a bigger stepper motor? Its not that I'm just cheap, but rather I'm disabled from back issues but still love to make chips when I am able to get out in the shop. So being on a limited income makes thing tight.

coburnlowman
Автор

Hi John,

Just a quick word on maintaining the depth, If it was me, I'd allow the pen to float within a housing with a spring to maintain the down pressure, along the same lines as your pneumatic approach, however you can swap out the springs and adjust it a bit easier.

More on the DIY CNC stuff, I think it'd be amazing for you to build a plasma CNC. I'm currently working on one in my spare time, so far I've got 3 stepper motors an arduino and a grblsheild (all thanks to you) and am looking into the hardware for the frame and gantry at the moment.

My next problem is that I need that 'coolant' on and off, or in other words another channel to send signals on. If you don't mind me asking, what would you do to make this happen? Is there someway to make this work with the GRBLSheild and arduino, if not would you go down the same path that you have with the TinyG, or is there another board out there I should check out?

I love the passion and enthusiasm you bring to your channel

Regards
Peter

ghaljfas
Автор

I would suggest using a spring in the spindle with adjustable tension. It would in effect give you a spring loaded engraving tool. This would allow you to engrave slightly curved or parts that are not flat as well. My experience is it takes some fine tuning in the tool paths to get it dialed in but in my opinion worth it.

clintonconger
Автор

Few thoughts... I've been fighting speed too... I'm guessing 1 start lead screws are going to be the slowest... 2 or 5 start would speed things up considerably, but not sure how hard that would push the steppers... Second... On the height adjustment. Could you put a spring around the pen and have an adjustable tension? That would give it reference and push the height up or down base on the material in the immediate vicinity of the pen. Awesome project man! I don't understand how you are going to put chili pepper onto a raspberry pi, but I'll look into that.

GregsGarage
Автор

Great video and info. A thought for your Z axis. why not use a linear servo with worm gear. You would have the ability then to have precise analog control of depth.

kencurtz
Автор

Happy to take a look at one of the tiny G boards :) I'll even send it back once it works

NathanielQuillin
Автор

Is there a followup (or next part) video to this one? It really hard to follow when the titles on the videos are different every time.

sallerc
Автор

So is this why you don't have detailed construction videos? It's disappointing because I got excited about this project and you guys didn't follow through... I'm new to machining and CNC being in the IT industry, but if I can learn enough I hope to start a side business in something that is fascinating to me (precision metalworking), but I will admit I wish you had detailed videos for this and other DIY CNC projects. I see your videos on your site, but they tend to be tool related and not machine building. I'm at least buying my first 3D printer in a couple weeks which will help me learn 3D modeling and precision fabrication. This stuff is easy and hard to get into, it's very overwhelming. I would prefer not to have to go back to college for an education in machining and CNC. At the least thanks for all your other awesome videos.

Devinm
visit shbcf.ru