filmov
tv
How to add CISCO L2 and L3 Image in EVE-NG | How to Install Cisco IOS in EVE-NG.

Показать описание
This video description Cisco IOS images download link available.
To add Cisco L2 and L3 images in EVE-NG, you need to follow these steps:
1. Obtain the Cisco images: You will need to have valid Cisco IOS images for the L2 and L3 devices you want to add.
2. Prepare the image files: Make sure you have the Cisco IOS image files in the appropriate format for EVE-NG. EVE-NG supports image formats such as .bin, .img, and . qcow2.
3. Access EVE-NG web interface: Open a web browser and access the EVE-NG web interface.
4. Upload the image files: Once you are logged into the EVE-NG web interface, navigate to the "Images" section. Here, you will find options to upload and manage images. Click on the "Upload" button and select the Cisco IOS image file(s) you want to add.
5. Import the image into a lab: After the image file(s) are uploaded, go to the "Nodes" section in the EVE-NG web interface. Click on the "Add" button to create a new node. In the node configuration window,
6. Configure the node properties: Provide a name for the node, select the desired specifications (e.g., RAM, CPU), and configure any additional settings required for your lab environment.
7. Save the node configuration: Once you have completed the node configuration, click on the "Save" button to save the changes.
8. Start the node: Return to the lab topology view and start the node by clicking on the "Start" button associated with the node. Access the device console: To access the console of the Cisco device, click on the console icon associated with the node. A console window will open, allowing you to interact with the device's command-line interface.
 0:08:20
Add CISCO L2 and L3 images in EVE-NG.. COMPLETE INSTALLATION!!!
 0:07:14
How to Add Layer 2 Switch in GNS3 | Cisco L2 Switch IOS vIOS-L2 | SYSNETTECH Solutions
 0:06:15
Add Cisco L2 & L3 Switches to EVE-NG | PCNSE
 0:01:59
How to add Cisco L2 & L3 IOL image on Pnetlab
 0:09:43
Add a Cisco Switch in GNS3 | Cisco vIOS-L2
 0:19:22
Step by step Configuration of Cisco L2 Switch and Basic Switch Management
 0:09:55
How to add Cisco L2 & L3 IOL image on Pnetlab
 0:11:37
Upload and install Cisco IOU L2 L3 images on #GNS3 2.2.29
 0:10:19
Add Router and Switch in GNS3 || L2 L3 IOU
 0:08:46
How to add CISCO L2 and L3 Image in EVE-NG | How to Install Cisco IOS in EVE-NG.
 0:06:45
Install and License Cisco IOU l2 IOU l3 images GNS3
 0:01:00
Assign ip address to cisco switch / Assign ip address to vlan
 0:07:45
How to Install Cisco IOU L2 Appliance in GNS3 | SYSNETTECH Solutions
 0:05:47
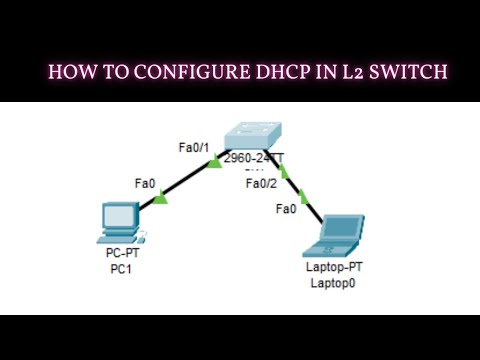
How to Configure DHCP on a Cisco L2 Switch | Configure DHCP Server in Cisco L2 Switch
 0:07:25
Connect a L2 Switch to the Data Center | Cisco Switching
 0:09:32
How to Add Layer 2 Switch in GNS3 | Cisco L2 Switch IOSv-L2.vmdk|via VMware workstation
 0:15:05
Setup IOU L2 and IOU L3 on GNS3
 0:06:25
How To add Layer 2 Switch IOS Image on GNS3 | GNS3 L2 IOU VM | Cisco Switch Easy Step by Step
 0:06:19
EVE NG Add CISCO L2 L3 IOL (Khmer)
 0:14:31
How To Configure CISCO Switches ( Step By Step )
 0:05:30
How to Add and Configure Cisco IOU L2 and L3 Switch in GNS3
 0:26:41
How to Install Cisco L2/L3 IOU on GNS3 VM | SYSNETTECH Solutions
 0:10:55
Setup IOU L2 and #iou L3 on #GNS3
 0:06:45
How To add L2/Multilayer Switch In Gns3 VM
Комментарии