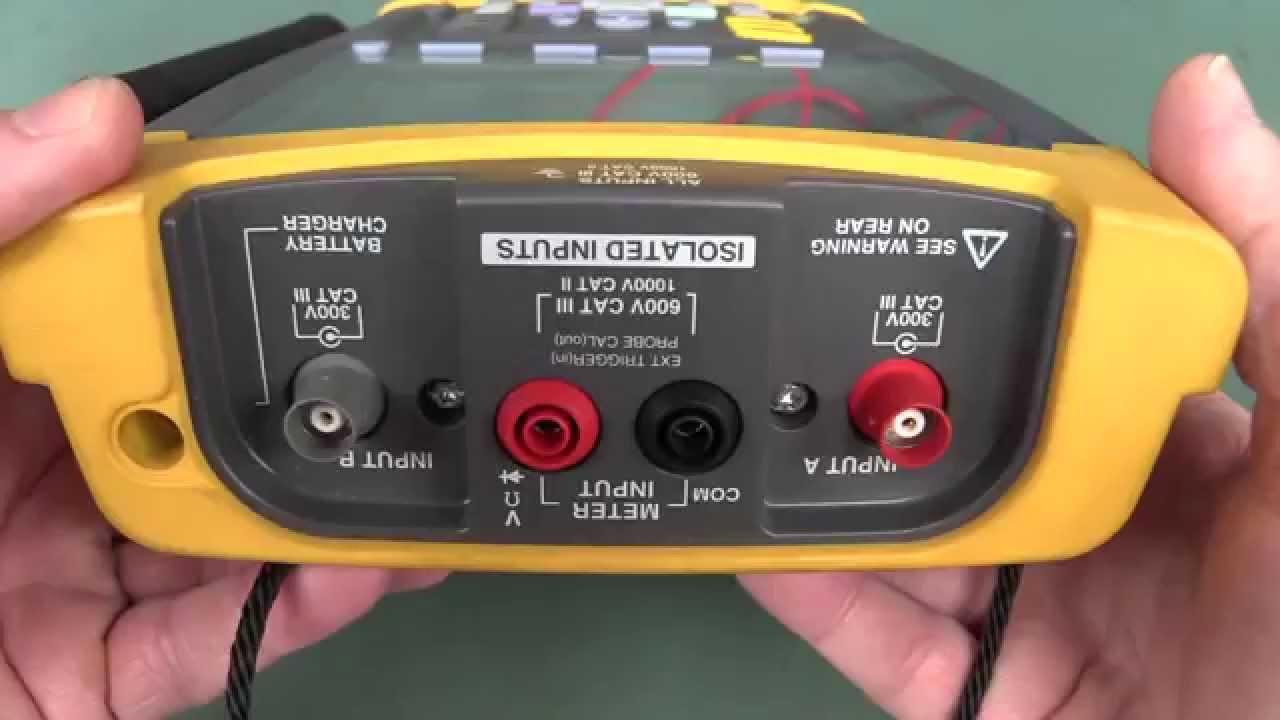
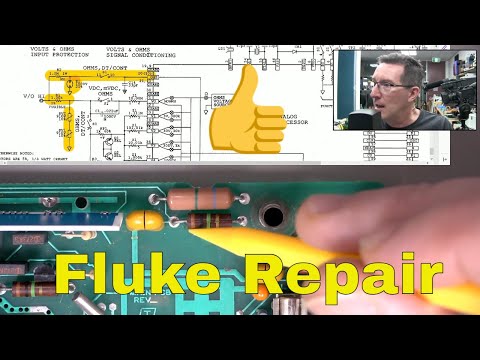
EEVblog #808 - Fluke 196 Scopemeter Repair

preview_player
Показать описание
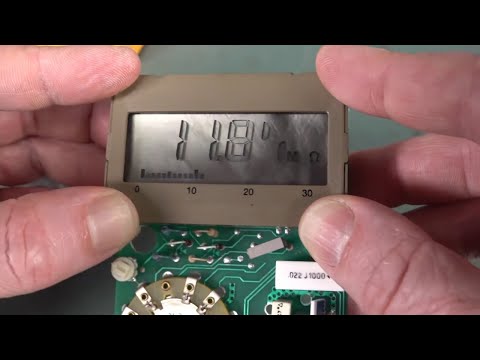
Dave repairs a dumpster Fluke 196 Scopemeter handheld oscilloscope that has a faulty LCD screen.
Forum:

How to repair a faulty hot bar LCD screen flat flex cable connection.

Support the EEVblog through Patreon!

EEVblog Amazon Store (Dave gets a cut):

Donations:
Projects:
Electronics Info Wiki:
Рекомендации по теме
Комментарии
Автор

Hi Dave,
My name is Dan.
At my old job I build and troubleshot this kind of devices(all of FLUKE scopemeters). They were manufactured in Brasov, Romania, now they are obsolete(this type of scopemeters).
What i wanted to say is: don't worry about the last bar it will fix it's self in time. Just leave it working for a while and it will disappear due to the heat generated by the display and backlight.
That white stuff on the chips is used for heatsink, the radiator is the shield it's self.
If you want help with the oscilloscope function write and I will try to help you.

bvcdi
Автор

You fucking legend, fixing a multi thousand Fluke with a hot gun and a pencil eraser, gold, you and AvE are the best things to happen to youtube

wither
Автор

Best feeling ever when you eventually fix something

uberhakz
Автор

Two successful repair videos in a row!!! You bloody ripper!!

ilikebaud
Автор

Fixing those strips is easier than it looks. Just hovering over the ribbon with a soldering iron can fix it easily. You don't even need to touch the strip. This is commonly done on the original Gameboy to fix the screens as they end up separating. You can even do it while its on to see your progress.

pacmanpaquette
Автор

Nice one Dave! I'm glad we finally got something fixed haha. Very fun to watch!

GadgetAddict
Автор

Hi David, I'm one of your multi-million followers eevblog, and I like a lot your way to show & teach electronics.

I came up with a PM97 Scopemeter, with one vertical line missing. But differently than your PM196, do not have zebra connectors hot welded on the pcb, but instead have (3) Zebra rubber connectors: TOP, LEFT & RIGHT, between the LCD GLASS and the pcb.
Useless to say the I wouldn't be able to recover the display using:
- extra pressure by hand on the upper LCD border
- cleaning the pcb LCD contacts using isopropyl alchool
- cleaning the Gold-on-glass contacts
- also cleaned the zebra strip band (both sides)
- furthermore I tried reversing the rubber zebra strip, thinking that one of the contacts was malfunctioning
- also tried to re-solder the Toshiba chips which drive the display columns
so I quickly gone in lack of new ideas I sadly reclosed it....
Thinking:

You're a liar or incredibly lucky ...

mariodistefano
Автор

I was repairing this kind of LCD about 10 years ago when I was working at Thomas Electronics in Sydney. Reheat will temporarily fix the issue, but the it will be back quickly. The "glue" is called ACF. Very expensive and have to be kept in fridge. The correct procedure is: 1. using chemical to remove and clean (under microscope) the flex cable; 2. clean glass and PCB; 3. using a Automatic Bonding Machine to bond the flex to glass and then PCB with ACF. Even you've done it correctly for 10 times, it will still be 2 or 3 come back a month later. Nowadays' COG (chip on glass) or more advanced CIG (chip in glass) are not worth to repair anymore.

mopk
Автор

I think it might be a decent repair technique for these hotbar attachments, to use a simple clamp and perhaps a long wooden or thin metal bar to apply even pressure to the entire connector (clamping it to the table basically), and then re-heating it. Avoids any sideways movement that could misalign the connections, and should bring the contacts into, well, contact, given some heat, since the pressure is all there waiting.

Purely hypothetical, I've never actually done this kind of repair, but it's how I would have done it if I was to make an attempt!

As surprised as you that it worked, good stuff!

Mythricia
Автор

(2.5 years too late): "I saw it, I saw it, I saw it!" At 3:08-3:15 during what I like to call, "Torsional maintenance." I saw two rows of pixels drop. Center of the screen.

Keep up the good work. Off to watch the rest of the video now...

philstuf
Автор

It's annoying you can't like more than once! One of the most rewarding fixes I've seen! VERY useful information to be found in this video in general!

LifeOnHoth
Автор

I think this was the most intense EEVBlog yet! Awesome!

tiesbeer
Автор

Had a same fault with an LCD years ago, also a hot-bar problem. I managed to fix it with just a regular soldering station set to a low (and increasing in case of fail) temperature and trial and error. Managed to fix the whole LCD. It was way smaller though! only 64x128 or something. The good part was that you don't need to take the compression bracket off of it. You can reach the hot-barred flex easily.

MrDubje
Автор

Had to do a LCD swap on a BMW E39 instrument cluster that has a hot-bar attached display. Need to get the iron with the T-bar tip so you can heat and press down at the same time. worked like a charm. Well done on the repair!

IsettasRock
Автор

You can sometimes get a quicker easier result by using a soldering iron rather than hot hair - provided temp not set too high. Same technique used to fix Gameboy and Game Gear LCD screen connections.

GadgetUK
Автор

What a beauty. And this Flukes 19x series, what a performance for a handheld scope.

bytefree
Автор

My guess would be stainless screws, probably to prevent corrosion. At least the non-magnetic nature means they probably used a decent stainless :)

TheChipmunk
Автор

I once used a clothes hot iron/steamer to re flux a similar flex... it worked flawlessly and the fix was permanent. Just make sure you have an infrared thermometer to monitor/set the temperature on the iron.

trifidsagitarius
Автор

Did this to my old Gameboy a while back. Damn those hotbar connections

Borednesss
Автор

I'm not an electronics engineer or anything, but I still find your videos to be extraordinarily useful and entertaining (hard to find that combination!)

Thanks!

GrantGuarino