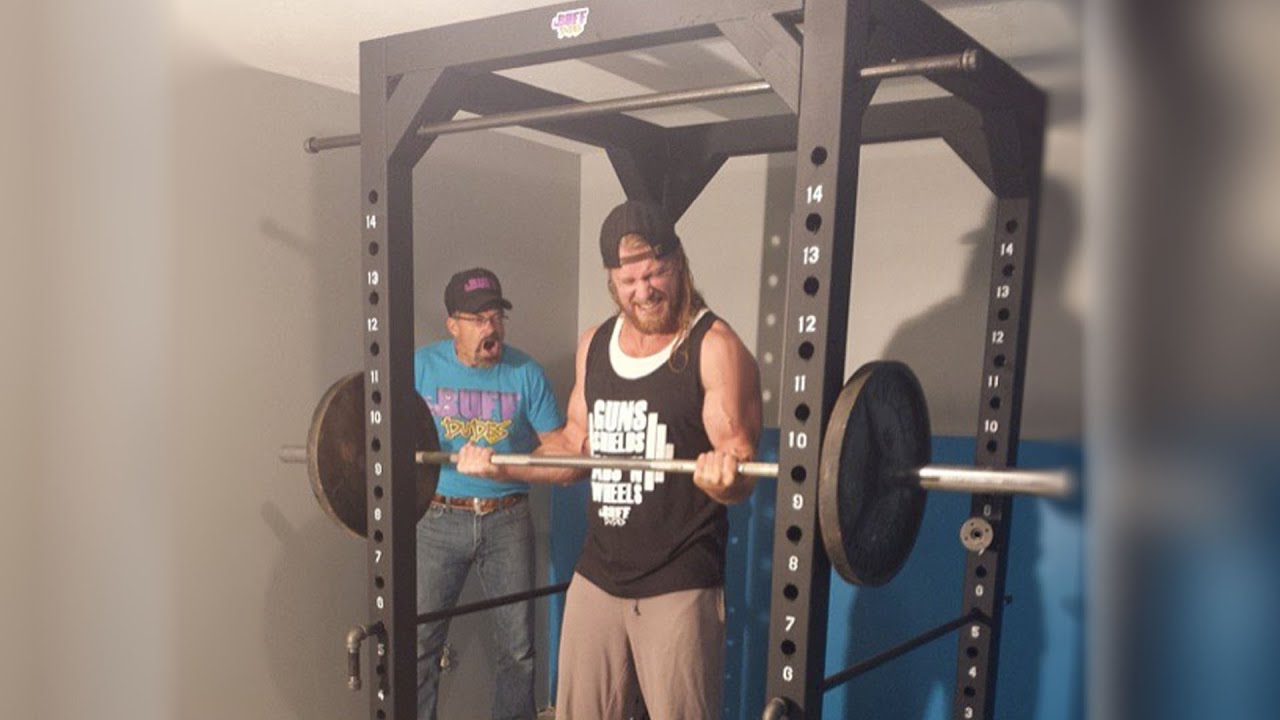
How to Build a HOME POWER RACK - DIY Dudes

preview_player
Показать описание
POWER RACK MATERIALS NEEDED:

8 - 8 Foot 4x4 Douglas Fir or Equivalent Wood
8 - 3x5 Flat Steel Ties (Simpson's Strong Tie TP 5)
14 - 1/2x2x2 3/4 90 Degree Steel Ties (Simpson's Strong Tie A23)
1 Pound of 2 inch Star Bit Wood Screws
1/2 Pound of 3 inch Star Bit Wood Screws
1 - 1/8 inch Drill Bit For Pilot Holes
1 - 1 1/4 inch Tri Fluted Wood Boring Bit

3/4 INCH PIPE LIST:

Racking Pins-

2 - Chair Flanges
2 - 1 1/2 Inch Pipes
2 - Pipe Connectors
2 - 4 1/2 Inch Pipes
2 - Caps

Safety bars:
2 - 60 Inch Pipes
2 - 4 Inch Pipes
2 - 90 Degree Elbows
2 - Caps

Pull Up Bar:
1 - 60 Inch Pipe
2 - Caps

Quart of Flat Black Latex Enamel
1 inch Number Stencils
Can of White Spray Paint.

BUFF DUDE'S:

Buff Dudes / Fitness / How to Build a Home Power Rack
Editing, Starring : Hudson
Starring: Duke

Music in this video is used under license from the rights holder.
Рекомендации по теме
Комментарии
Автор

I've been re-watching this video for years getting ready to build this. I finally bought my house last winter and I've been gradually collecting equipment in my basement gym. This summer I plan to build this power rack and it's going to be so awesome!!!

IJest
Автор

Hudson and I had a great time putting the power rack together and realized we would have never built it if it wasn't for the Buff community. It was all of you that made it possible -thank you and thank you for the awesome comments. I'm reading the comments thinking I've gotta get busy here; so many things to build. Thanks too for the dudes who catch things like the pressure treated would we used cause diyDuke made a bad cut and it was Sunday so we improvised as the lumber yard was closed. Or the term stub, instead of nipple for the inch and a half pipe, I guess it was my eighth grade humor that kicked in but I couldn't say nipple without cracking up thinking about the comments that dudes would come up with. Thanks so much again. Stay BUFF.

diyduke
Автор

Thanks Buff Dudes!

So I built one of these with handsaw, It's pretty awesome, it's just a shame I don't need it anymore because my hands are super buffed from all that sawing :D

Seriously, if you plan on building one of these either rent a miter saw or table saw, or better yet, for the same price as rental someone will probably cut all of it for you. Using handsaw takes forever, and what is worse, you rarely get nice and square cut.
Get long enough drill to drill the holes from one side only, its extremely hard to mate the holes if you need to finish it from other side. Other thing to consider is I bought rough wood, which means I got a lot more extra work with sanding, so if you can, buy sanded wood. For color I used dark varnish, so I can still see the wood grain. Hope these tips help, good luck! Stay buffed

dsaswq
Автор

This was a huge game changer for my workouts. My workouts increased and I'm stronger than ever. If there's a snowstorm? I have a workout with hot chocolate. Gyms closed at night? No problem. Tormado? Go to the basement.

Basement ceiling was too low for any power rack outside so I built it to perfectly fit. Safety pins are life savers. This workout tool is legit the best piece of equipment I own.

Thanks Buff dudes and Buff dad.

johnhein
Автор

Who else is here in 2020 because your gym is closed and you’re considering building this

quentins
Автор

I am building one of these right now and thought some of you might like this tip. In the holes that you put your "clips" or safety bars, drill the holes a bit larger and find some steel bushings that will still allow your clips or bars to slide through and pound them in there for some added durability. Also, if you are going to use anything over 300 lbs on it I would reccomend finding some solid steel bars for the safety bars instead of that black gas pipe. Also, consider bolting it to the ground or studs in the wall because while it is plenty strong it is also really lightweight and tends to rock when you put a heavy squat load back into the clips. Works pretty well though honestly. Not as "cool" as a sweet rouge rack but functional and cheap

jayn
Автор

Didn't see it mentioned in the video (may be in the description ... hint hint ... add it if not), but use Kiln Dried Wood, NOT Pressure Treated. PT wood is highly saturated and has a huge shrinkage rate compared to KD wood. Keep up the great work dudes!

trevorsgaragemusings
Автор

I just built one. Only difference was I took a router to the edges of the 4x4s just to round them a little. Thanks for the great walk-through!!

chadyeager
Автор

I remember watching this when it was first posted but I only owned a drill and a screw driver. Over time I amassed more tools and then COVID finally convinced me to just make this rack. I've now made two with slight mods. Thanks Duke and Buff Dudes!

volumeboyman
Автор

Know this is 2021 but wanted to say Buff dad you are not only cool but a amazing instructor keeping things simple and understandable for people. The safety first and be aware of dangers of tools being used has saved many from harm great job. I built my first cage in 1974 just like this one 4x4x8. Built second one with 2 inch metal tubing in 1978 sold them both, one to fire department guys and one to a gym. I love making things in weightlifting equipment area. Now guys we need a Buff dude wood safety bench press machine (for no spotter benchers)

charlesevans
Автор

I feel like this is getting a lot more traffic now

derekleonard
Автор

Apparently my drill isn't buff, it went up in flames after hole 11 of 56.

Автор

Thats awesome, i just priced everything out at my local home depot and it came out to $173.12 that's nothing for a power rack!

StrongWing
Автор

My nephew just asked how my rack was holding up. I built mine in 2019. I followed Buff Dudes directions and mine came out beautifully. Mine was pretty cheap too since I used up some old wood I had laying around. The priciest part was the piping. First, I would like to thank you for sharing with everyone; second, I recommend NOT drilling all the holes until you figure out how you're going to use it. I do bench, squats, step ups, etc with the rack....I didn't need all the holes...I use only 8 holes; third, instead of using 4X4s, I used two 2X4s as posts (like I said, I was using scrap wood laying around)
Finally, I asked my nephew: "What are you waiting for? YouTube 'Buff Dudes power rack.'"

briangabert
Автор

I've been a fan of these guys for over a year now. Why am I just now finding these videos!!! I'm about to have a whole gym of buff dudes stuff!

CyrilOfTheWind
Автор

Since I'm the only one who's going to be using not drilling all those holes. haha

joestl
Автор

Hey Duke. Drilling those holes was the hardest part of this build. You made it look too easy.

shaunhwhite
Автор

Mr. White is the man! Very smart and talented. Awesome power rack, guys. I honestly always thought that it was e metal rack. Very professional. DIY Duke should be very proud along with Hudson

nickviviano
Автор

Nice project. But the top horizontal  44 inch 4x4  should be resting on the two vertical 7 feet 4x4.  That piece will be be a 52 inch 4x4. Thats the way to do it, more strength. Im experience carpenter. Well only 2 years. lol

Libertarianmobius
Автор

I don't trust the wood. Maybe I'm just

peggyjohnson
visit shbcf.ru