filmov
tv
Converting a Cisco Aironet 3600 Series Access Point from Lightweight to Autonomous mode Standalone
Показать описание
Let's get started!
Requirements:
--------------
1.Cisco 3600 series Access point
2.Serial or Usb to Console Cable
3.Cisco IOS Software AP3G2-K9W7-M for (C3600 Series AP)
4.Router that will connect the access point and your
computer/laptop to the same network ip range
5.TFTPd64 Server software
6.Putty/Tera Team or any software that connect to a serial
connection
7.Adapter (48v)/Switch for POE which will be used to power and
connect to the router.
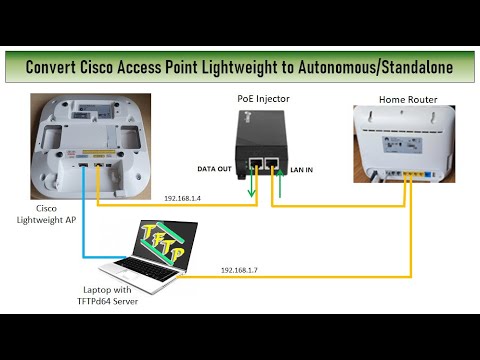
The network setup
-----------------
Cisco Lightweight AP IP address will be 192.168.100.50
Computer/Laptop IP address where TFTP server is installed
192.168.100.6 [Default Router IP for Tftpd]
Note: The computer or laptop does not need to be static during
the entire process. The Cisco AP will be dynamic before
formatting the static during installation to standalone mode
Download Link for IOS image of Cisco Aironet 3600 Series
Standalone Access Point (AP3G2-K9W7-M):
Download Link for TFTPd64 Server:
Download Link for Tera Term:
Download Link for Putty:
Procedure
----------
Open Tftpd64 and set the following:
Current working directory: Where the Cisco software location is
Server interface: 192.168.100.6 where the AP will connect to
copy the Cisco Software
Open settings and set the following:
On global ensure the TFTP server is checked only.
On TPFTP:
On the base Directory set the location where the Cisco Software
is located.
TFTP is set to standard
On Advanced TFTP options only the following should be checked.
- Option negotiation
- Show progression Bar
- Bind TFTP to this address where mine will be 192.168.100.6
Connect your Cisco AP to confirm you are able to connect to the
from device manager and confirm on Device Manager at Port(COM &
LPT) which COM port is connected to.
Connect to AP with putty set to serial and indicate the COM
Port. With tera term it will give you in the options which to
connect to.
The default credentials are Cisco/Cisco
Once logged type the following to start configuring
en
Password will be Cisco
You can get the current ip configuration by typing:
show ip interface brief
You can confirm the version by typing:
show version
To view the contents of the flash type:
show flash:
Because there is not enough space to copy and install a new
software, we will need to format it.
Format by typing:
format flash:
It will ask for confirmation. Press enter
NOTE: In some cases, you will receive the following error:
"% Invalid input detected at '^' marker.".
The '^' character points to the "o" of the "format flash:"
To work around this type:
delete /recursive /force flash:
You can confirm the formatting by typing:
show flash:
Disconnect the Ethernet cable from the AP then Press the Mode
button and plug back the Ethernet cable to the AP and hold the
Mode button Until flash light turns to Amber.
Once the Lightweight AP goes to online then apply the
following commands to convert it to Autonomous version:
set IP_ADDR 192.168.100.50 [According to my network]
set NETMASK 255.255.255.0 [According to my network]
set DEFAULT_ROUTER 192.168.100.6 [According to my network]
tftp_init
ether_init
flash_init
tar -xtract tftp://192.168.100.6/ap3g2-k9w7-tar.153-3.JH.tar flash:
This will take a few minutes to transfer
dir flash:
set boot flash:/ap3g2-k9w7-mx.153-3.JH/ap3g2-k9w7-mx.153-3.JH
set
boot
This will begin the resting to autonomous. It will take a few
minutes depending on your machine.
Once done, you can change the ap name to which ever you like.
Write the following commands:
enable
configure terminal
hostname HOME1
do copy run start
It will ask for confirmation. Press Enter
type exit to get out of terminal
type show ip interface brief to get new DCHP address
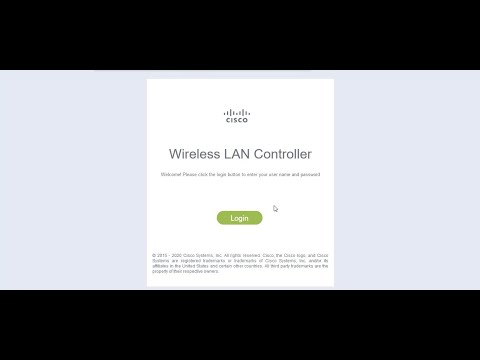
You can confirm on the browser by typing [based on my network]:
Default password is Cisco/Cisco
Requirements:
--------------
1.Cisco 3600 series Access point
2.Serial or Usb to Console Cable
3.Cisco IOS Software AP3G2-K9W7-M for (C3600 Series AP)
4.Router that will connect the access point and your
computer/laptop to the same network ip range
5.TFTPd64 Server software
6.Putty/Tera Team or any software that connect to a serial
connection
7.Adapter (48v)/Switch for POE which will be used to power and
connect to the router.
The network setup
-----------------
Cisco Lightweight AP IP address will be 192.168.100.50
Computer/Laptop IP address where TFTP server is installed
192.168.100.6 [Default Router IP for Tftpd]
Note: The computer or laptop does not need to be static during
the entire process. The Cisco AP will be dynamic before
formatting the static during installation to standalone mode
Download Link for IOS image of Cisco Aironet 3600 Series
Standalone Access Point (AP3G2-K9W7-M):
Download Link for TFTPd64 Server:
Download Link for Tera Term:
Download Link for Putty:
Procedure
----------
Open Tftpd64 and set the following:
Current working directory: Where the Cisco software location is
Server interface: 192.168.100.6 where the AP will connect to
copy the Cisco Software
Open settings and set the following:
On global ensure the TFTP server is checked only.
On TPFTP:
On the base Directory set the location where the Cisco Software
is located.
TFTP is set to standard
On Advanced TFTP options only the following should be checked.
- Option negotiation
- Show progression Bar
- Bind TFTP to this address where mine will be 192.168.100.6
Connect your Cisco AP to confirm you are able to connect to the
from device manager and confirm on Device Manager at Port(COM &
LPT) which COM port is connected to.
Connect to AP with putty set to serial and indicate the COM
Port. With tera term it will give you in the options which to
connect to.
The default credentials are Cisco/Cisco
Once logged type the following to start configuring
en
Password will be Cisco
You can get the current ip configuration by typing:
show ip interface brief
You can confirm the version by typing:
show version
To view the contents of the flash type:
show flash:
Because there is not enough space to copy and install a new
software, we will need to format it.
Format by typing:
format flash:
It will ask for confirmation. Press enter
NOTE: In some cases, you will receive the following error:
"% Invalid input detected at '^' marker.".
The '^' character points to the "o" of the "format flash:"
To work around this type:
delete /recursive /force flash:
You can confirm the formatting by typing:
show flash:
Disconnect the Ethernet cable from the AP then Press the Mode
button and plug back the Ethernet cable to the AP and hold the
Mode button Until flash light turns to Amber.
Once the Lightweight AP goes to online then apply the
following commands to convert it to Autonomous version:
set IP_ADDR 192.168.100.50 [According to my network]
set NETMASK 255.255.255.0 [According to my network]
set DEFAULT_ROUTER 192.168.100.6 [According to my network]
tftp_init
ether_init
flash_init
tar -xtract tftp://192.168.100.6/ap3g2-k9w7-tar.153-3.JH.tar flash:
This will take a few minutes to transfer
dir flash:
set boot flash:/ap3g2-k9w7-mx.153-3.JH/ap3g2-k9w7-mx.153-3.JH
set
boot
This will begin the resting to autonomous. It will take a few
minutes depending on your machine.
Once done, you can change the ap name to which ever you like.
Write the following commands:
enable
configure terminal
hostname HOME1
do copy run start
It will ask for confirmation. Press Enter
type exit to get out of terminal
type show ip interface brief to get new DCHP address
You can confirm on the browser by typing [based on my network]:
Default password is Cisco/Cisco
 0:16:52
 0:17:51
 0:03:59
 0:20:33
 0:09:02
 0:02:21
 0:16:22
 0:06:55
 0:12:17
 0:00:33
 0:12:35
 0:26:34
 0:26:56
 0:01:49
 0:04:34
 0:01:37
 0:25:18
 0:02:39
 0:31:13
 0:14:20
 0:36:05
 0:03:25
 0:08:10
 0:00:22