filmov
tv
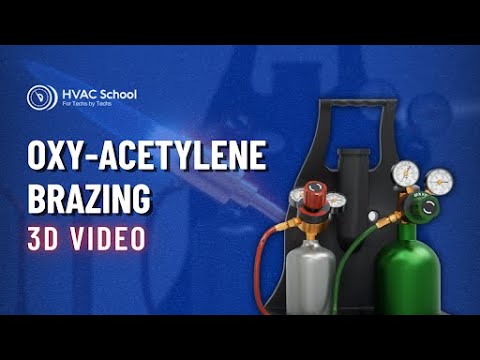
Oxy-Acetylene Brazing 3D
Показать описание
This 3D video demonstrates how we do oxy-acetylene brazing for residential HVAC equipment. We show how to braze copper at both the air handler and the outdoor unit, and we cover some considerations when brazing and soldering other metals.
Start by removing Schrader cores, which can cause pressure to build up in the system when you flow nitrogen. If you’re working on a system that already has refrigerant in it, you will need to use proper recovery practices.
Before cutting copper, be sure to clean it. Then, ream or deburr the copper tubing to remove the burr. Cutting copper causes a burr to form on the rim of the tubing, which can cause turbulence or deform your flared connections if it stays in the tube. Make sure the burr doesn’t fall in and that you don’t over-ream your copper.
Fit the tubing together and ensure that there isn’t too much of a gap between the male and female ends. If the gap is too large, you risk making a weak connection and ought to consider using reducers or bushings.
First, purge the air from the system with nitrogen. Then, flow nitrogen at 3-5 SCFH, which is a very tiny amount. Before brazing, make sure you have your PPE and a fire extinguisher. Protect components with a wet rag or a heat-blocking putty, like Refrigeration Technologies WetRag.
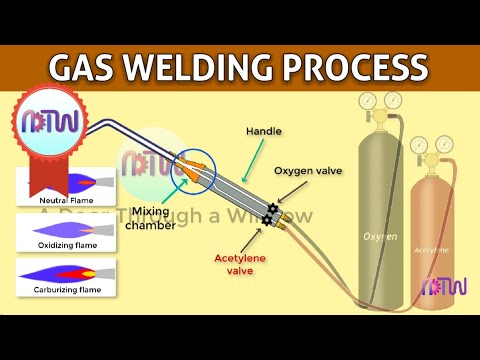
Your oxy-acetylene torch rig should NOT have any oil on the threads. First, connect the oxygen regulator to the oxygen tank, and then do the same for the acetylene tank. Connect and tighten your hoses to the regulator and torch handle assembly. Make sure you use the appropriate torch tip, including specialty tips in special applications.
Then, close off the regulator adjustments and open the tanks. Bubble-test the connections and hoses to check for leaks in your torch rig. Set the pressure at the regulator with open torch handles, which may vary. Use a proper striker to light the torch; you may light it with acetylene first or with oxygen and acetylene already mixed.
You will want a flame that’s as close to neutral as possible. Carburizing flames have large secondary feathers and have too much acetylene, and oxidizing flames have no secondary feathers and have too much oxygen.
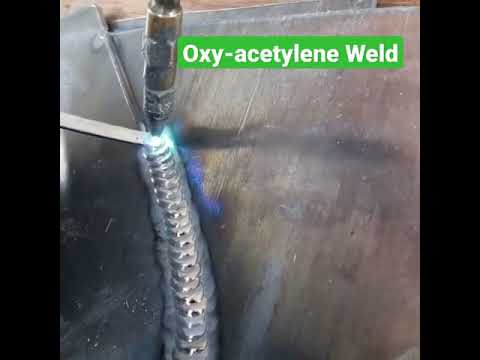
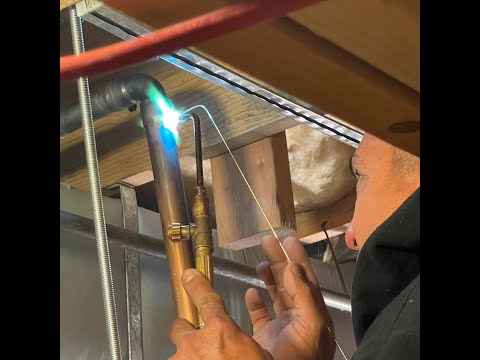
Heat your copper to a dark cherry red color, moving your torch to conduct heat into the joint. That will allow the alloy to be drawn into the joint. You’ll want to make sure you’re flowing nitrogen when you’re brazing copper, as cupric or copper oxide can build up on the inside otherwise. When you’ve finished, shut off oxygen first and then acetylene. In the field, you might shut them off simultaneously as quickly as possible.
Copper is the most common brazing metal, and it can be annealed. It’s also easy to estimate its temperature by color, and it can be fluxed with phosphorus-bearing alloys. However, some “copper” components are actually copper-plated steel, so you have to treat those components as steel when you reach the steel. Brass is softer and often used for cast parts like valves. It has a lower melting temperature and doesn’t conduct heat as well as copper. It’s best to use a high-silver rod with a paste flux (or a flux-coated high-silver rod). Steel is common in compressor stubs. When working with steel, avoid phosphorus-bearing rods. Stick with a high-silver flux-coated rod or a high-silver rod with a paste flux. Aluminum has a low melting temperature and doesn’t give you temperature indicators, so it can be tricky. You will also not use the same alloys or flux you’d use for the other metals. Usually, the flux will be your temperature indicator.
When patching an evaporator coil, you will have to solder aluminum. It’s a good idea to use an air-acetylene torch or MAPP gas torch. Repairs can be done within the coil pack or on the U-bends. Heat the tip of your rod and dip it in the flux. Heat the base material and melt the flux on top of it. Heat the flux until it goes clear and quiet, add the alloy, heat the alloy until it goes clear and quiet, and then pull the torch back. Then, clean off the flux to prevent corrosion.
You can also use an indirect heating method with a separate flux. Heat the base material, apply the flux, heat the flux until it bubbles, and back off and apply the alloy. Pressure-test and bubble-test your system to check for leaks.
When you’ve finished brazing, allow your connections to cool for a bit before cooling them with a wet rag. Inspect your connections with a mirror. If everything looks good, you can add your core remover tools and do your pressure and bubble test in preparation for your vacuum. Again, check your connections with a mirror. You don’t want to see bubbles or microfoam, and you don’t want a pressure drop.
Start by removing Schrader cores, which can cause pressure to build up in the system when you flow nitrogen. If you’re working on a system that already has refrigerant in it, you will need to use proper recovery practices.
Before cutting copper, be sure to clean it. Then, ream or deburr the copper tubing to remove the burr. Cutting copper causes a burr to form on the rim of the tubing, which can cause turbulence or deform your flared connections if it stays in the tube. Make sure the burr doesn’t fall in and that you don’t over-ream your copper.
Fit the tubing together and ensure that there isn’t too much of a gap between the male and female ends. If the gap is too large, you risk making a weak connection and ought to consider using reducers or bushings.
First, purge the air from the system with nitrogen. Then, flow nitrogen at 3-5 SCFH, which is a very tiny amount. Before brazing, make sure you have your PPE and a fire extinguisher. Protect components with a wet rag or a heat-blocking putty, like Refrigeration Technologies WetRag.
Your oxy-acetylene torch rig should NOT have any oil on the threads. First, connect the oxygen regulator to the oxygen tank, and then do the same for the acetylene tank. Connect and tighten your hoses to the regulator and torch handle assembly. Make sure you use the appropriate torch tip, including specialty tips in special applications.
Then, close off the regulator adjustments and open the tanks. Bubble-test the connections and hoses to check for leaks in your torch rig. Set the pressure at the regulator with open torch handles, which may vary. Use a proper striker to light the torch; you may light it with acetylene first or with oxygen and acetylene already mixed.
You will want a flame that’s as close to neutral as possible. Carburizing flames have large secondary feathers and have too much acetylene, and oxidizing flames have no secondary feathers and have too much oxygen.
Heat your copper to a dark cherry red color, moving your torch to conduct heat into the joint. That will allow the alloy to be drawn into the joint. You’ll want to make sure you’re flowing nitrogen when you’re brazing copper, as cupric or copper oxide can build up on the inside otherwise. When you’ve finished, shut off oxygen first and then acetylene. In the field, you might shut them off simultaneously as quickly as possible.
Copper is the most common brazing metal, and it can be annealed. It’s also easy to estimate its temperature by color, and it can be fluxed with phosphorus-bearing alloys. However, some “copper” components are actually copper-plated steel, so you have to treat those components as steel when you reach the steel. Brass is softer and often used for cast parts like valves. It has a lower melting temperature and doesn’t conduct heat as well as copper. It’s best to use a high-silver rod with a paste flux (or a flux-coated high-silver rod). Steel is common in compressor stubs. When working with steel, avoid phosphorus-bearing rods. Stick with a high-silver flux-coated rod or a high-silver rod with a paste flux. Aluminum has a low melting temperature and doesn’t give you temperature indicators, so it can be tricky. You will also not use the same alloys or flux you’d use for the other metals. Usually, the flux will be your temperature indicator.
When patching an evaporator coil, you will have to solder aluminum. It’s a good idea to use an air-acetylene torch or MAPP gas torch. Repairs can be done within the coil pack or on the U-bends. Heat the tip of your rod and dip it in the flux. Heat the base material and melt the flux on top of it. Heat the flux until it goes clear and quiet, add the alloy, heat the alloy until it goes clear and quiet, and then pull the torch back. Then, clean off the flux to prevent corrosion.
You can also use an indirect heating method with a separate flux. Heat the base material, apply the flux, heat the flux until it bubbles, and back off and apply the alloy. Pressure-test and bubble-test your system to check for leaks.
When you’ve finished brazing, allow your connections to cool for a bit before cooling them with a wet rag. Inspect your connections with a mirror. If everything looks good, you can add your core remover tools and do your pressure and bubble test in preparation for your vacuum. Again, check your connections with a mirror. You don’t want to see bubbles or microfoam, and you don’t want a pressure drop.
Oxy-Acetylene Brazing 3D
 0:06:16
Oxy Acetylene Brazing, Torch Adjustments- Reducing Flame, Oxidizing Flame, Neutral Flame
 0:04:45
Two Types of HVAC Brazing Torches (3D)
 0:05:55
GAS WELDING | Oxy-acetylene welding
 0:00:09
Oxy-acetylene Weld #shorts #youtubeshorts #welding #welder #khan #education #skills#skill#technology
 0:01:50
X511® Original - Cutting Torch (NEW DESIGN)
 0:00:27
Cutting Skills with Gas Cutter #cutting #gas #skills #cutter #welding #nepal #india #usa #uk
 0:00:14
Brazing guna Oxy Acetylene
 0:04:24
BRAZING COPPER | ACETYLENE | OXYACETYLENE
 0:01:00
How to set your oxy-acetylene cutting torch?
 0:00:57
How To Light A Oxygen Acetylene Torch For Beginners
 0:10:28
Oxy Acetylene Setup and Copper Brazing
 0:01:01
oxy acetylene brazing welding
 0:01:21
GCEacademy (6) - FLASHBACK (Backfire, Sustained backfire, Flashback)
 0:00:42
C2H2 gais kaise banate h. Asitylin gais kaise banate h. gais welding.
 0:12:48
How to brazing copper pipes using an oxigen acetylene torch
 0:00:14
HVAC hack: The brazing torch kit you didn’t know you needed!
 0:04:46
How To Choose an Oxy-Fuel Torch Cutting Tip
 0:00:15
Gas Welding ⛽ | Oxy-Acetylene Welding #shorts #tools #machine
 0:06:16
How To Set Up Oxygen & Acetylene torch for beginners
 0:01:29
How To Adjust the Flame on a Cutting Torch?
 0:00:15
Gas welding practice👍 | Flame preparation🙂| #industrialskills #welder #gaswelding #flame
 0:00:13
First day on the job and you roll in like this?!
 0:00:12
HVAC Brazing: Oxy-Acetylene torch
Комментарии