EEVblog #1178 - Build a $10 DIY EMC Probe

preview_player
Показать описание
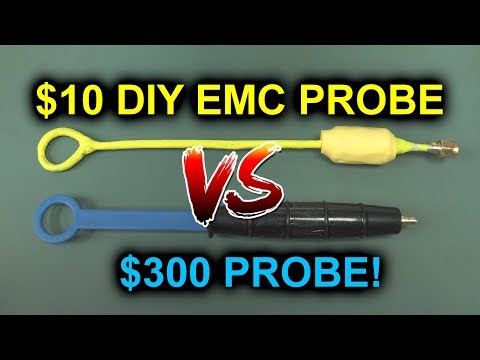
How to make your own magnetic H-field EMC probe out of semi-rigid coax for $10 that performs identically to a $300 commercial probe!
Search for "Low noise amplifier" and "semi-rigid rg402" on ebay.

Bitcoin Donations: 38y7DE8HEHNj8fGDtUr4PkCn9nWxiorvvy
Litecoin: ML7oQokTwB38bgzzjLDbRV97HKAHuwRfHA
Ethereum: 0x11AceA38DCA9DbFfB4F35f3F746af65F9dED28ce

Support the EEVblog through Patreon!

Buy anything through that link and Dave gets a commission at no cost to you.

Stuff I recommend:

Donate With Bitcoin & Other Crypto Currencies!

Рекомендации по теме
Комментарии
Автор

Now build a additional spectrum analyzer for 10 bucks and every one is happy ;-)

daskasspatzle
Автор

I came here to say this is one of your best videos in a while and am amazed to see how many others are saying the same thing. I couldn't believe you peeled back that Tekbox cover; thanks for doing that!

PixelSchnitzel
Автор

You had time to build it to scale and to paint it!!!

RemcoStoutjesdijk
Автор

I'm looking forward to next video "Build a $100 DIY Spectrum Analyzer" <3

patryksikora
Автор

Another solution for your rubber coating: buy ABS filament for 3d printers and solve it in acetone. Then you can use a brush to apply it. The acetone vaporizes on its own at >20°C and only the ABS is left

erikgleber
Автор

That faint thudding at the end of the video is Tekbox executives jumping out of the windows.

Choober
Автор

It's funny that I don't have any use for the probe but found it so entertaining.

TheMeddlingKidsHaunt
Автор

For all those wondering the weird round package is a type 86 plastic package, and the amplifier, which has only GND, IN, OUT, is a MSA0486.

jovangrbic
Автор

You don't need plasti-dip for probe coating, use electrical tape. It almost looks like the cheaper one could be prototyped in strip board if the need was urgent enough. For a cheap spectrum analyzer, attach a 10 MSPS SPI ADC to a raspberry pi, write some code to perform FFT on the data using the GPU and pipe the output to a graphing utility to get an approximation of a spectrum analyzer.

notamouse
Автор

I got loads of those RF amps sitting around, they're handy because you can use a buck converter and set the output voltage to calibrate gain with them, no need to use an attenuator.

streaky
Автор

Great, now I just need a Spectrum analyzer :|

Автор

Not sure why you have a few thumbs down. A huge money saver that will give the same performance. This is great Dave. Thank you yet again

stevetobias
Автор

Use the PastiDip in the non-aerosol can or liquid electrical tape and you will be much happier.

Also, you can make the very small loops from very small diameter coax. The coax does not need to be rigid, and if you put some steel wires or small fiberglass/carbon-fiber rods along side the coax for the small loop, it will add the needed rigidity. Use heat shrink over the coax and stiffener for the straight part and dip/paint on the liquid tape over the loop.

The small loop can be even more finicky to cut and solder, so short the end of it back over the coax before bending it into the loop, then solder the whole end back to the shield to make the loop. To cut the gap in the middle, you only need to make a single slice, and when you dip it or brush on the tape, it will fill that slot and Robert is your mother’s brother.

kenchilton
Автор

I may actually join the discussion over on the forum. We have billions of these DIY H-field probes in our lab of varying qualities. Might be rather entertaining to post a picture of all of them.

russoft
Автор

13:29 It looks like a tool handle dip to me 4:14 the surface finish is rough, bumpy, and full of holes.

It's likely the same thing you used Plastidip and that shade of blue is one of the three shades they sell. It also comes in a can so you can dunk the part rather than spray it.

Just just dunk the PCB into the container, pull it out, and let it drip dry. Repeat the process to thicken the coat.

Bushougoma
Автор

The guys at tekbox spent houndres of hours on r&d for this thing to work properly.
Dave botches something together in 10 minutes and it works just as fine if not better than the pro kit. :D

iceCOLDkillaxDLoL
Автор

That coax looks like they just dipped normal braided shielding and dipped it in some solder.

hgbugalou
Автор

I built an EMC probe for less than $8, using a toraial core coil and soic op amp. I needed to measure current WITHOUT physically touching the current-carrying conductor. Torrid core coil to the rescue! You can see it, and the printed circuit board CAD files that I offer as "open source", on my MeWe page @ Esp and IoT

williambello
Автор

You know you need to take this to the next level right?
First you use a 3d printer as x/y scanning platform for the board (printer can be fed gcode for movements from pc via usb) and then record the data from the oscilloscope via for example python integration with scope (usb again). Recording the spectrum on each position in a grid and display everything in a nice overlay on a photo of the board. User could then either see a sum/max of all the emissions or scroll through the spectrum and visualize a frequency slice in the overlay. Now that's sexy!

kreature
Автор

we've always called that soldered braid stuff "semi-rigid" coax. Solid copper outer shield was called "rigid" ..

clau