filmov
tv
Blender UV Unwrapping Tutorial | Explained for Beginners (Arijan)

Показать описание
Blender UV Unwrapping Tutorial | Explained for Beginners (Arijan)
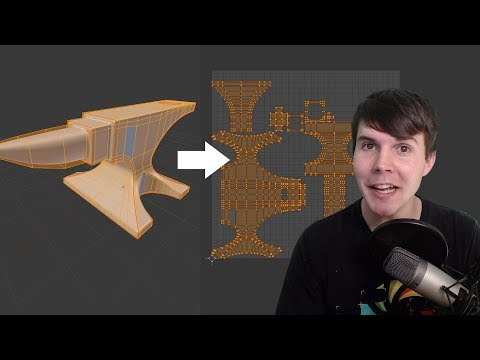
UV Unwrapping in Blender is not rocket science. This video is a quick and simple explanation of what UV unwrapping is and how it works.
UV Unwrapping in Blender is not rocket science. This video is a quick and simple explanation of what UV unwrapping is and how it works.
 0:19:23
Blender Beginner UV Unwrapping Tutorial (Chair Part 7)
 0:32:17
UV Unwrapping for Beginners (Blender Tutorial)
 0:26:08
Blender Intermediate UV Unwrapping Tutorial
 0:10:57
Blender UV Unwrapping Tutorial | Explained for Beginners (Arijan)
 0:22:57
UV Unwrapping Explained for Beginners | Blender Tutorial
 0:05:36
I made 100+ UV Maps to learn this ONE Lesson..
 0:07:36
Blender 4.0: How to UV Unwrap Anything
 0:12:23
GAME ASSET BEGINNER TUTORIAL - UV Unwrapping In Blender (Part 2/5)
 0:08:27
Blender 4.2 Tutorials Bigener to Addvanced in Telugu @FxMen #BlenderInstallation
 0:09:11
UV Unwrapping Blender Tutorial
 0:12:24
Blender 2.8 Beginner Tutorial - Part 6: UV Unwrapping
 0:08:17
The Complete Guide to UV Unwrapping for the 3D Artist - Where & Why Marking Seams
 0:05:26
Blender Texturing tutorial - Blender Texture Mapping tutorial (Blender UV mapping simplified)
 0:06:25
UV Unwrapping - Blender 2.80 Fundamentals
 0:35:40
Intro to Blender UV Mapping
 0:13:08
The Simple 4-Step Process for Perfect UVs
 0:20:48
UNWRAPPING Tutorial for Blender (The Easy Way)
 0:11:06
Blender Tutorial | Your own PS1 Mascot! - Part 2: UV Mapping Tips and Tricks
 0:39:10
Part 8-Blender Beginner Tutorial (UV Mapping and Texturing)
 0:01:00
Lazy UV Mapping - In less than 1 Minute // Blender Quick Tip
 0:05:52
Blender UV Mapping For Beginners!
 0:05:31
Blender 4.0 - Texture Painting quick start guide
 0:26:34
26 Essential Blender Tips for UV Unwrapping Subdivision Surfaces
 0:03:14
Blender Smart UV Project Quick Start Guide - UV Unwrap
Комментарии