filmov
tv
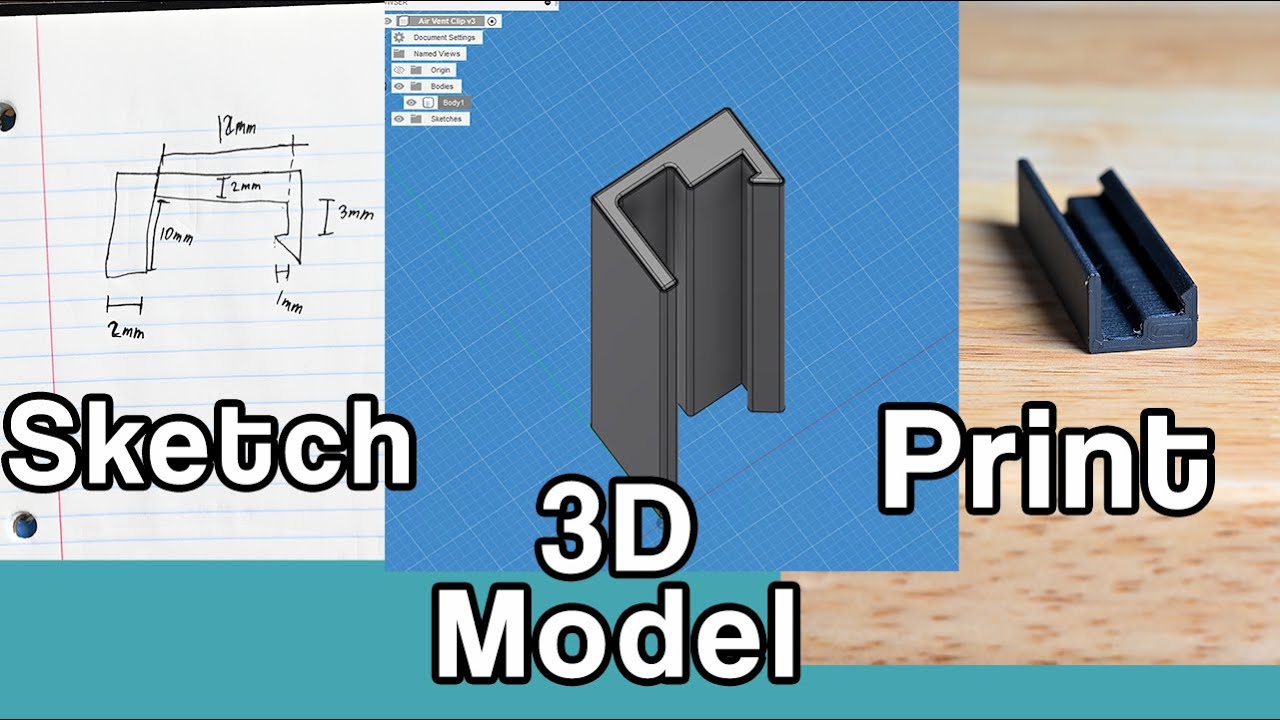
Designing Your First Functional 3D Printed Parts | Basic Fusion 360 3D Printing
Показать описание
It is time to take your 3D printing to the next level and create your own designs. The steps are simple, and the process is easier than you are expecting. I am using the free version of Fusion 360 for modeling.
There are 4 basic steps of creating your own prints.
First you need to think of what you want to make. This may sound basic, but it is a very important step. I am starting with some functional designs that will help around the house. I wouldn't start too advanced for your first design. That way you won't get discouraged.
Second it sketching and measuring. Digital Calipers are cheap and make this step really easy. Also, don't over think your sketch. These don't have to be pretty, just so you can understand what you wanted to create.
Third is 3d modeling of your sketches. I am using Fusion 360, because it is really powerful and makes basic designs easily once you get a hang of it. I would recommend skipping TinkerCAD because even a design as simple as this would have been so much harder in TinkerCAD, but took 5 minutes in Fusion 360.
The Fourth Step is printing, and I would recommend printing at a prototype quality. That means weaker and faster than you normally would, because your first design might not work.
The gear I use:
 0:18:28
Designing Your First Functional 3D Printed Parts | Basic Fusion 360 3D Printing
 0:10:37
5 Tips to start designing your own 3D printed parts - Tinkercad
 0:18:52
15 Useful 3D Prints: Go From Beginner to Advanced!
 0:04:35
10 Secret 3D Printing Tricks Only Experts Know...
 0:19:18
Learn Blender for 3D Printing - Complete Quick and Easy Guide (Beginner)
 0:05:03
11 USEFUL Things to 3D Print First - Practical Prints 2023
 0:06:38
Beginners Guide To 3D Printers In 2023
 0:09:49
Top 10 3D Printable Tools Every Maker Should, Like, Make
 0:15:38
12 more 3D printed tools you need for your workshop
 0:22:03
How to design your first 3D printing project without tears
 0:15:11
Selecting a free 3D CAD option - 3D design for 3D printing pt1
 0:24:02
50+ Useful 3D Prints You Never Knew You Could Print
 0:10:14
How Easy is 3D Printing ACTUALLY? (Ender 3 S1 Review)
 0:24:27
Complete beginner's guide to 3D printing - Assembly, tour, slicing, levelling and first prints
 0:11:36
From idea to reality - Functional 3D Printing
 0:11:36
Top 20 BEST 3D printed products to SELL! 🤑💰💵
 0:28:23
Best 3D Printing Ideas in 2022 - 3D Printed Trends (Part 2)
 0:13:33
Which LAYER HEIGHT gives you the STRONGEST 3D prints?
 0:01:00
How much money can one 3D printer make in a week?
 0:12:56
The 3D Printer I'd buy if I started over
 0:01:01
My Genshin sword took 150h to 3D print! ⚔️ #diycrafts #cosplay
 0:10:25
Why your 3d printed stuff doesn't fit together and how to fix it!
 0:30:49
3D PRINTING 101: The ULTIMATE Beginner’s Guide
 0:10:38
I 3D Printed a TURBINE and Produce Electricity With It.
Комментарии