Foundation Waterproofing

preview_player
Показать описание
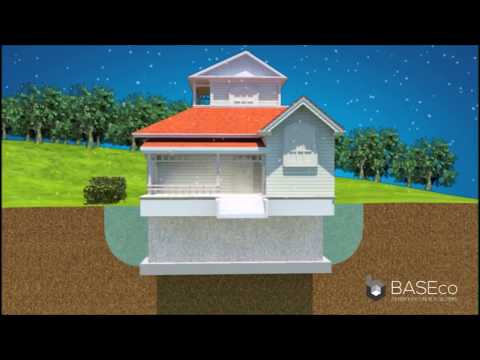
It will be buried beneath soil, concrete, landscaping, driveways, pool, patios, and so much more. All of that combines to mean we have to get it correct the first time. Drain and dry, down and out. Water away from the foundation and not held in tension is key.
.
.
#aarowbuilding #comobuilds #kcmobuilds #foundations #foundationwaterproofing #watermanagementsystem #dimplemat #coatings #builditbetter #construction #longliveourbuildings
Рекомендации по теме
Комментарии
Автор

This is the gold standard for foundation waterproofing. Anyone building a house today anywhere there's moderate rainfall, this is the only strategy worth considering. Like Jake said, there's never going to be a better more cost effective opportunity to do it properly than during initial construction. I live in Ohio where it seems like it's raining half the year and this will by my strategy when I eventually build my retirement home. Low maint will the name of the game. No one wants to have to worry about major home repairs in retirement.

dlg
Автор

If youre adding spray insulation, you could just put that right over top of the dimple membrane right?

MyBiPolarBearMax
Автор

"Do 2" = belt and suspenders. Love it. Careful on the amount of clay that is backfilled because clay expands when wet and contracts as it dries.

doug.ritson
Автор

Great thinking about the position of the holes in the drainage pipe, water will always take the easiest route, the sooner you provide this route, the better.

CasaBurner
Автор

Really like this style of water/damp proofing. I also like that the dimples are facing inward on the foundation wall with your dimple mat. Other products have dimples facing outward with fabric over the dimples that face flat gets glued to the foundation wall, which when you think about it, ruins the idea of lowering hydrostatic pressure. Glad you mention that Polywall is EXTREMELY EXPENSIVE. I'd be happy with this installation.

JMoney-neto
Автор

Excellent system breakdown. Other than the “burrito” and ridged pipe this detail is very common in my market. One of key details you mentioned that I don’t think people realize is the use of clay as a cap between stone and topsoil. With positive drainage away from the building, the clay will act as a backup for rainwater that is absorbed through the topsoil and help direct it away from the wall and ideally past the over dig.

SommerBros
Автор

Excellent presentation. I am in the process of doing this now. Inground wall bitumen coated 30 years ago, spec for the day, failed at the cold joint, footing, first layer of blocks. Very detailed information especially about wrapping drainage pipe, water tables and a comment regarding putting in a flushing riser pipe.

waynebevan
Автор

Here in Sweden dimple mats were widely used 20 to 30 years ago. For the last 15 years permeable systems such as Isodran have been more common, at least for heated spaces and not extremely high watertables. These permeable systems have no waterproofing but a 4 inch very permeable sheet of insulation on the outside of a "naked" basement wall (the sheets are made of small eps balls dipped in tar) and covered by geotextile and then dirt. The wall and some of the dirt outside is then dried out from the wall into the basement which causes more humidity in the basement from the beginning but considerably less later. Obviously a good drainage system with gravel, geotextile and drainage pipes below the foundation is also required to take care of water from the surface or the ground, but this water will not go into the wall. The problem with the waterproof system is the generation of condensation on the basement walls, which these permeable systems do not have.
I am careful not to wrap the drainage pipes in geotextile. Usually we only put geotextile on top and on the sides of the pipe, and at least 4 inches of gravel between. If you are unlucky clay can make the geotextile almost waterproof with a resulting disfunctional drainage system.

larion
Автор

5:25 ... you should key your footing so the stem wall / foundation wall locks into the footing, eliminating the cold joint.

Take a 2×, laying flat, positioned at the top of the footing so the top of the 2x is flush with the top of the footing, centered where the wall will sit, and then pour the footing.

Once you strip away the 2x, you are left with a keyway in the footing for the stem wall / foundation wall to lock into the footing.

There are a dozen ways to get there.

To accomplish what I wrote above, you would drill holes in the 2x for your rebar / footing reinforcements, and that would hold your rebar in place. And the 2x you used as a spreader bar, nailed on top of your footing form boards to hold the width of your footing, would be nailed into the 2x you are using as the key way to hold it flush with the top of the footings.

BrianBaldridgeC
Автор

Outstanding! A few esoteric points, and I learned something new after doing this for 40 years.

AF-O
Автор

Probably the only thing I would add is a vertical pipe or two for cleanout purposes.

samuelfeguer
Автор

This was an excellent presentation and I am grateful. Well done Sir.

hunts
Автор

Great presentation for sure and nicely summarized… one upgrade would be to use either 3/4” round or even 1 1/2” round inside the burrito wrap to provide more void as well as prevent small rock chips from that 3/4” limestone from blocking or even entering that pvc inside the wrap.

Also, Baughman tile makes some excellent single wall 8-slot that’s incredibly strong and slotted 360 degrees around so no extra drilling and between the ribs of the corrugation so less likely to ever clog in combination with round stone

rfventuri
Автор

You should extend the polywall material over the footing drains. Water will run to the lowest point regardless and get underneath the polywall, but this will be at the base of the footing where the drain sits. Silting from the top will be prevented. The area you excavated is basically an unfinished swimming pool …water will flow to the lowest point, and the drain will be there to move that water.

dilvishpa
Автор

Jake learned the hard way, it seems.

Flex drain pipe should never be used around a foundation - it crushes too easily. Jake is using the best product - rigid SDR perforated drain pipe. Only thing I'd add is a few cleanouts - if there's ever a problem, you can scope the drain and run a snake down it.

Top notch install, as usual.

For any potential clients reading this - hire this man - he's a helluva good builder - pay him well and it will be the best money you'll ever spend. I'd hire him over Matt Risenger any day.

ArthurDentZaphodBeeb
Автор

First comment! Hey Jake. Thanks for sharing! Keep the basement content coming!!!

AaronHope_Sow
Автор

I hadn't used that dimple mat before and for some reason I put the dimples out. I did install self adhesive membrane behind it. And I added silt fabric in front of it. And drain is below top of footer. So far very dry basement after very hard rains. Like you say one chance to do it while it's easy to get to.

kevinshafer
Автор

I'm glad there are builders that care. I've got a basic at-grade slab in Florida (built in 80s) and it's so damp that if you set anything on the bare slab it will grow mold. Is there anything that can be done for that?

I've heard you can paint moisture barriers onto the slab, but post-construction application means you aren't reaching under the wall sill plates... I grew up in this house and I'm terribly ill, many doctors failed to help me, and now I can't help but think I'm one of the people who is sensitive to mold... Too ill and poor to help myself out of here.

honkbeforeitstoolate
Автор

The Form-A-Drain system has a distinct flaw, you need to set it level for your footings, but a level drain doesn’t put water anywhere, it just stands still.

SkinnaMov
Автор

If you use a 5000 psi or higher concrete to begin with the amount of permeability drops significantly. Superior Walls use this method and their foundations don't even require water proofing.

c.a.martin