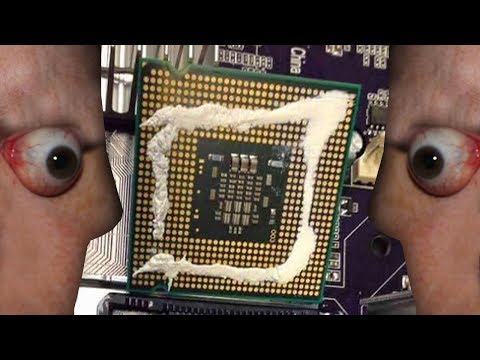
Common PC Building Mistakes that Beginners Make!

preview_player
Показать описание
Here are the most common PC Building mistakes I see when people are building their first PCs! Don't let these happen to you!

○○○○○○ Items featured in this video available at Amazon ○○○○○○

••• Follow me on your favorite Social Media! •••
Рекомендации по теме
Комментарии
Автор

IF YOU LOSE A SCREW OR OTHER SMALL METAL OBJECT, DO NOT TURN ON YOU COMPUTER UNTIL YOU FIND IT. I cannot tell how easy it is to fry a board that way.

thegoodboi
Автор

Exceeding the budget is my most common mistake

scottgardiner
Автор

HVAC engineer here with 15 years experience in the aerospace industry. All ventilation tips here are very accurate! Well done!

Senseimatty
Автор

Number one tip that I learned is to watch a ton of videos before even buying a single piece of hardware, that way we don't have to send it back and wait even longer for the right parts.

reallauradee
Автор

Build Tip:
Lay your case on its side when assembling. Stop trying to fight gravity. Don't be Linus.

ragtop
Автор

Forgetting to turn on the PSU when you're done

SLO_MZ
Автор

Great video, I've made a few milestones because I had to watch more than once

1:00 motherboard assembling suggestions (processor, m2 ssd)
3:56 dram installation (best usage of channels)
6:20 cpu cooler
9:14 air flow, fans
12:20 water cooler radiators air flow
14:29 graphics card, sizes, dimensions
17:18 power cables

ralphmods
Автор

Pro Tip: If upgrading your PSU do not be lazy and reuse your old wires. You will fry your motherboard and/or hard drives. Take the old power cords out and put in the new ones that came with your new PSU. Each PSU manufacturer and even models are wired differently on the PSU side.

bdmski
Автор

Don´t drink 12 beers while building a system. 6-8 is the sweet spot !

Автор

pro tip: don’t forget to plug in the cable for the power button

edit: yes, i made this mistake & spent 6 hours trying to diagnose something that wasn’t broken until i actually read the manual and realized what was missing.

kingvon
Автор

I managed to avoid all the common issues in my first build because I read all the manuals first, but I will say that the issue I DID have was caused by following the instructions TOO closely. My motherboard had two places to plug in the PSU. The manual stated that the second slot was only needed if you overclocked. We’ll I didn’t plan on overclocking, so I only plugged I. The first set of PSU cables, trying to have as few cables as possible. Once O turned it on… nothing. No post, no beeps, no fans. All I got was a debug led that said CPU. I thought for sure it was a bad CPU, so I returned the chip and bought another one. Still didn’t fox it. It took my brother telling me that sometimes you need that overclock power, even if you aren’t overclocking. I plugged in those cables, and BOOM, it’s worked perfectly ever since.

juvenilemrcia
Автор

It would be helpful to have a short video of what to expect after you finish the physical build. For example installing the new OS, downloading new drivers, and common errors that arise (setting motherboard to Windows 11 settings, etc).

Xomihni
Автор

Tip for new builders: "First you're gonna need a table" -Stefan Etienne

alex_ofl
Автор

IO SHEILDS: not all motherboards come with them built-in! Install this into the case first! In the correct orientation!

Turbo
Автор

Pro Tip: Make sure you purchase a power supply that can supply enough power to your build. Purchasing a properly rated power supply is critical to a properly functioning and safe build. As mentioned in the video, power is drawn, not supplied. So, if your system, including MB, Processor, video card, and hdd/sdd needs a certain amount of power, an under rated PS isn't going to last. You will burn it up. If your Video card need 300 W, your MB and chipset needs another 200 W, you will want somewhere in the neighborhood of a 700 W PS minimum. This insures that you have enough rated power to also handle all those peripherals, like powered USB devices, your case fans, liquid cooling pumps, SSD/HDD, etc... It is Okay to get one a lot larger than what you actually need, A 1200W PS does not use 1200W, it just means that it can handle a 1200W draw from the devices in your build. If your system is using 550W of power and you are putting in a 300W PS, you are pulling 150 W more than the PS can handle. This creates a lot of excess heat, components burn up and you will eventually let the magic smoke out of your PS. The mathematical formula for Power (watts) is Voltage (V) x Current/Amps (I) = Watts (P). In the US power runs at 110-120 Volts. That 300W PS can only handle 2.5-2.72 Amps of current. Your system needs 4.5-5 Amps of current, so you are forcing an additional ~2.5 amps through a power supply that is not designed to handle it. I will work for a while, but eventually the PS will die, and sometimes spectacularly, and when it does go, you risk losing your whole computer system to current spikes. TLDR: DON'T USE A PS THAT IS RATED LOWER THAN YOUR COMPUTERS POWER NEEDS, OR YOU WILL BREAK YOUR COMPUTER.

brianritzler
Автор

Tip: don't go crazy tightening the screws on the first pass, i.e., before you realize where everything needs to go, and in what order. You can always come back to them later.

joeistead
Автор

Not a seasoned PC builder and you've mentioned this a few times before, Jay, but... turning on the RAM XMP thingy in the BIOS is pretty easy to overlook...

Dank_Lulu
Автор

That tip at the end for increased frame rates is amazing! I went from displaying 59hz to 60hz in an instant 😎

johnjackson
Автор

Bend radius: don't stress cables just to be sure you can hide them.
Also be sure you don't have loose wiring passing in front of the fan. Especially on top of horizontal fans.

Senseimatty
Автор

My tip:
0. Check the manual first always before you start/buy any parts.
1. Similar to the previous, check if the RAM you are gonna buy is tested by the MB company.
The MB company will put the part number they have tested on its web.
2. Don't forget to consider the static. So using an anti-static mat can help.
3. Keep the CPU socket protector, and put it back when you don't have a CPU on it.
4. When installing AIO, make sure the fan side pipe is hight than the CPU side pipe because it may contain some air inside the pipe.
5. Imaging how heat flow in your PC can help you to avoid some silly mistakes.

ZA