filmov
tv
Arduino OLED Gauge

Показать описание
Learn how to create a simple OLED gauge with Arduino UNO!
Useful links from the video:
Related videos:
------------------------------------------------------------------------------------------------------------------------------
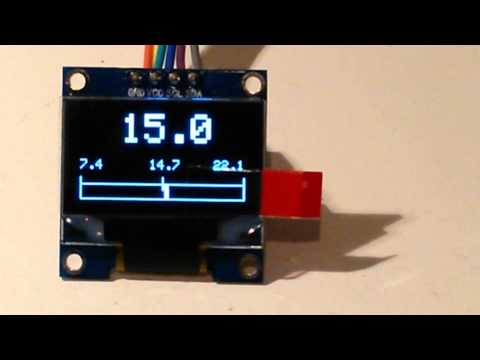
Learn how to create a custom gauge using 128x64px SSD1306 OLED Display connected to Arduino UNO, driven by a simple 10K potentiometer. Everything is explained step by step, so even if you are beginner, you should be able to follow this tutorial. For graphics, a free online graphic editor Photopea is used. Before we go with real Arduino, we will test the program running in the free online Arduino emulator WOKWI. Have fun!
------------------------------------------------------------------------------------------------------------------------------
PCBWay is a service for manufacturing custom PCBs. If you click the link above, you will get a coupon for $5, which is exactly the price of 10 pieces of custom PCBs. In that case, you will only pay for shipping. Do you have any experience doing this? Please let me know in the comment section!
------------------------------------------------------------------------------------------------------------------------------
Do you have any questions? Suggestions for the next video? Please put those down in the comment section. I try to answer as many questions as I can. Thank you for watching and reading the video description, and I hope to see you next time. Good luck with your projects!
--------------------------------------------------------------------------------------------------------
Hashtags:
#wokwi #arduino #OLED
--------------------------------------------------------------------------------------------------------
Keywords related to this video:
Arduino UNO, Arduino, OLED, u8g, u8g2, Arduino Display, Arduino Free Code, esp32, Arduino project, Arduino display, Arduino ideas, new project ideas, Arduino 2022, Arduino project 2022, Arduino project ideas, Arduino tutorial, microcontroller, arduino projects for engineering students, arduino based projects, microcontroller projects, cool projects, mini project using arduino, arduino mini projects, electronics projects using arduino, how to make arduino project, arduino uno projects for beginners, projects with arduino, projects using arduino, project using arduino, arduino based projects for final year
Useful links from the video:
Related videos:
------------------------------------------------------------------------------------------------------------------------------
Learn how to create a custom gauge using 128x64px SSD1306 OLED Display connected to Arduino UNO, driven by a simple 10K potentiometer. Everything is explained step by step, so even if you are beginner, you should be able to follow this tutorial. For graphics, a free online graphic editor Photopea is used. Before we go with real Arduino, we will test the program running in the free online Arduino emulator WOKWI. Have fun!
------------------------------------------------------------------------------------------------------------------------------
PCBWay is a service for manufacturing custom PCBs. If you click the link above, you will get a coupon for $5, which is exactly the price of 10 pieces of custom PCBs. In that case, you will only pay for shipping. Do you have any experience doing this? Please let me know in the comment section!
------------------------------------------------------------------------------------------------------------------------------
Do you have any questions? Suggestions for the next video? Please put those down in the comment section. I try to answer as many questions as I can. Thank you for watching and reading the video description, and I hope to see you next time. Good luck with your projects!
--------------------------------------------------------------------------------------------------------
Hashtags:
#wokwi #arduino #OLED
--------------------------------------------------------------------------------------------------------
Keywords related to this video:
Arduino UNO, Arduino, OLED, u8g, u8g2, Arduino Display, Arduino Free Code, esp32, Arduino project, Arduino display, Arduino ideas, new project ideas, Arduino 2022, Arduino project 2022, Arduino project ideas, Arduino tutorial, microcontroller, arduino projects for engineering students, arduino based projects, microcontroller projects, cool projects, mini project using arduino, arduino mini projects, electronics projects using arduino, how to make arduino project, arduino uno projects for beginners, projects with arduino, projects using arduino, project using arduino, arduino based projects for final year
 0:37:14
Arduino OLED Gauge
 0:01:55
Arduino Car Cluster with OLED Display (Dashboard, gauges, controls, SSD1306, u8glib)
 0:15:43
U8g vs. U8g2 Arduino Graphics Libraries (Tutorial - OLED and LCD screens with Arduino UNO)
 0:00:57
Nissan s14 arduino oled gauges
 0:00:12
AEM Infinity Custom CAN bus Display w/ Arduino and OLED
 0:43:58
CHEAP DIY BOOST GAUGE
 0:00:34
Arduino OLED EGT Gauge K-type Thermocouple
 0:00:23
Arduino OLED Oil Gauge
 0:01:00
Digital Dash MX5 Miata Arduino Custom TFT Cockpit
 0:09:29
How To Interface A GC9A01 Round Display With Arduino & ESP32 - Voltlog #349
 0:01:31
Arduino Gauge OLED 1.3' for. Speeduino ECU
 0:00:22
Zada Tech OLED digital single oil pressure gauge - BAR
 0:00:27
Arduino OLED gauge SSD1306
 0:05:30
ESP32 S3 board with Round Touch Display GC9A01
 0:00:24
Oled virtual analogue voltmeter gauge
 0:07:04
Arduino OBD2 gauge display elm327
 0:13:15
Finally, ESP32 board with an AMOLED display .LilyGO T-display S3 AMOLED
 0:08:40
ESP32 Car Dashboard/Controller
 0:07:07
ARDUINO NANO with Oil Pressure and Temp Sensor + OLED display
 0:00:41
Arduino Multi Function Auto Gauge Display
 0:01:36
DIY OLED CAN Bus multigauge using Arduino and Link G4+ ECU - modes demo
 0:27:57
Arduino OLED Menu Tutorial (for beginners - Arduino UNO, 128x64px SSD1306 OLED screen, u8g)
 0:00:37
Arduino oled AFR gauge.
 0:03:38
OLED Arduino DIY Boost Gauge Volvo 740 Turbo
Комментарии