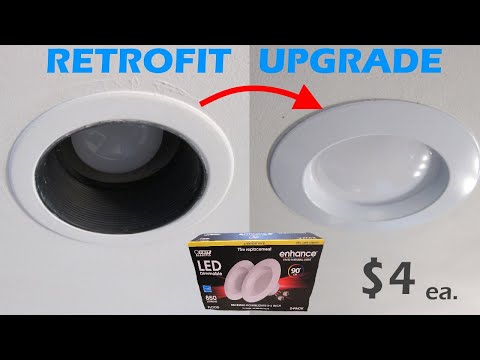
Cheap Retrofit Upgrade | Recessed Can to LED Flush Light | BR30

preview_player
Показать описание

We decided to update our old can/recessed lights in our house. Considering that if you want to replace the old BR-30 bulbs with LED's it was going to cost around $2 per bulb, this upgrade wasn't that much more expensive. The new flush mounted, air-tight, lights were only a couple bucks more. The install process was pretty easy, only taking a few minutes per light.
Just remove the old bulb, remove the springs holding on the collar, screw in the new light, then push up into place. The hardest part was getting the new light to stay flush to the ceiling.
But the overall look is much better then the old lights.

Disclosure Note: The above links are Amazon Affiliate links. There is NO additional cost to you, however I get paid a small percentage from Amazon if you purchase after clicking on the link.

led ceiling light, can light, recessed light, retrofit light, costco light, br30 light, br30 led, ceiling light replacement, can light replacement, replace can light, replace ceiling light, dimmable br 30, dimmable light, how to upgrade ceiling light, flush mount ceiling light, air tight ceiling light, warm led, retrofit light
Рекомендации по теме
Комментарии
Автор

I love that he used a kitchen chair instead of a ladder. That is true DIY strategy when you think its all gonna' go smoothly....

danbailey
Автор

This video is the only one I found that actually shows how to take the trim and center piece down. Thank you so much!

kellylynn
Автор

A recessed light is recessed for a reason. It has anti-glare effect which means the light doesn’t hit your eyes unless you are standing directly under the lamp.

It’s an upgrade backward.

KBS_ar
Автор

One of the best DIY videos I've seen on the internet. Great presentation. This has come in handy as my son is buying his first home and they are all older and many have had recessed lights installed years ago and are in need of upgrading. Dad will now swoop in and look like a genius. Again thanks.

thomasjacques
Автор

If you are going to change out the fixture make sure to understand the color of the new bulb. Many make the mistake of mixing brightness (lumens) for color (2700k to 5000k). I most often use 4000k and secondly 3500k. 2700k, called soft white, but is very yellow and makes the room look dingy. 5000k is the bright milky white security light looking color. A lot of the LED lights now include a switch so you can change the color on the unit.

nitdiver
Автор

Thank you so much for this video. I am glad you did not get the ladder nor turn off the power. I am about to do exactly what you did and like you, I know enough to realize what is absolutely necessary. My son sees that ladder mover he will say momma why didn't you call me if you needed something done. If I use the chair, he will be none the wiser! I will not be fibbing at all when I say I just changed a lightbulb, baby! Apparently, when they are grown, they become our parents and talk to us like we are their children. He is a pretty fantastic parent to his momma, so I guess he had a good teacher. Thank you for the video. I noticed the new light seems a lot brighter than the one on the right. I do not know if those bulbs decreass their brightness as they age, but there was a huge difference. I think your DIY solved the problem and looks fantastic. I already have the recessed lighting, but I am switching mine out with smart lights. That way, Alexa can do the walking to the switch.

NanasHouseDIY
Автор

Omg so it’s just changing a lightbulb. I swear I learn so much on YouTube. Thanks for this video!!!

charlenestewart
Автор

Use a sharpened pencil to remove the retention springs; insert pencil into the loop on the spring and slowly push up to disengage the hook at the top.

MuzixMaker
Автор

Recessed lighting is way cooler though. You need to get the deep recessed led retrofit

imgleb
Автор

Like watching my Dad... chair for a ladder and turning the breaker off is an option. Thanks for the good laugh, but really thanks for the easy instructions!

katygirl
Автор

Thanks for this video. I installed several, but the ones I used didn’t explain where the spring arms were supposed to go, so I just pushed up inside the can. Inserting the arms in the four slots made a much better fit.

fredarnold
Автор

There is also something called the color rendering index (CRI), the higher the number (out of 100) the more complete the spectrum of light emitted by the LED and the more accurate (when compared with natural daylight) the colours of objects viewed under these lights will be. This a completely separate issue to color temperature or color appearance.

In a domestic installation I would be looking for a color temperature of 3000K warm white and a CRI of 90+
These 'glare bombs' in the video have no glare control and are visually uncomfortable especially in low ceiling height applications. Also be aware that if there is not enough void space above these lights for air to move and they are on for long hours, the operating temperature of the LED driver will exceed the recommended maximum and the light will not last a fraction of the claimed life time.

robertvictor
Автор

All the comments about “they look a lot better” are subjective of course! GLARE is the topic that is not mentioned here. The reason for the deep recess of the old incandescent cans was to reduce glare and to direct the light pattern in a more downward direction. The black color of the inner “stepped baffle” trim cone was all about reducing glare and eye strain. Black was the go-to for that but white and other colors came into fashion as well. 20 years ago I always preferred white step-baffle trim cones as they looked better IMHO when the lights were not actually on. Don’t get me wrong….LED is a wonderful advancement in our lighting world! Fabulous in fact. But recessing the light source a bit is also quite appropriate in many cases. For now though, LED’s are so “new” that the nuances of recessing the light source and being concerned about glare aren’t what consumers want to hear. And I get that. But in a few years this will be an improvement to what is out there in our choices for replacing our old technology.

pdg
Автор

I replaced all of our recessed cam lights with these about 3 years ago. Before I was always replacing the bulbs, but have not had a single one fail since. Great investment.

BlackberryDazed
Автор

I changed two LED bulbs out at home. The most notable difference was the increased amount of light since the bulb was no longer recessed 2” into the housing.

Be sure to buy inserts that allow you to choose the light (i.e., soft white, bright white, daylight etc.). So far, I haven’t found any that allow you to change the light from outside the fixture. The switch is on the back part so you’d have to pull the light down to change it.

If you have to add dimmer switches, some are about $25 each depending on where you shop. Definitely needed in some places (e.g., near a TV) as the light is much brighter. Great for finished basements or a room that doesn’t get a lot of sun.

musicman
Автор

Indeed. Looks much better. I am in Arizona, and this will be a big bonus for keeping hot air from being sucked in when the whole house HVAC kicks on.

telecasterbear
Автор

Thanks for the tip. Fought very dim can lights for 30 years. Bought 2 of them at Menards. Great product, easy to install.

trainman
Автор

I can understand people like the look of them but personally its easier to install, replace if one dies and is cheaper to just buy LED light bulbs. If you want it to look better you should be using flood style bulbs that are larger in size in the can lighting vs the normal E12 type. Just imagine in say 1-5yrs one or two going out and having to try and find something that will match the rest. Not just the style but there will also be fading and it will look off. That means replacing all 4-6+ in one room and more if you wanted them to match in all the rooms vs just using any off the shelf bulb that you wont be able to see the difference from.

Tpearson
Автор

This vid "not OSHA Approved" 😊 Well done! Short and to the key points. Tks, especially for pointing out there are 2 sets of attachment points for the spring clips - to fit either 5 or 6 inch housing. At first I thought i'd have to return these. Much appreciated! 👍👍

dlcmsid
Автор

Nice video, thanks for making it. Unfortunately, like so many things in 2021, the prices have increased...as of this date they're more like $10 each. Still that's a bargain considering the advantages.

paulc