filmov
tv
How to create a form using form wizard in Microsoft Access
Показать описание
Learn how to create a form with the help of Form Wizard. Add the fields you want to be displayed in the form as per your preference.
Form wizard in Access lets you create forms with great ease. You can create forms in Ms Access with the help of the wizard with just a few clicks. In this tutorial, we will teach you how to use the wizard and other options relating to it. New record entry can be done to the database with the help of these forms.
Step # 1 -- Creating a form
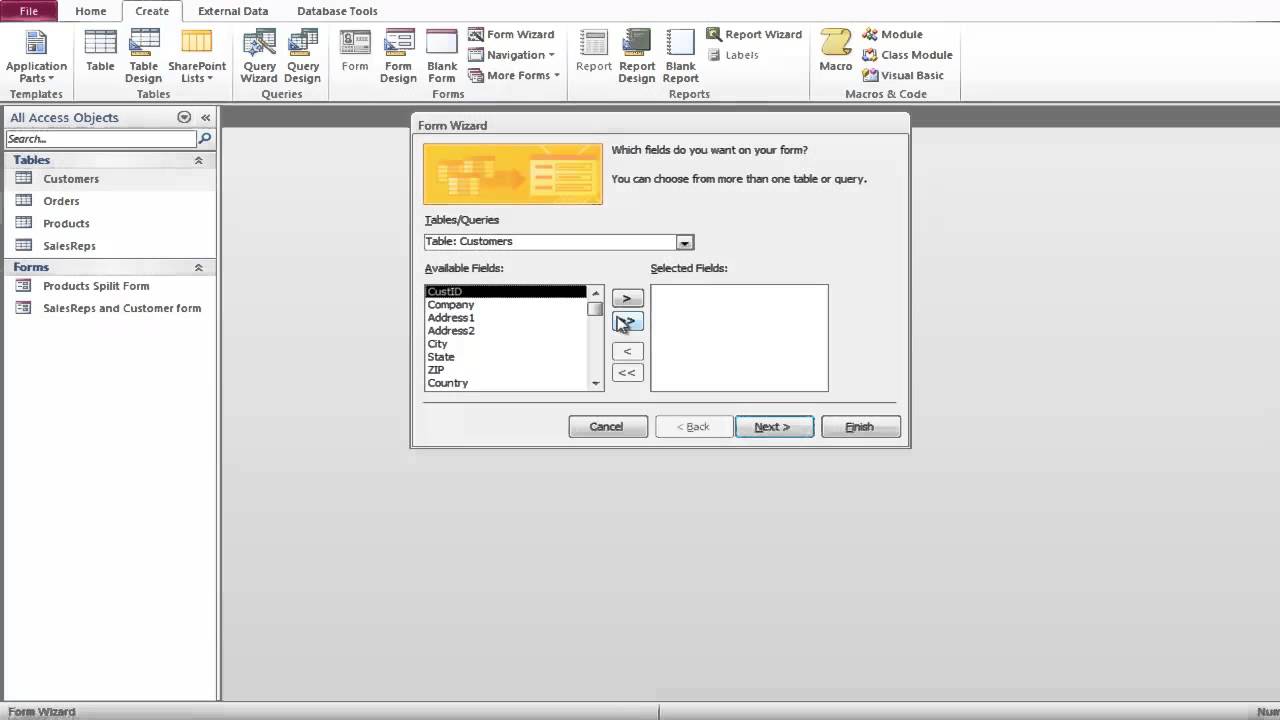
To create forms in Ms Access, click once on the customers table and then go the create tab. Over there, click on the form wizard button. A window will open showing you the name of selected table. On the left side of the window, a list of all the fields in the table would be shown. We will move all the fields to the right by using the double headed arrow.
Step # 2 -- Adding tables
Now change the table to "orders" table and move all of its fields to the right as well. Once you are done, click on the "next" button thrice to proceed further. As we are creating a form that contains information about customers and orders, we will select all the information from these two tables. The purpose of doing so is that it will show you which type of products are preferred by the customers and the number of orders per customer.
Step # 3 -- Forms with sub-forms
In this part of the form wizard in Access, we will select the "forms with sub forms" option because it is easier to understand and use. As you can notice in the grey area, Access already recognizes the relationship between the tables and sets them up in sub-form.
In the next part of the wizard, select the "datasheet view" option. The datasheet view allows the user to use more options and make changes to the form.
Step # 4 -- Naming the form
Change the name of the form to "Customers order form" and click finish. It is important to save the changes otherwise the changes will be lost and the process will have to be repeated all over again. As this form is about the customers and orders, use the same name to save the table because it will be easier to remember.
Step # 5 -- Viewing the form
Now you will see a form showing all the customer information. Right below this information, the respective orders of that particular customer would be displayed. By clicking on the left and right arrows located at the very bottom, you can navigate through customers and view their information.
Complete information about the customer is displayed in the upper portion and the lower portion shows order details such as the date, product and order id.
Form wizard in Access lets you create forms with great ease. You can create forms in Ms Access with the help of the wizard with just a few clicks. In this tutorial, we will teach you how to use the wizard and other options relating to it. New record entry can be done to the database with the help of these forms.
Step # 1 -- Creating a form
To create forms in Ms Access, click once on the customers table and then go the create tab. Over there, click on the form wizard button. A window will open showing you the name of selected table. On the left side of the window, a list of all the fields in the table would be shown. We will move all the fields to the right by using the double headed arrow.
Step # 2 -- Adding tables
Now change the table to "orders" table and move all of its fields to the right as well. Once you are done, click on the "next" button thrice to proceed further. As we are creating a form that contains information about customers and orders, we will select all the information from these two tables. The purpose of doing so is that it will show you which type of products are preferred by the customers and the number of orders per customer.
Step # 3 -- Forms with sub-forms
In this part of the form wizard in Access, we will select the "forms with sub forms" option because it is easier to understand and use. As you can notice in the grey area, Access already recognizes the relationship between the tables and sets them up in sub-form.
In the next part of the wizard, select the "datasheet view" option. The datasheet view allows the user to use more options and make changes to the form.
Step # 4 -- Naming the form
Change the name of the form to "Customers order form" and click finish. It is important to save the changes otherwise the changes will be lost and the process will have to be repeated all over again. As this form is about the customers and orders, use the same name to save the table because it will be easier to remember.
Step # 5 -- Viewing the form
Now you will see a form showing all the customer information. Right below this information, the respective orders of that particular customer would be displayed. By clicking on the left and right arrows located at the very bottom, you can navigate through customers and view their information.
Complete information about the customer is displayed in the upper portion and the lower portion shows order details such as the date, product and order id.
 0:01:15
Create a form in Microsoft Forms
 0:03:06
How to Create Google Form | Google Forms Complete Tutorial (2022)
 0:05:22
How To Create Google Form | Google Forms Tutorial 2024
 0:06:23
How To Create a Fillable PDF Form For FREE!
 0:12:00
How to make Fillable Form in Microsoft Word
 0:03:16
How to Create Data Entry Forms in Excel - EASY
 0:04:13
Access: Creating Forms
 0:08:05
How to Create a Form with Microsoft Forms
 0:16:35
Clinic Management System | Create Prescription Forms| Part-11
 0:06:00
How To Create Google Form - 2024 | Complete Tutorial
 0:46:08
How to Create a Fillable Form in Word | Microsoft Word Tutorials
 0:08:39
Learn HTML forms in 8 minutes 📝
 0:01:02
How to create a form using form wizard in Microsoft Access
 0:15:52
How to use Microsoft Forms
 0:29:15
Google Forms Tutorial
 0:05:52
How to create online registration form using google docs Forms
 0:05:13
How to Create Google Form | Google Forms Complete Tutorial | 2020
 0:12:29
How to Create a Form in Microsoft Word - MS Word Form Tutorial
 0:06:42
How to Create a Form with Jotform
 0:19:30
How to Create Fillable PDF Form for FREE
 0:06:11
How To Create A Fillable Form In Microsoft Word (Create HR Template Forms) Part 1
 0:01:07
How to Create Google Form and Share Link (Quick & Easy)
 0:29:09
24: Forms In HTML and CSS | How To Create A Form | Learn HTML and CSS | HTML Tutorial | CSS Tutorial
 0:03:30
how to create online questionnaire l how to use Google Form l step by step guide
Комментарии