filmov
tv
Working with OpenSSL and Httpd
Показать описание
Introduction
In this video, we will learn how to generate a signed certificate using openssl and use that certificate to secure HTTP traffic. We will then use the openssl command to verify the Apache configuration.
Open your terminal application, and run the following command (remember to replace PUBLIC_IP with the public IP you were provided on the lab instructions page):
Type yes at the prompt.
Enter your cloud_user password at the prompt.
Install mod_ssl on the Host webserver
Log in to the webserver host.
ssh webserver
Escalate privileges to root.
sudo su -
Install mod_ssl.
yum install -y mod_ssl
Generate and Sign a Private Key
Change to the /tls/ directory.
cd /etc/pki/tls/
Create a new encrypted private key.
Enter httpd at the next two passphrase prompts.
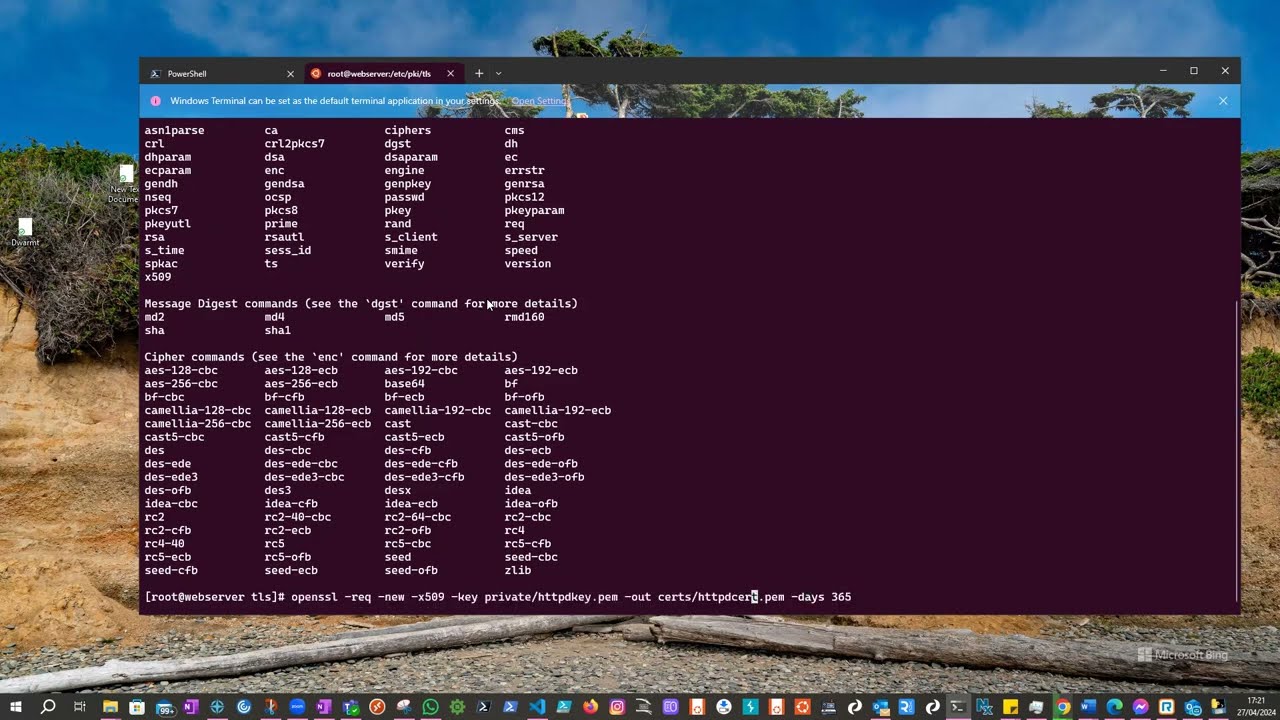
Generate a self-signed certificate using the encrypted private key.
Enter httpd at the passphrase prompt.
At the next prompt, enter the following information:
Country Name: US
State or Province Name: Texas
Locality Name: Dallas
Organization Name: Example Corp
Configure the Default Apache Virtual Host
Type /Virtual to search for the SSH Virtual Host Context section.
At the end of the VirtualHost _default_:443 section, add the following on a new line:
Type /SSLCert to search for the Server Certificate section.
Press Esc, then type :wq to exit the vim text editor.
Restart the Apache httpd server.
systemctl restart httpd
Enter httpd at the passphrase prompt.
Open port 443 on the OS firewall.
firewall-cmd --add-service=https --permanent
Reload the firewall.
firewall-cmd --reload
Verify the Configuration
Press Ctrl + D twice to log out of webserver and return to workstation.
Verify that the configuration is working properly.
Press Ctrl + C to return to the command prompt.
Write the s_client output to a file.
** place 2 arrows pointing to the file
List the contents of the file to verify that the certificate information is there.
cat /home/cloud_user/httpd_output
In this video, we will learn how to generate a signed certificate using openssl and use that certificate to secure HTTP traffic. We will then use the openssl command to verify the Apache configuration.
Open your terminal application, and run the following command (remember to replace PUBLIC_IP with the public IP you were provided on the lab instructions page):
Type yes at the prompt.
Enter your cloud_user password at the prompt.
Install mod_ssl on the Host webserver
Log in to the webserver host.
ssh webserver
Escalate privileges to root.
sudo su -
Install mod_ssl.
yum install -y mod_ssl
Generate and Sign a Private Key
Change to the /tls/ directory.
cd /etc/pki/tls/
Create a new encrypted private key.
Enter httpd at the next two passphrase prompts.
Generate a self-signed certificate using the encrypted private key.
Enter httpd at the passphrase prompt.
At the next prompt, enter the following information:
Country Name: US
State or Province Name: Texas
Locality Name: Dallas
Organization Name: Example Corp
Configure the Default Apache Virtual Host
Type /Virtual to search for the SSH Virtual Host Context section.
At the end of the VirtualHost _default_:443 section, add the following on a new line:
Type /SSLCert to search for the Server Certificate section.
Press Esc, then type :wq to exit the vim text editor.
Restart the Apache httpd server.
systemctl restart httpd
Enter httpd at the passphrase prompt.
Open port 443 on the OS firewall.
firewall-cmd --add-service=https --permanent
Reload the firewall.
firewall-cmd --reload
Verify the Configuration
Press Ctrl + D twice to log out of webserver and return to workstation.
Verify that the configuration is working properly.
Press Ctrl + C to return to the command prompt.
Write the s_client output to a file.
** place 2 arrows pointing to the file
List the contents of the file to verify that the certificate information is there.
cat /home/cloud_user/httpd_output
 0:17:30
 0:05:54
 0:14:24
 0:06:31
 0:11:04
 0:11:02
 0:25:01
 0:04:12
 0:30:00
 0:00:50
 0:06:37
 0:08:54
 0:27:59
 0:40:25
 0:06:06
 0:05:05
 0:09:22
 0:11:42
 0:00:50
 0:33:30
 0:45:49
 0:05:34
 0:22:08
 0:02:33