How MEMS Accelerometer Gyroscope Magnetometer Work & Arduino Tutorial

preview_player
Показать описание
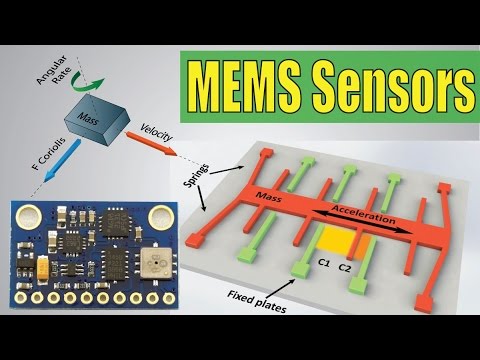
In this article we will learn how the MEMS accelerometer, gyroscope and magnetometer work and how to use them with the Arduino Board. Also with the Processing IDE we will make some practical applications using the sensors.

Like my page on Facebook:

Add me on Google+:

Рекомендации по теме
Комментарии
Автор

Great video. And because you do not use a library it gives more details on the inner working of the sensors.

AndreasSpiess
Автор

This code is simple and clean.
I learned to program by studying pinball machine firmware at a time when the engineers were forced to use assembler language for 8 bit processors. The Williams pinballs were using the MC6800 first, then the MC6809.
When I started to use C language, I found natural to check that the compiler generate the same assembler code as the hand coded version that I knew for years.
The code to read two I2C bytes and make it appear as a single 16 bit integer would be:

X0 = Wire.read(); //get D7-D0, the 8 least significant bits
X1 = Wire.read(); //get D15-D8, the 8 most significant bits
X_out = (X1 << 8) | X0;

The only difference here is using "OR" instead of "+". The assembler instruction for shift left was one byte less than the instruction to add two registers and return the result in a third register. It was also faster by 1 machine cycle. But the real reason I preferred the "OR" over the "ADD" was the elimination of risk of overflow spilling or corrupting the next bits. This risk is more obvious when dealing with many binary fields of different size in a given 16 bit register.

The type of X0 and X1 should be "unsigned" if these variable are 8 bits. Otherwise, in both the "|" or "+", an overflow can occur if the bit 7 is 1 in the variable X1.
For example, if the sensor returns:
0x8006, the value in X1 is 0x80 and X0 is 0x06
The answer from "X1 < 8" should give "0x8000" but if the compiler think that X1 is signed, it would extend the sign and the result would be : 0xFF00. The negative bit D7 makes all bits from D15-D8 to become one which elegantly preserve the sign when converting signed 8 bits to signed 16 bits.
Then, after the "|" or "+", the final result would be 0xFF06, very different from the expected 0x8006.

The problem is avoided here because all integer are "int", which is 16 bit or 32 bits, so no worries about 8 bit overflow.

The last line:
Xa = X_out / 256.0 is converting from "fixed point" to "floating point".

The fixed point assume that the 16 bit value D15-D0 is actually composed of 8 bit integer (D15-D8 is seen as the value 0 to 255 (unsigned) or -128 to +127 (signed))
and the next 8 bits are assumed to represent a fraction ranging from 0 / 256 to 255/256.

Suppose the 16 bit value would be
0x00FF (255/256) and we add 1, the result then become:
0x0100

The integer part is "1" and the fraction is "0/255"
which is effectively 1.0

The value 0.5 is 0x0080 (integer part is 0, fraction part is 128/256)
The value 1.5 is 0x0180

moiquiregardevideo
Автор

Thank you! I watched 5 videos in an attempt to understand the mechanisms you illustrated more clearly in under 10 seconds.

ryanhewitt
Автор

Best tutorial so far with excellent graphic. I will now check on your vebsite.

godsloveministry
Автор

Thank you sir!
I almost lost hope while searching for the videos that explain the basics of gyros..but then I came across your video. great explanation, i must say. First, the basic working and then explaining the code (rather than using the libraries like others).
Thank you

harshitpurohit
Автор

this is what i call a perfect explanation suitable even for some of us who are slow to learn. like the illustrations too.

silentlessons
Автор

This is an excellent tutorial - concise and to the point. Thanks for putting this together

notam
Автор

Very useful documentary. I use this to make my training materials and aware knowledge of Mechatronics/Innovation students etc.

namaledrisinghe
Автор

Great video. I guessed it was a mechanical system at that level, but seen how it worked add another level of amazement for me. Engineering is awesome .
😃😃😃

estudiordl
Автор

One of the Most Useful and Informative Channels Ever :D Thanks A Lot Eng. Dejan And also thanks for giving your Source Codes because that also help a Lot :)

noorahmedsamir
Автор

Great visuals! This video was informative. So many people use the term accelerometer and gyroscope interchangeably, but they are very different sensors.

isaacerickson
Автор

Hence the old saying, "Drifty as a ten cent gyro."

diggydude
Автор

I would pay a lot of money for one of those things. Just beyond me to set it up. Loved it.

billhesford
Автор

GREATLY impressive…
We WANT that technology !

ValeryDjondo
Автор

Дружище, ты русскоговорящий по любому.

venkospro
Автор

Very well explained, the video on physical functioning of accelerometer helps a lot!

siddharthr
Автор

Can the combined code from accelerometer and gyroscope be found somewhere? I can only find the accelerometer and gyroscope code separated.

Hikizuru
Автор

Your tutorials are so cool and detailed. thank for uploading.

WRAND
Автор

Hello just a question can tou put a gyroscope in your device? Like replacing the hardware?

freidrichtomolnoc
Автор

I can't wait to build mine. That's sick

spacejunky