filmov
tv
Macbook Air M1 2020 Space Grey Screen Replacement A2337
Показать описание
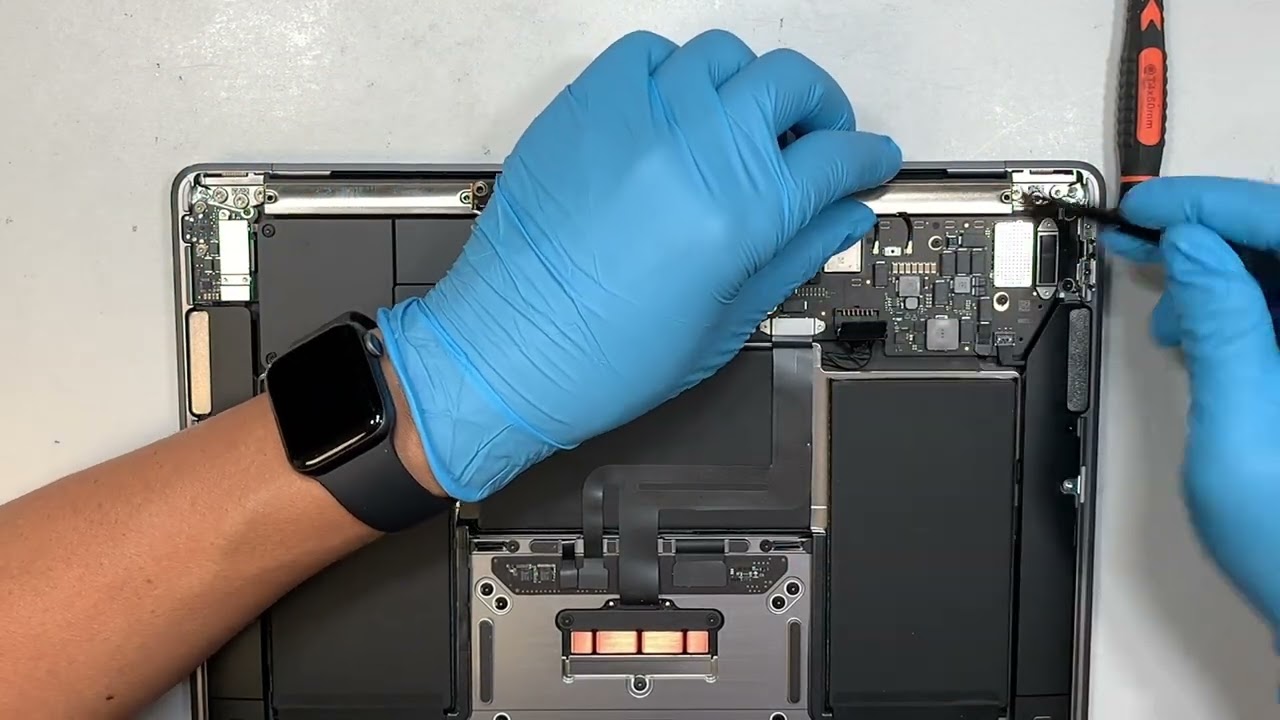
This video is to show step by step on how to replace entire Macbook Air M1 Full Assembly Screen.
Cracked screen ? Pixelated Screen ? Fuzzy color or distorted screen ?
On your macbook Air, you need definitely a new screen.
Macbook Air 13" M1 2020
A2337
** For US shopper **
Where to get the LCD screen from ?
Amazon:
eBay:
Tools Kit Screwdrivers:
Pentalobe P5 Screwdriver
Prying Tool:
** For UK shopper **
Where to get the LCD screen from ?
Amazon:
eBay:
Tools Kit Screwdrivers:
Pentalope P5 1.2mm for backcover screws
Prying Tool:
-----------------------------------------------------------------------------------------------
If this video is helpful or helped you, it will be nice to have a cup of coffee.
Appreciation support to UberGeeks via PayPal:
Subscribe to our channel for all our latest videos!
Follow us on Facebook:
Follow us on Instagram:
Links included in this description might be affiliate links. If you purchase a product or service with the links that I provide I may receive a small commission. There is no additional charge to you!
As an Amazon Associate I earn from qualifying purchases.
As an eBay Partner Network I earn from qualifying purchases.
Legal Disclosure:
UberGeeks video(s) or information provided on this website does not, and is not intended to, constitute legal advice, constitute IT professional advise, information technology expert, or tech related material; instead, all information and content available on this are for entertainment purposes only. No information contained in this video shall create any express or implied warranty or guarantee of any particular result.
UberGeeks shall not be held liable for any damages, losses, injuries, loss of data, or harm arising from the use of information or techniques presented in our video(s) or information provided on this website. By accessing and using our content, you agree to release us from any liability.
Participation in any activities or experiments presented in our video(s) is entirely voluntary. If you choose to replicate any actions or experiments, exercise caution, and prioritize your safety and the safety of your equipment.
Thank you for joining us on this IT journey. We hope you find our video(s) enjoyable. Remember, your participation in this channel is at your own discretion, and we encourage you to use the information responsibly and safely.
#macbookpro #A2338 #laptopscreen #screenreplacement #apple #macbook #macbookm1 #a2442 #m1macbook #macbookprom1 #2021macbook #2179 #2337
 0:10:27
MacBook Air M1 2020 Space Gray Unboxing
 0:01:03
Introducing Macbook Air with M1
 0:17:54
Macbook Air M1 2020 Space Grey Screen Replacement A2337
 0:07:15
macbook air M1 2020 (space gray) | unboxing and setup ♡⋆. *. ⋆💻
 0:10:03
Apple M1 MacBook Air - Long Term User Review
 0:07:34
Why I Bought a 2020 M1 MacBook Air for 2023!!
 0:25:04
Macbook Air M1 2020 Unboxing, Set Up and Review! Space Grey
 0:07:08
Macbook Air M1 UNBOXING and REVIEW - 2020
 0:06:05
Horizontal vs Vertical MacBook Docks From TOBENONE!
 0:12:11
MacBook Air M1 2020 Unboxing (Space Gray) 💻 | + laptop accessories ✨
 0:07:53
Buy The M1 MacBook Air?!
 0:05:30
space grey macbook air m1 (2020) unboxing 💫
 0:06:57
NEW M1 MacBook Air UNBOXING and First Impressions!
 0:09:27
✨🌱 macbook air m1 2020 unboxing (space gray) + accessories
 0:11:43
YOU Should Buy the M1 MacBook Air in 2024, And Here's Why!
 0:16:43
MacBook Air M1 in 2024: Why you should get it (4 years later)
 0:17:14
2020 MacBook Air M1 - Unboxing, Setup and First Look
 0:10:13
✨🌱 macbook air m1 (space gray) unboxing | accessories + case decoration 💻
 0:00:32
unboxing the new MacBook Air 2020 with M1 chip (Space Grey) by Glez
 0:12:19
🌱✨macbook air m1 2020 unboxing (space gray) | accessories + case decoration💻
 0:14:32
MacBook Air M1 (2020) vs MacBook Pro M1 (2020) - FULL Comparison
 0:00:33
Things You NEED to Know about the M1 MacBook Air! 😮🔥 #tech
 0:00:47
The Perfect Accessories For Your MacBook Air 🍎
 0:06:33
2020 MacBook Air Impressions: A Clean Refresh!
Комментарии