How To Install the Big 3 Upgrade | Improve Your Vehicle's Electrical Charging System | Car Audio

preview_player
Показать описание
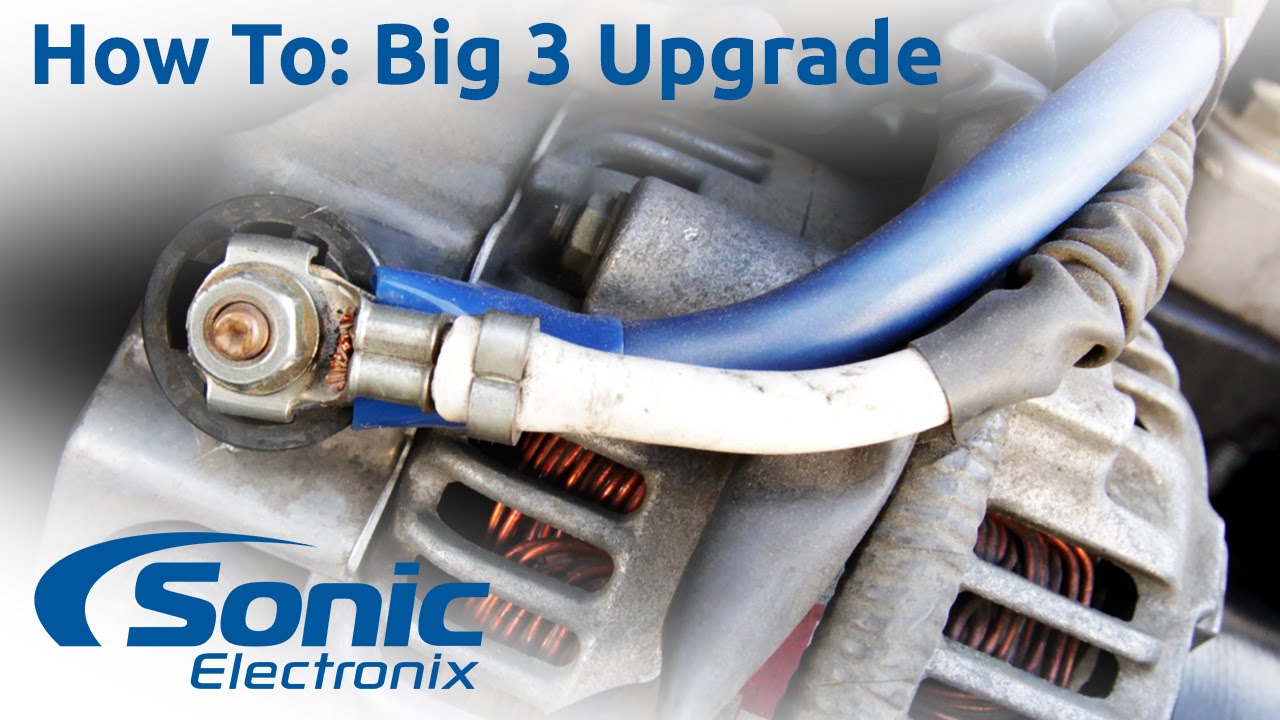
The Big 3 Upgrade improves your vehicles charging system, giving all it's electrical equipment the current it needs to perform it's best.

Anyone with an amplified aftermarket car audio system, especially those over 1000 Watts, should seriously consider performing this upgrade. If you've noticed dimming headlights, slow window roll down speeds, or voltage drops it's time to do a Big 3 Upgrade.

Wires to Upgrade / Installation Steps:
1. Alternator charging wire to Battery positive
2. Battery negative to chassis ground wire
3. Engine Block to chassis ground wire

1/0 Gauge wire is recommended as it will provide the lowest resistance and potential current flow, but any size larger than the factory wires will be an improvement.

OFC (Oxygen Free Copper) wire is always recommended over CCA (Copper Clad Aluminum) because of it's superior conductivity and corrosion resistance.

Examine your vehicle before purchasing an Big 3 Upgrade kit to make sure you have all the necessary tools to do that job, and that you buy the correct length of wire.
*Keep in mind that some car's batteries are located in the trunk of the vehicle, these will require longer runs of wire.*

Installation Tools and Accessories:

More information on the Big 3 Upgrade:

- - - - - - - - - - - - - - - - - - - - - - - - - - - - - - - - - - - - - - - - - -

Sonic Electronix always strives to be the premiere online shopping destination for car electronics and other consumer electronics. Our slogan is "The X-Factor When Shopping for Electronics" and it is our goal to be just that. We're here to help you find solutions and great prices without sacrificing service.

Our Store:

Our Facebook:

Our Twitter:

Our Instagram:

- - - - - - - - - - - - - - - - - - - - - - - - - - - - - - - - - - - - - - - - - -

Big 3 Upgrade step by step
Рекомендации по теме
Комментарии
Автор

6:59
When connecting to an aftermarket battery terminal such as shown, it's best to first put the bare wire into a wire ferrule and then clamp it down inside the terminal block with the Allen set screw. This keeps the individual wire filaments from fraying and makes a better overall connection.

thecarman
Автор

And additional 'tip' is before you crimp the terminal end, is to dip the freshly stripped wire into some light oil (PB blaster, WD-40 etc) because the wound wire will 'wick' the oil back up under the rest of the wire insulation to help prevent corrosion seeping up into wire after time. And then if you decide to use heat shrinking sleeves, it will protect just that much better. (ESPECIALLY for the Northern states that use salt etc on the roadways)

blownaway
Автор

Always disconnect the battery negative before starting any electrical service. It is safety & protects electronics! Best practices are good.
Purchase a digital multi meter (DMM) to have the ability to do “Voltage Drop” test and (OCV) open circuit voltage at the battery. There are good videos on both.
The battery stored energy to start the car, un-lock, lock and power lights plus many other duties like certain memory functions & clock. Yours will vary. The alternator uses diodes to direct energy to negative (Back Case of Alternator) and the B+. Negative to the battery completes a DC circuit and most cars don’t have a “Full” dedicated frame. Negative wire to the battery (As his Example) have a “Tee” inline, that bolts to chassis but to the engine. Rebuilding or modifying can be fun but a good cable for negative should attach from the back of the alternator and continue on to the battery. You need grounds everywhere to chassis, engine, battery, frame (If applicable) but the littles ones found on intakes, cylinder head or rocker arm cover to the firewall (Bulkhead) are required but the battery to the block is the big one. After all, you want it to crank to start. A good battery tested at 100% state of health and (OCV) at 12.6-12.8 Vdc is correct. The alternator will charge a good battery at less than 1/2 an amp while driving. OEM alternators sense B+ but also temperature. Cold batteries take as much as 14.2 volts as hot batteries take 13.2. The Marine industry + some auto’s with the battery under the rear seat has temp sensors to adjust the rate of charge.
Use wire that is quality with “Star Washers” inside or out that dig into both metals, the connector & car. Yes, remove paint to a minimum but protect your connections with a $6 tube of dielectric grease.
Adding amps, DSP, and other aftermarket components need a single large fuse that totals the added load. Placed next to the battery as close as one can. Route using existing rubber grommet and avoid all pinch points to avoid fire. Amp clamps w / direct readout are reasonably priced and with the loads on, measure each. Write this down and purchase a distribution fuse center. Sizing wire for unknown amps is guessing and boxes lye about amperage requirements. You can never use “OutPut” for calculation of picking the correct fuse. Start with only the size indicated by the component then the system on at full, the amp clamp will show the correct fuse by 28.6 amps, get a 30 amp fuse, not a 50 amp. The fuse protects the wire and not the component. Voltage drop is measuring the loss of voltage across point “A” to point “B” while on at maximum. The higher the circuit amps, the higher the voltage drop, so a 120 amp circuit voltage drop is 0.500 Vdc. 1/2 of a volt is lost! Normal.
16 amp circuit will show 0.050 Vdc loss. Like headlights or blower fan. These are series circuits, therefore the component uses all the voltage in the circuit. A new switch, wires, connectors, fuse and ground will add up losses when on and new. Measure with DMM on volts, turn on circuit and measure B+ side, ground side both to battery, the component gets the rest. Anything kissing high volts is resistance due the ground, connector, switch, wire or even a fuse. Follow these suggestions and you will have no problems and it works well in diagnosing. Amps to a fuel pump are about 7.0 - 8.5 Amps. Higher than this, plugged filter, pinched line, etc. Lower means the pump is worn and will fail. A simple fuse jumper wire plugged in at the fuel pump fuse w / Amp clamp will show. Voltage drop? If the black or red meter leads are backward, the reading is the same only with a (-) sign in front of it.

deankay
Автор

This is the best Big 3 Upgrade videos that I've seen. The camera work is stable. You can see almost everything mentioned. The presentation is organized and features graphics. The presenter is knowledgeable, smooth, and easy to understand. The presenter is wearing a lav mic so the viewer can hear him clearly. The video presents more than one vehicle to illustrate differences in vehicle designs and challenges they may present. I give a big thumbs up on this very informative video!

taichijohn
Автор

I gotta say heaven, in car audio for 20 for almost 25 years and I have to say your guy’s video at SONIC Electronics is the best on YouTube!

gtstanton
Автор

Sir, you are the very first (v1st) vehicle mechanic that I see working under the hood seating down. Excellent ... absolutely nothing wrong in working in a "comfy" style!
Sir, thank you for your great video on "The big three (3).

olechuga
Автор

Definitely the best and clearest explanation that i could find, thank you very much, even 7 years later 👍🏻

Straight_White_Fatherly_Figure
Автор

Quick tips- The nuts/bolts on the strut towers which hold the strut mount to the chassis work extremely well as ground points because they are nice and large, the metal on the strut towers is thick, and you can tighten them down tight without stripping it or causing damage because they are large and sturdy. Just don't ground to the strut/mount itself since it's usually isolated by rubber bushings. I would also suggest finding a large bolt on a sturdy part of the engine block or head to connect the ground to instead of connecting it to a small bolt on a valve cover, bracket, or something similar. That way the cable is connected to a thick piece of metal that can handle current well, and you can tighten the bolt down nice and tight for a solid connection. Also, as he said, make absolutely sure to sand/wire brush all connections to clean, shiny metal since paint and oxidized metal are very poor conductors. I hope that this information helps someone

averyalexander
Автор

I've done all of these things..It works.. Excellent tutorial for those un savvy in automotive electrical.

joshtaylor
Автор

I have done this upgrade to a dozen different cars. but why? you will not gain any horsepower. but your car will start faster, your battery will last a little longer, reduce chances of shorts and check engine lights, and your interior lights and gouge will be slightly brighter. to the engineers that say don't do it. the car manufactures especially imports use the bare minimum metal and materials to get by to maximize profit on quantity of cars sold. we live in a world where quality is rare and quantity dominates. just look at the food Mcdonald's sells.

freeyourmind
Автор

This tutorial provides clear and concise instructions on how to install the big three upgrade for your vehicle's electrical charging system. The steps are easy to follow and the explanations are helpful. I appreciate the time and effort that went into creating this content. It has been very informative and useful. Keep up the good work!

Ella-gbrj
Автор

All done on the Saab 900. Put 4ga from the alternator to the battery and went from 12 volts to 13.1 no load and much more stable when adding load. Thanks Sonic

KOIFLA
Автор

The Big Three Upgrade is a great insurance for a trouble free starting system for the life of the vehicle. If you don't have a wiring kit, any welding shop can provide very high quality DC cables, sold by the foot and a variety of quality connectors. Total upgrade cost is about $50 and a little driveway labor.

chrisgraham
Автор

This is a great idea for preventing the dreaded - rusty and falling off wires that are burnt and rubbed through and sparking when it rains and there is road salt.

Up my way - this kind of stuff is for diesels, like the old or new TDI or old Mech pumps. Winter requires a 1000 COLD CRANK AMPS. And then you have to get all that power to the starter and not melt off the connections, so dont forget to keep going with the upgrades.

Best regards - you did a great job explaining and including solder use. Cheers!

mpccenturion
Автор

I'm a big fan of a crimp for the mechanical connection, and soldering to make a more solid, permanent electrical connection. It's how I've always made welding cables, and it's always worked great. I also use closed end terminal lugs (100% copper) and adhesive lined shrink wrap where the lug meets the insulation to create more long term resistance in wire degradation from age and oxidation.

NordicDan
Автор

I did the big 3 today and it made a big improvement!!

thomass
Автор

For the charging wire any additional wire you add smaller or larger than the original wire size you'll see an improvement.

nelagordon
Автор

I actually upgraded, and added a few more grounding points to my 1985 Corolla GT-S, along with the battery ground, over a decade ago. I thought of the alternator charging wire to the battery but wasn't sure how to do it. I will be definitely be upgrading the charging wire today which will compliment my upgraded alternator (OEM was a mere 60 amperes) with a 100 amperes unit for a 1993 MR2 (w-p/s), which happens to be Plug & Play.
Thanks a lot for this informative video, very helpful!

mrolskul
Автор

My brother had a '69 Camaro, California car with very little rust. Constant electrical problems, too many to list. Ended up running heavy gage wire replacing factory positive and negative battery cables. Helped! Added heavy ground wires to several spots of front body panels. Helped more! Ran ground terminals with connections to each other. Much better! Then, ran heavy Ground to engine block, both cylinder heads, and front frame. It made a world of difference. Was amazed how much resistance there was between metal on car...

stephenkeebler
Автор

Any idea why my battery light came on after I did this?

chapelbarnes