filmov
tv
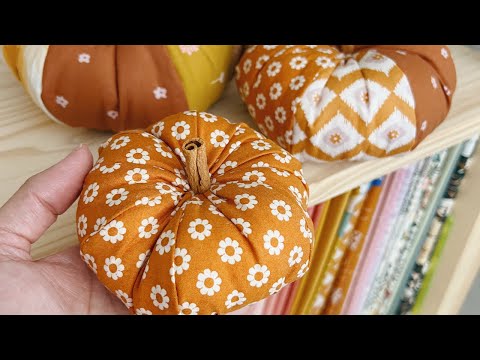
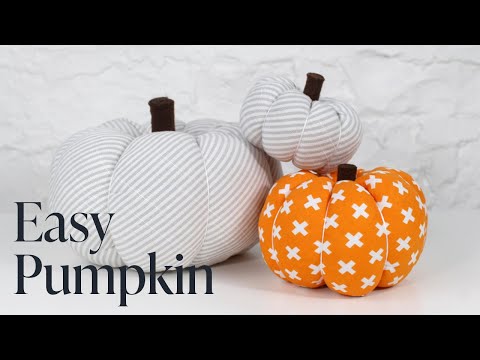
Easy To Sew Fabric Pumpkins : COMPLETE WALKTHROUGH!

Показать описание
Fabric pumpkins are not a new idea, you can even buy them in popular stores! Here is my take on a the popular project, showing you every step of the process, and what to do when the thread breaks. You can get SO creative with these little pumpkins!
Happy Sewing!
Time stamps for each step is in the comments below!
Popular blog posts I looked over for pumpkin inspiration:
----------------------------------------------------------------------------------------------------------------
Requirements:
- Fabric cut 2 times the length as width (mine is 7"x14")
- Machine needles, hand sewing needles and doll/upholstery needles.
- Thread: 40wt, 12wt and 6 strand embroidery floss
- Small pliers, leather thimble, stuffing (I use polyester stuffing)
- Stem: small stick or rolled felt and hot glue
----------------------------------------------------------------------------------------------------------------
Products Used:
----------------------------------------------------------------------------------------------------------------
My sewing machines -
----------------------------------------------------------------------------------------------------------------
Say "Hi!" to me on some other platforms:
Don't forget to tag your makes with #OklaRootsTuts so we can connect!
----------------------------------------------------------------------------------------------------------------
Filming Equipment Used:
- Video: Samsung Galaxy S10+
*Indicates affiliate links.
#diyhome #sewing
 0:36:29
Easy To Sew Fabric Pumpkins : COMPLETE WALKTHROUGH!
 0:07:10
FABRIC PUMPKINS DIY - How to easy make fabric pumpkins?
 0:26:09
HOW TO MAKE FABRIC PUMPKINS. Easy but not shabby!!
 0:11:25
Fabric Pumpkin | How to make Pumpkin using fabric | Fall Sewing | Beginner Sewing
 0:09:55
Fabric Pumpkin Trio | How to make Pumpkin using fabric | Forgotten Memories fabric | Beginner Sewing
 0:15:10
Cute Fall Fabric Pumpkins to Sew with Free Pattern
 0:16:23
How to Make Easy Fabric Pumpkins | Teddy Fabric | DIY Project | Autumn Decor | Home Decor
 0:02:41
Easy DIY Fabric Pumpkins - How to Make Fabric Stuffed Pumpkins
 1:58:43
8/26/2024 Material Madness plus a Check-In from Gloria at Baby Lock Tech
 0:06:44
Quick Fabric Pumpkins
 0:04:10
Easy DIY No Sew Fabric Pumpkins
 0:24:39
DIY Easy Fabric Pumpkin Tutorial
 0:09:32
No Sew Fabric Pumpkins! ~ Quick & Easy! ~ Fall or Halloween DIY
 0:07:59
How to sew fabric pumpkins, rustic farmhouse style
 0:12:25
EASY Fabric Pumpkins!!!
 0:08:57
How to Sew: Easy Fabric PUMPKINS ! | Cute Halloween Ornaments | Quick DIY Sewing Project
 0:08:24
How to Make a Fabric Pumpkin | Tutorial | Fall Decor Idea's
 0:08:51
DIY Fabric Pumpkins Tutorial / 3 sizes // Free Pattern
 0:19:47
How to sew a fabric pumpkin | Cosy autumn craft sew-along tutorial | Sewing for kids | Beginner sew
 0:12:53
Fast & Fabulous No-Sew Fabric Pumpkins with Mx Domestic
 0:04:36
How to Make Scrap Fabric Pumpkins: An Easy Fall No-Sew DIY Idea!
 0:08:37
DIY Farmhouse/Rustic Fabric Pumpkins | DIY Fall Decor | faythchik777’s DIY by Design
 0:12:35
How to make a fabric pumpkin - Inexpensive and easy
 0:45:16
How to sew a fabric pumpkin
Комментарии