filmov
tv
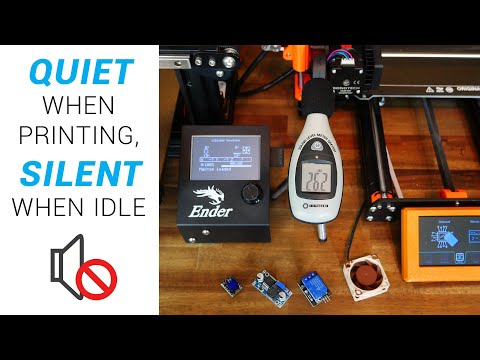
Quiet 3D printing guide: Noctuas, buck converters, relays & firmware tricks

Показать описание
If your 3D printer is too loud for your liking, this video guide is for you. We cover how to make it quieter while it is printing, as well as making it completely silent when idle. In my case, this means I can have most of my printers sitting in wait for a print job to be sent to them wirelessly.
The guide covers using quiet Noctua fans using a buck converter, even with PWM control, as well as relays to switch off unneeded fans and power supplies. With firmware instructions for Marlin, RRF and Klipper, your particular machine should be covered.
0:00 Introduction
0:38 Quiet contents - plan of attack
Previous WIFI conversion videos:
1:20 Quiet stepper motors
2:50 Quiet vs standard fan noise comparison
4:01 Quiet fans pros and cons
5:19 Using Noctua/quiet fans with a buck converter
6:42 PWM/variable speed fans (part cooling) buck converter wiring
7:58 Using relays to switch fans and PSU
10:33 Firmware changes for automatic hot end/electronics fan control
11:46 Noisy power supplies
12:48 Printer vibrations
13:14 Conclusion
Get Quality Resins from 3D Printers Online. 5% off storewide for Teaching Tech subscribers [Code: tech5]
Take a look around and if you like what you see, please subscribe.
 0:13:51
Quiet 3D printing guide: Noctuas, buck converters, relays & firmware tricks
 0:03:26
WHY NOT NOCTUA FANS FOR 3D PRINTING?? SILENT 3D PRINTERS. NOCTUA FANS MAKE 3D PRINTERS SILENT, BUT..
 0:10:42
Buck converters: Quieten your 3D printer with a Noctua fan & directly power your Pi
 0:01:10
Ender 3 with Noctua Fans (Silent)
 0:13:19
Noctua vs Creality Fan Showdown Part 2
 0:08:32
Quiet 12V NOCTUA Fan on 24V Creality Ender 3
 0:00:23
Creality Ender 3 v2 Silent Fang Noctua
 0:13:12
No More Noise! How to Make your 3D Printers quiet (Ender 3 and Anycubic Chiron)
 0:09:16
Are quiet fans worse for your 3D printer? You might be surprised!
 0:08:56
Upgrading Ender 3 Fans with Noctua 40x20 for Quieter Printing
 0:09:23
The Great Search - 24V Quiet Hot End Fan (3D Printer Replacement)
 0:01:01
How to Replace a 24V Fan With a 12V Fan - Noctua Silent Upgrade
 0:10:27
Making any 3D PRINTER (almost) SILENT
 0:05:12
3D Printer Fans - AXIAL vs BLOWER (MUST KNOW)
 0:00:15
Ender 3 - Noctua Fan Mod, dead silent!
 0:10:24
Can You Make An Ender 3 V2 WHISPER QUIET? - Step By Step Guide
 0:00:17
Creality Ender 3 stock vs. silent
 0:02:47
Will Acoustic Foam Make a 3D Printer Silent?
 0:14:10
Ender 3 Silent Fan Upgrade (Upgraded Pro Vs Stock V2)
 0:10:49
Ender 3 S1 noctua fans final setup . Very silent compaired to the stock setup.
 0:11:12
ENDER 3 V2 SILENT FAN MOD | Step-By-Step Guide
 0:43:03
Ender 3 V2 Near Silent Mod / Quiet Fans Upgrade
 0:12:37
Creality Ender 3 Pro Hot End Noctua A4x20 Fan Upgrade 40mm x 20mm | FINALLY Some Silence!
 0:21:43
Quiet Please! Reducing 3D Printer Noise with DIY Mods
Комментарии