filmov
tv
Lighting 101: Intro to Light Placement

Показать описание
Stay tuned to the end for a chance to win a prize!
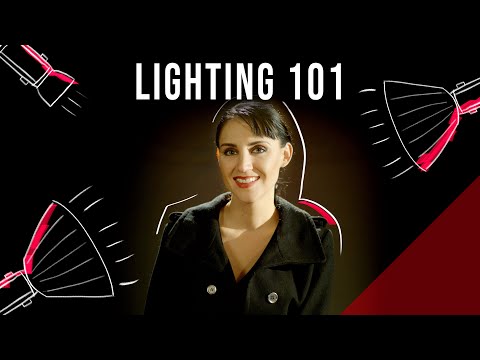
Three point lighting is the most common structure for cinematic lighting in film history. Everywhere we look, we see three point lighting being used on movies both big and small budget. Not everyone uses three point lighting the same way, but nearly every light placement can fit into one of the three placements of three point lighting. Knowing the basics of three point lighting will help you to better understand film lighting as a whole, and strengthen your ability to communicate your cinematic vision! Today on 4 Minute Film School, we go over the fundamentals of three point lighting and show you how you can take your footage to the next level, using these basic tips.
In this video, Matt from the A-Team shows us the various options you have within a three point lighting setup. He also goes over the names of each light and how they can be used in a scene. First, he goes over the general location of each of the lights in the three point setup; as well as the names given to each light. Next, he shows examples of what lights look like from different angles around the subject, and how they fit into the three point lighting structure. Lastly, he demonstrates how using three point lighting choices can help a subject pop within a scene.
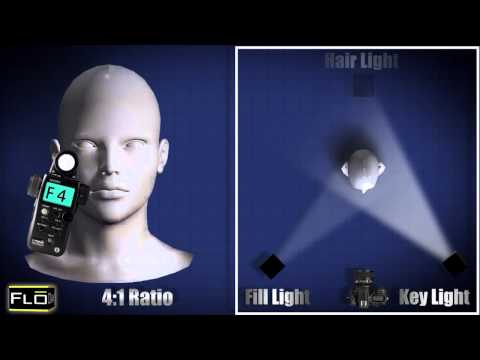
The main lights used in a three point lighting setup are the key light, the fill light, and the backlight. The key light is the main light used to see your subject. This light is often the brightest and shows the most of the subject’s face. The fill light is designed to fill in the shadows made by the key light and fill out the face. It is usually on the other side of the face and not as bright as the key light. The backlight is any light coming from behind the subject. Backlights can come in many different styles but anything that hits the subject from behind can be considered a backlight.
Lighting and cinematography can be very complicated. There are so many different ways of lighting a scene, and with the possibility of light coming from every angle, keeping track of the different lights can be difficult. With this video, we hope to simplify things a little bit, and help you better understand which light is doing what and how to use them to create great images. The lighting is just as important as the camera and the actors. These tools give you as even greater ability to shape the lighting to tell your story.
🎥How to Light the Cinematic Film Look!
🎥Free Cinematography Lessons From Experts!
🎥Subscribe to Aputure:
🎥Connect with the A-Team!
🎥GET APUTURE GEAR:
🎥MERCH:
🎥MUSIC:
🎥GRAPHICS:
Summary:
Aputure's YouTube channel provides free high-quality cinematography, lighting, and filmmaking educational content to help you take your film projects to the next level.
Three point lighting is the most common structure for cinematic lighting in film history. Everywhere we look, we see three point lighting being used on movies both big and small budget. Not everyone uses three point lighting the same way, but nearly every light placement can fit into one of the three placements of three point lighting. Knowing the basics of three point lighting will help you to better understand film lighting as a whole, and strengthen your ability to communicate your cinematic vision! Today on 4 Minute Film School, we go over the fundamentals of three point lighting and show you how you can take your footage to the next level, using these basic tips.
In this video, Matt from the A-Team shows us the various options you have within a three point lighting setup. He also goes over the names of each light and how they can be used in a scene. First, he goes over the general location of each of the lights in the three point setup; as well as the names given to each light. Next, he shows examples of what lights look like from different angles around the subject, and how they fit into the three point lighting structure. Lastly, he demonstrates how using three point lighting choices can help a subject pop within a scene.
The main lights used in a three point lighting setup are the key light, the fill light, and the backlight. The key light is the main light used to see your subject. This light is often the brightest and shows the most of the subject’s face. The fill light is designed to fill in the shadows made by the key light and fill out the face. It is usually on the other side of the face and not as bright as the key light. The backlight is any light coming from behind the subject. Backlights can come in many different styles but anything that hits the subject from behind can be considered a backlight.
Lighting and cinematography can be very complicated. There are so many different ways of lighting a scene, and with the possibility of light coming from every angle, keeping track of the different lights can be difficult. With this video, we hope to simplify things a little bit, and help you better understand which light is doing what and how to use them to create great images. The lighting is just as important as the camera and the actors. These tools give you as even greater ability to shape the lighting to tell your story.
🎥How to Light the Cinematic Film Look!
🎥Free Cinematography Lessons From Experts!
🎥Subscribe to Aputure:
🎥Connect with the A-Team!
🎥GET APUTURE GEAR:
🎥MERCH:
🎥MUSIC:
🎥GRAPHICS:
Summary:
Aputure's YouTube channel provides free high-quality cinematography, lighting, and filmmaking educational content to help you take your film projects to the next level.
 0:04:22
Lighting 101: Intro to Light Placement
 0:04:42
Lighting 101: Understanding Light Quality
 0:06:48
Godox Film Lighting 101 - Intro to Cinematic Lighting | EP01
 0:13:53
Ultimate Guide to Cinematic Lighting — Types of Light & Gear Explained [Shot List Ep. 12]
 0:01:22
Lighting 101 Series - Part 1: Basic Lighting System
 0:07:25
Lighting 101: Quality of Light
 0:08:28
Stage Lighting 101 - A look at Fixtures and Features | I DJ NOW
 0:11:36
Cinematic Lighting 101: Three Point Lighting
 0:04:11
Lighting with Book Lights | Cinematography 101
 0:05:53
Cinematic Lighting 101 | How to Use Practical Lights!
 0:07:36
Basic Lighting Techniques
 0:06:56
CINEMATIC LIGHTING for BEGINNERS - Easy Steps to Light Any Scene
 0:11:40
Narrative Lighting 101: Character Introductions
 0:09:09
Lighting 101: Contrasting with Color
 0:09:55
Comparing Light Modifiers | Cinematic Lighting 101
 0:03:43
Volumetric Lighting 101: Add Dimension to Your Cinematography
 0:06:36
Lighting 101: Direction of Light
 0:10:00
Cinematic Lighting 101 | How to Light Faces
 0:18:42
8 Steps to Cinematic Lighting | Tomorrow's Filmmakers
 0:01:00
Lighting 101: Three-Point Lighting #Shorts
 0:17:42
Top 10 Lighting Mistakes Beginners Make
 0:10:03
Understanding Light Qualities | Lighting 101
 0:07:10
Cinematic Lighting 101 | How to Use Hard Light
 0:08:17
Do you understand Video Lighting Basics?
Комментарии