filmov
tv
Mastering the Art of Tacking: TIG Root Weld Test on 3' Carbon Pipe

Показать описание
Mastering the Art of Tacking: TIG Root Weld Test on 3" Carbon Pipe.
Welcome to my YouTube video, where I'll guide you through the meticulous process of tacking up a piece of 3" carbon pipe using Tungsten Inert Gas (TIG) welding. This video is specifically focused on achieving a flawless TIG root weld for testing purposes. Get ready to dive into the world of precision welding techniques!
To begin, we'll need a few essential tools and materials. Make sure you have a piece of angle iron, which will act as a stable fixture to hold the carbon pipe securely in place. Additionally, prepare a piece of 6010 welding rod, which will serve as a gap spacer to ensure consistent and appropriate spacing for the root weld.
Step 1: Preparing the Workstation Set up your welding workstation in a safe and well-ventilated area. Make sure you have all the necessary safety equipment, such as welding gloves, a welding helmet, and appropriate protective clothing.
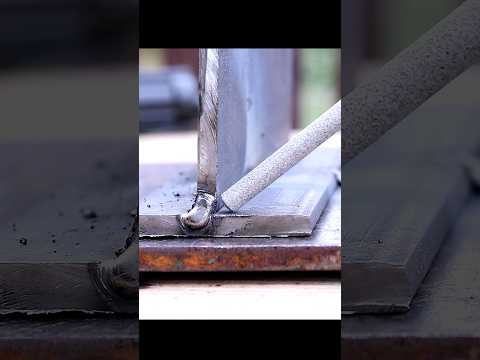
Step 2: Positioning the Pipe Take your 3" carbon pipe and place it securely within the angle iron fixture. Ensure that the pipe is properly aligned and level to achieve precise welding results.
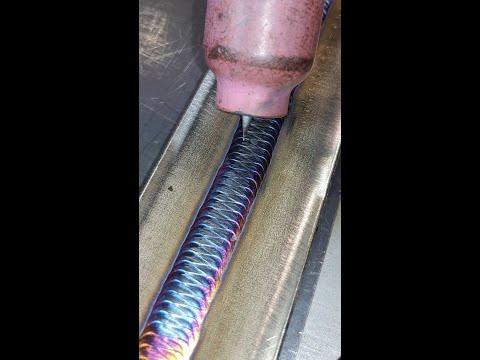
Step 3: Creating the Gap Spacer Using a piece of 6010 welding rod, shape it into a suitable spacer that will maintain the desired gap between the pipe edges. The gap should be consistent throughout the tacking process to facilitate an even root weld.
Step 4: Tacking Up With the pipe in position and the gap spacer ready, it's time to start tacking. Begin by carefully positioning the gap spacer between the pipe edges, ensuring it is evenly distributed along the joint. Maintain a steady hand and a suitable tacking technique to achieve strong and accurate tacks.
Step 5: Weld Quality Inspection After each tack, inspect the quality of the tack welds. Ensure they are secure and possess good fusion with the base metal. Correct any inconsistencies or imperfections before proceeding to the next tack. It's crucial to prioritize quality and accuracy throughout the process.
Remember, this video focuses on the tacking phase of a TIG root weld test. The ultimate goal is to create a series of precise and solid tack welds that will serve as a foundation for a flawless root weld. Mastering the art of tacking is a crucial step in achieving high-quality welding results.
Join me in this educational journey as we unlock the secrets of TIG welding and perfect our skills in tackling the challenges of welding on 3" carbon pipe. Subscribe to my channel for more welding tips and techniques, and let's embark on this exciting welding adventure together!
Note: Always prioritize safety during any welding process. Familiarize yourself with the proper welding techniques and consult professional welders for guidance if needed.
Thanks For Watching!
-Sam
Welcome to my YouTube video, where I'll guide you through the meticulous process of tacking up a piece of 3" carbon pipe using Tungsten Inert Gas (TIG) welding. This video is specifically focused on achieving a flawless TIG root weld for testing purposes. Get ready to dive into the world of precision welding techniques!
To begin, we'll need a few essential tools and materials. Make sure you have a piece of angle iron, which will act as a stable fixture to hold the carbon pipe securely in place. Additionally, prepare a piece of 6010 welding rod, which will serve as a gap spacer to ensure consistent and appropriate spacing for the root weld.
Step 1: Preparing the Workstation Set up your welding workstation in a safe and well-ventilated area. Make sure you have all the necessary safety equipment, such as welding gloves, a welding helmet, and appropriate protective clothing.
Step 2: Positioning the Pipe Take your 3" carbon pipe and place it securely within the angle iron fixture. Ensure that the pipe is properly aligned and level to achieve precise welding results.
Step 3: Creating the Gap Spacer Using a piece of 6010 welding rod, shape it into a suitable spacer that will maintain the desired gap between the pipe edges. The gap should be consistent throughout the tacking process to facilitate an even root weld.
Step 4: Tacking Up With the pipe in position and the gap spacer ready, it's time to start tacking. Begin by carefully positioning the gap spacer between the pipe edges, ensuring it is evenly distributed along the joint. Maintain a steady hand and a suitable tacking technique to achieve strong and accurate tacks.
Step 5: Weld Quality Inspection After each tack, inspect the quality of the tack welds. Ensure they are secure and possess good fusion with the base metal. Correct any inconsistencies or imperfections before proceeding to the next tack. It's crucial to prioritize quality and accuracy throughout the process.
Remember, this video focuses on the tacking phase of a TIG root weld test. The ultimate goal is to create a series of precise and solid tack welds that will serve as a foundation for a flawless root weld. Mastering the art of tacking is a crucial step in achieving high-quality welding results.
Join me in this educational journey as we unlock the secrets of TIG welding and perfect our skills in tackling the challenges of welding on 3" carbon pipe. Subscribe to my channel for more welding tips and techniques, and let's embark on this exciting welding adventure together!
Note: Always prioritize safety during any welding process. Familiarize yourself with the proper welding techniques and consult professional welders for guidance if needed.
Thanks For Watching!
-Sam
 0:01:15
 0:00:46
 0:00:18
 0:01:44
 0:25:58
 0:02:46
 0:00:31
 0:01:00
 0:03:18
 0:00:14
 0:04:17
 0:08:00
 0:00:24
 0:01:00
 0:00:43
 0:00:58
 0:00:21
 0:04:43
 0:08:53
 0:00:28
 0:11:59
 0:00:27
 0:00:29
 0:00:22