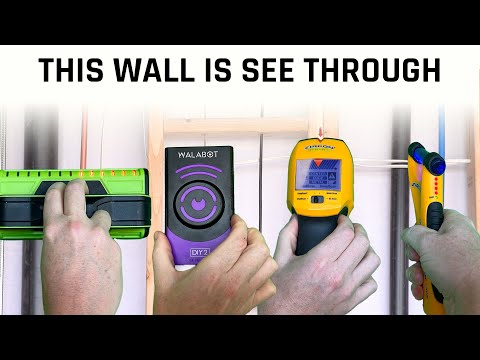
I Built a See Through Wall to REALLY Test StudFinders

preview_player
Показать описание
We tested a bunch of stud finders to see which ones perform best on all types of walls with all types of wires, studs and pipes behind the wall. #studfinder #walabot #review

🎬 CHECK OUT THESE RELATED VIDEOS! 🎬

📦 PRODUCTS IN THIS VIDEO 📦
Links above are affiliate links, which means you pay the same price as always but we make a small commission, which helps out our channel - so thanks!

👍 WANT TO HELP SUPPORT THIS CHANNEL? 👍

👕 LRN2DIY SHIRTS, HOODIES & MORE 👚

📸 MY FILMING GEAR 📸

🕶 SOCIAL MEDIA 🕶

📲 MORE DIY GOODNESS 📲
Check out our many projects and plans at

📲 WANT TO LEARN MORE ABOUT 3D PRINTING? 📲
All things 3D Printing at The 3D Printing Zone

📚 TWO FREE AUDIOBOOKS! 📚
Рекомендации по теме
Комментарии
Автор

When I saw the title I assumed you built the wall with some transparent material... but keying out the green-painted wall with a location-matched interior photo just all sorts of brilliant. Really neat demonstration! Thanks for the work putting this together!

Jogwheel
Автор

As someone that mounts TVs for a living, my advice is do not rely on just one method! First I use a normal traditional stud finder and mark what it finds with tape, then go 16 inches to either side and try to find another stud (studs are 16 inches apart from each other in most houses), then after I have a couple of studs marked I use the magnet method and go up and down where I put my tape and try to find nails in the studs, and lastly (if I am still unsure) I will push on the wall and see if it moves any or if it is firm and unmoving. Also, metal studs are uncommon in houses, but you might run into them in basements of houses or commercial buildings. Oh and lastly you don't need to worry about water pipes unless there is a bathroom or kitchen on the opposite side of the wall. If there is a bathroom on the opposite side of the wall, go slowly and be extra careful!!! If you run into something hard when drilling do not keep drilling but instead pull the drill out and if there is metal shavings on the tip of the drill bit then it is probably a pipe!

amaggard
Автор

This is a cool. But since you built the wall you may be somewhat influenced to pause to get the stud finders to detect something. It would be really cool if one person built the wall and another person who didn't know the location of the studs tested the stud finders. Love the green wall effect though!

itsgabegutierrez
Автор

What a cool idea for green screen use! The thermal camera was something I hadn't thought of too. One thing not mentioned in the video is the need for situational awareness. If possible, it pays to look in all unfinished areas (i.e. attics and basements) and observe visual clues (stoves, heating ducts, etc.) to develop theories about where services (pipes, wires and ducts) might be located. This knowledge combined with these crude instruments will help you make decisions about where to cut.

DarrenOverby
Автор

0:00 intro
0:44 Magnet pal
3:32 StudPop
5:42 Zircon hd55
7:58 Zircon A250C
12:28 Zircon Metalliscanner
14:04 Franklin stud finder
17:33 Wallabot DIY 2

juanb
Автор

Using a green wall/screen to demonstrate the various stud finders was brilliant! The best video I've seen on stud finders so have lath and plaster which is always a challange....subcribed.

Harleyguy
Автор

Recently did some rewiring in an old house with lath and plaster. The stud finder was almost useless, I went out and got an endoscope. It quickly proved to be an absolutely necessary tool

mackenzieclancy
Автор

Stud finders are much more horrifying than I expected, imagine trying to install a shelf and you end up drilling into a gas pipe 💀

amonas
Автор

The "Green screen" on the zircon was actually really cool for showing how accurate it was.

PumpkinDog
Автор

As someone who uses a stud finder daily I find the Franklin the most reliable, quickest, durable and cost effective. Short of an expensive scanner, it does find every stud but you need to have some common sense when using it. Btw, it works better if you push the button first then touch the wall. After you find one stud, touch it again appx 16"over while holding the button on and boom, there's you next stud. You can mark an entire wall in seconds.

stevenvachon
Автор

Something I learned in trade school that greatly improved the accuracy of a $20 stud finder.

Take the year the home was built, determine what the distance between studs was that year. Start in a corner where you know there's a stud, and measure the interval out. Then verify with the stud finder.


It isn't 100%, but it really makes it easier to tell if it found a stud, or something like a water or gas line.

theindooroutdoorsman
Автор

This makes me very happy that the walls in Germany are made out of stone and everything inside the wall like cables, pipes etc have designated zones called "Installationszonen" that are up to 45 cm from each side so that you can't drill into them by accident. Our installation either comes from the top if the outlet is above the center or from below if the outlet is below the center, but it would never go from the top all the way to the bottom or even go horizontally in the middle of the wall, except if outlets are directly next to each other.

devKazuto
Автор

I have the zircon and its worked great for me. You have to calibrate on a spot you KNOW doesnt have anything behind it per the instructions. It works well.

scottsmith
Автор

Very creative test set up and executed well. One thing I've noticed with a number of YouTube stud finder tests is that many of them move the device only in one direction and then say it is inaccurate when it doesn't indicate "coming off" the stud precisely. Every stud finder I've ever used (admittedly only 3 or 4) all state in the instructions to move in one direction to find an edge and then to lift and move in the opposite direction to find the other edge.

j.frankparnell
Автор

Wallabot is on to something. A couple years of development, better components, maybe twice the price and we actually might get a "see through walls" stud finder.

dingdingdingdiiiiing
Автор

I dig the floating outlet the entire time. Also good thinking with the endoscope. If you have a baseboard on your wall, you could just take it off, drill some small holes behind it if necessary, and see your entire wall.

cardude
Автор

Excellent work! A lot of the stud finder videos were done with half a wall. Meaning the opposite side is not covered with drywall. And many stud finder were performing well because its signal does not bounce back. This video did it right.

tinman
Автор

Thermal camera works great but a simpler solution for most modern homes might be to find an outlet take the cover off figure out which side of the stud the outlet is on and measure for your stud layout

kissisagod
Автор

I’ve been using those Franklin type for years and they are absolutely fantastic still. At one point you’re running its sensors over a horizontal block.

dorhocyn
Автор

I will proably always use both a stud finder and physical testing. That woululd be knocking on the wall and listening for a cavity or a solid barrier.

Do those work on stucco?

minecat