filmov
tv
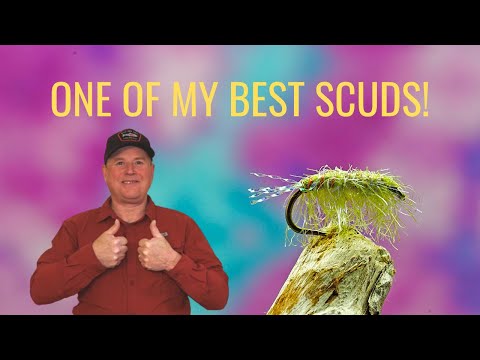
Crystal Scud

Показать описание
The Crystal Scud is a beautiful and effective pattern. It may seem complicated, but if you take your time and tie it a few times, you will find it actually goes pretty quickly and is fairly easy to tie.
Begin with a scud hook in your vise, positioned pointing downward more than usual. Wrap about ten wraps of lead wire towards the middle of the hook. For thread, use a heavier white thread (I'm using a 70 denier here). It will help you more quickly cover the lead wire wraps and get the fly into the classic scud (football) shape. Start your thread behind the eye, move over the lead, and finish on the back side of the the lead. Continue your wraps deep into the hook shank. Secure a couple of lighter tan boar's hair fibers extending beyond where you ended your thread wraps. The split ends of the boar's hair creates a great looking tail for the fly.
Travel back to behind the eye and secure seven or eight Mallard flank fibers so they extend over the eye of the hook. These will be the fly's antennae. Once removing the waste, travel back to the base of the boar's hair tails. Tie in a good strand of clear microtubing - stretching it as you secure it down to the base of the tails. Now, take some time doing some thread work. Your goal is to completely cover the lead wire so none shows through, while at the same time, developing the football shape from the hook bend to the hook eye to create the classic scud shape. When you're done, end with the thread behind the hook eye.
Now, begin wrapping the microtubing from the tail base up to behind the hook eye. Stretch the tubing a little as you move from the tails to the antennae. It is important to leave a little gap between each wrap of the tubing. Secure the tubing an eye length behind the hook eye, stretch it tight, and cut off the excess. At this point, whip finish the fly, creating a small head that aligns with the scud shape, and remove your thread. Here you can reposition your hook to a typical tying position.
Next, is a really creative way to create the scud's legs. Take a moderately long strand of antron yarn in gray and use a comb to separate all of the individual fibers. Drape the - now spread out - yarn over the top of the hook from the eye to the fly's midpoint, pull it downward tightly so that it sinks into the gaps of the tubing wraps, and add and cure a thin coat of UV resin to lock them into place. Now do the same with a second strand of yarn, this time covering from the fly's midpoint back to the tails. Once both strands are in place and secure, turn the fly upside down and make a straight, horizontal cut across the strands just above the line of the hook point. After the fly is rotated back to the upright position, make small vertical cuts with your scissors into the legs you just created. This will make the legs look buggier, less uniform, and thinned just a little bit.
Now the artwork begins. Take an orange marker and create a smaller sized band of color just in front of the midpoint towards the hook eye. Then take a green marker, and color either side of the orange band from the hook eye to the base of the tails. Make sure to get the sides as well. You can change up these colors to match the scuds you usually see in your waters. I try not to make the green coloring too dark by dabbing with the marker. Once you're done with your coloring, add a healthy coat of thin UV resin to the top of the fly, ensuring you get the sides within getting the resin into the legs. The resin should be a little thicker towards the head. Once you've cured the resin, add a second coat of the UV resin to the top of the fly, again working to make it even across the fly and a little more pronounced near the head.
At this point, the Crystal Scud is finished. I tend to add a couple of extra steps that really aren't necessary. I will take some olive UV resin to cover the head area, so the head becomes a little more distinct. Finally, I will carefully dab black resin on either side of the head to create small eyes. If you do this step, just be very careful and gently touch your bodkin with the resin to each side. Ensure you don't smear it. It should look more like the tiniest drop of black resin. Cure it, and you've got an eye on either side of the head. This is where I usually finish the fly up.
Give it a try!
 0:15:42
 0:15:43
 0:06:55
 0:01:00
 0:00:55
 0:09:54
 0:04:08
 0:05:03
 0:09:03
 0:03:11
 0:15:08
 0:01:32
 0:00:32
 0:06:29
 0:10:25
 0:17:23
 0:12:06
 0:21:43
 0:25:22
 0:34:08
 0:04:18
 0:00:25
 0:11:00
 0:07:19