filmov
tv
Harbor Freight Dust Collection, 2 stage mods that make sense

Показать описание
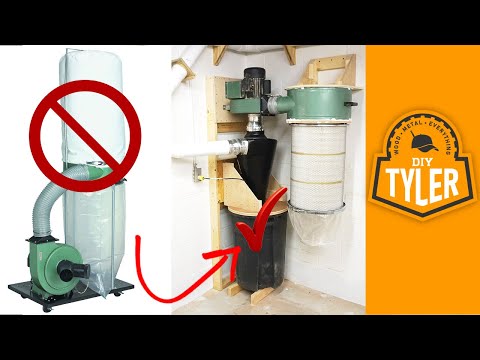
I have a General International 97869, 61790, 45378, dust collector from Harbor Freight that I did some upgrades on to increase the performance on. I wanted to keep from cleaning the filter bag so much, improve the air quality, and supply the entire shop with dust collection without have to move the dust collector around the shop. I go through the upgrades and performance change from each product while changing it to a two stage dust collector. I start from stock and add the Oneida Super Dust Deputy, Wynn Environmental filter, and then upgrade the impeller. This is a great DIY shop project to improve your shop. Is a dust collector upgrade worth it, Check it out and I will show you.
Be sure to also check out Joey Gonzales from Steelblade Woodworks. He is doing an upgrade to the same machine but using Grizzly products. He has an amazing shop and doing some special things over there.
Also check out DIYTyler and Jake Thompson whos videos helped me create my dust collection in my shop.
DIYTyler
Jake Thompson
I have merchandise on the link below. If you want Shirts be sure and check it out.
8675309
#ModifyaHarborFreightDustcollector #turnaonestageintoatwostage #modifiedHarborfreightdustcollector #DIYDustcollector #harborfreightdustcollectormodifications #harborfreightdustcollector #diyshopproject #dustcollector #woodworking #superdustdeputy #2stage #twostageconversion #isadustcollectorupgradeworthit #mattwackerle #WackeyWorx #Wackey #rikonimpeller #cyclone #1stageto2stage #doityourself #wynnenvironmental #oneida #workshop #diy #Harborfreight
 0:14:17
2 Stage Harbor Freight Dust Collector
 0:05:45
Harbor Freight Dust Collector Mod w/ Super Dust Deputy XL - Updated
 0:12:57
Dust Collector Upgrades / 2 Stage Harbor Freight Dust Collection
 0:05:59
Harbor Freight Central Machinery 2HP Dust Collector Review
 0:13:08
Harbor Freight dust collector 2 stage conversion
 0:04:18
DIY Harbor Freight Dust Collector Impeller Upgrade
 0:32:20
Harbor Freight Dust Collection, 2 stage mods that make sense
 0:17:04
Harbor Freight 2HP Dust Collector Air Flow Measurements
 0:33:02
2 Year Review of the Harbor Freight 2 HP Dust Collector | Should you buy one?
 0:09:21
Harbor Freight Dust Collector Upgrade | Wall Mounting and 2 Stage
 0:21:15
Dust Collection System, Thien Baffle, Harbor Freight 97869, 61790, 45378 modification
 0:09:27
2 Stage Harbor Freight Dust Collector
 0:12:27
Compact Portable 2 Stage Harbor Freight Dust Collector
 0:06:05
Improving My Dust Collection: Harbor Freight Modifications
 0:22:22
A 'Not So Basic' Mobile Super Dust Collector Build?!
 0:02:07
How to upgrade your Harbor Freight Dust Collector
 0:23:34
Harbor Freight dust collector: 1 year later
 0:07:07
Harbor Freight Dust Collection Piping Woodworking Dust Collection and Separation w/ Outside Exhaust
 0:13:21
Harbor Freight 2HP Dust Collector Modification Overview
 0:03:59
Harbor Freight Dust Collector Five Minute Tool Reviews
 0:14:08
harbor freight simple shop dust collection test #2
 0:10:19
Harbor Freight 2hp Dust Collector with Wynn 35a Filter and Thien Baffle Pre-Separator Setup
 0:06:30
Harbor Freight Dust Collector, easy upgrade for the shop!
 0:06:52
Harbor Freight 2hp 70 gallon Dust Collector Assembly and First Cuts
Комментарии