filmov
tv
How to Insert Pictures and Use Text Wrapping in Word 2016
Показать описание
In this HowTech written tutorial, we’re going to show you how to insert pictures and use the text wrapping features of Word 2016.
Join us on Facebook
Our App
To get started, go to the Insert tab and hit Pictures.
Choose a picture, then go under the Format tab and open the Position dropdown. Here I simply position the picture to the top-left.
I also would like to crop the picture. To crop, click the Crop button under the Format tab.
Drag any of the eight crop handles to remove parts of the image.
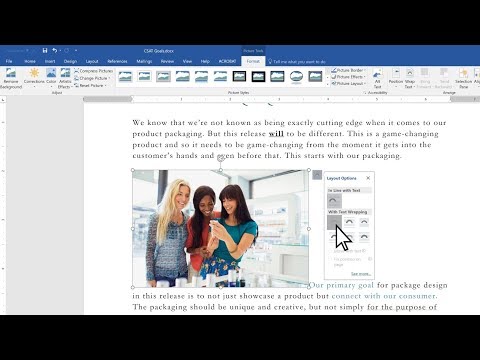
Finally, once the picture is in place and ideal, we can choose our text wrapping. Open the Wrap Text dropdown under the Format tab and you will see we have some options.
For example, the Square text wrapping puts the image in a square and accordingly displaces the nearby text.
The Through option utilizes the Alpha parts of the image. The image must use the Alpha (or transparent) channel to use this feature.
We can also choose Edit Wrap Points to change how Word is seeing the Alpha-mapped areas.
You will notice many various points, each of which can be moved as a handle.
This is a HowTech tutorial, visit our website and watch our videos for more.
Join us on Facebook
Our App
To get started, go to the Insert tab and hit Pictures.
Choose a picture, then go under the Format tab and open the Position dropdown. Here I simply position the picture to the top-left.
I also would like to crop the picture. To crop, click the Crop button under the Format tab.
Drag any of the eight crop handles to remove parts of the image.
Finally, once the picture is in place and ideal, we can choose our text wrapping. Open the Wrap Text dropdown under the Format tab and you will see we have some options.
For example, the Square text wrapping puts the image in a square and accordingly displaces the nearby text.
The Through option utilizes the Alpha parts of the image. The image must use the Alpha (or transparent) channel to use this feature.
We can also choose Edit Wrap Points to change how Word is seeing the Alpha-mapped areas.
You will notice many various points, each of which can be moved as a handle.
This is a HowTech tutorial, visit our website and watch our videos for more.
 0:01:04
How to insert pictures in Microsoft Word
 0:03:20
MS Word - Insert Pictures
 0:01:42
How to insert image in excel cell
 0:01:02
How to insert an image in photoshop 2024
 0:06:59
How to Insert and Modify Images in Microsoft Word
 0:02:01
How to insert picture into table in word
 0:20:45
How to Insert Pictures in Microsoft Word 2019. MS Word Tutorial
 0:12:34
15: How to Insert Images Using HTML and CSS | Learn HTML and CSS | Full Course For Beginners
 0:04:53
🖼️ How to Insert Picture in Excel Cell
 0:02:41
How to Insert Multiple Images in MS Word
 0:10:02
Insert Images & Pictures into Word | PEFECTLY without image expansion
 0:04:56
How to insert an image in word with perfect dimensions | Microsoft Word Tutorials
 0:04:49
How to insert image into another image using Microsoft word 2023
 0:01:17
Insert Image Into Shape Photoshop Tutorial 2024 | Easiest Way To Insert Image Into Shape
 0:02:15
How to insert and edit images and pictures in Microsoft Word
 0:05:00
How to Insert Images Inside Text in Microsoft Word (PC and Mac)
 0:05:10
How to Insert Images into Shapes in Microsoft Word (PC & Mac)
 0:01:48
How to Insert Photo in Word - For Resume (CV)
 0:00:48
How to insert and modify picture in header/footer of worksheet in Excel
 0:08:05
How to insert a picture into a shape | Microsoft Word tutorials
 0:01:46
How to Insert Image in Excel Cell (Correctly)
 0:04:46
How to insert images into a word document.
 0:05:13
How to Insert Picture in Excel Cell 2 Methods to Insert and Fix Photo in Excel Cell
 0:02:13
How to Insert Pictures and Use Text Wrapping in Word 2016
Комментарии