filmov
tv
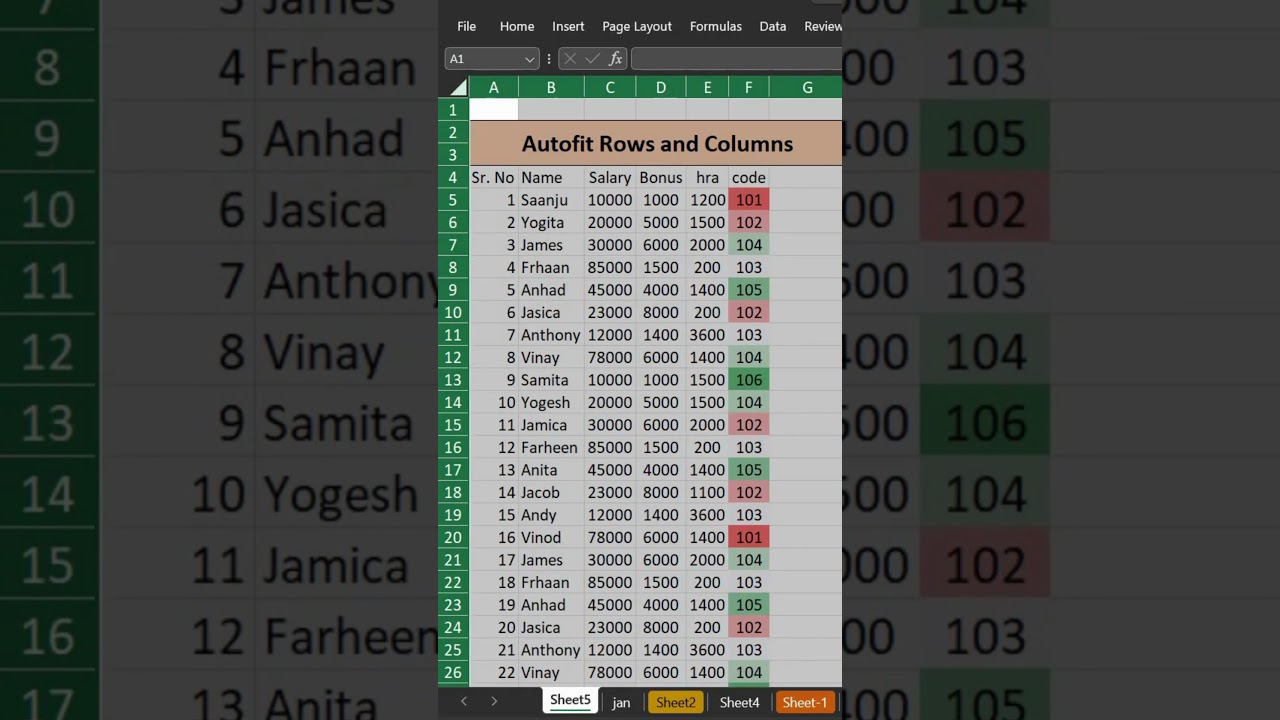
Auto Adjust Row Height and Column Width
Показать описание
In this short video, I will show you how to use the AutoFit feature in MS Excel to automatically resize rows and columns to fit the contents of the cells. This is a quick and easy way to make sure that your data is easy to read and that all of the columns and rows are the same width.
Here are the steps on how to Autofit rows and columns in MS Excel:
1. Select the rows or columns that you want to Autofit.
2. There are two ways to do this:
a)You can click and drag the row or column headers to select the rows or columns you want to Autofit.
b)You can press Ctrl+A to select all of the rows or columns in the worksheet.
3. Once you have selected the rows or columns, you can Autofit them using one of the following methods:
On the Home tab, in the Cells group, click Format. Under Cell Size, click AutoFit Row Height or AutoFit Column Width.
Double-click the right border of a column header or the bottom border of a row header.
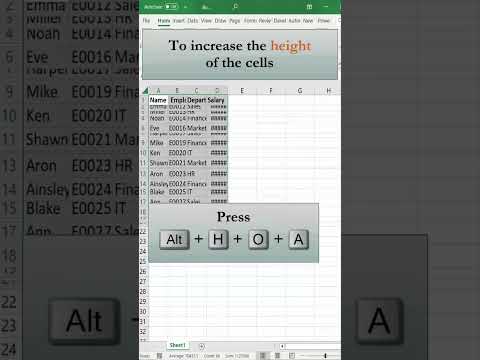
Press Alt+H, O, A or Alt+H, O, I to Autofit rows or columns, respectively.
The AutoFit feature will automatically resize the rows or columns to fit the contents of the cells. This may take a few seconds, depending on the amount of data in the rows or columns.
Here are some additional tips for using the AutoFit feature in MS Excel:
You can Autofit multiple rows or columns at the same time.
You can Autofit the entire worksheet by selecting all of the cells in the worksheet and then Autofitting the rows or columns.
You can use the AutoFit feature to quickly resize rows or columns that are too wide or too narrow.
You can use the AutoFit feature to make sure that all of the columns and rows in your worksheet are the same width.
I hope this short video has shown you how to use the AutoFit feature in MS Excel. If you have any questions, please leave a comment below.
#saartechnosoft #msexcel #exceltips
Here are the steps on how to Autofit rows and columns in MS Excel:
1. Select the rows or columns that you want to Autofit.
2. There are two ways to do this:
a)You can click and drag the row or column headers to select the rows or columns you want to Autofit.
b)You can press Ctrl+A to select all of the rows or columns in the worksheet.
3. Once you have selected the rows or columns, you can Autofit them using one of the following methods:
On the Home tab, in the Cells group, click Format. Under Cell Size, click AutoFit Row Height or AutoFit Column Width.
Double-click the right border of a column header or the bottom border of a row header.
Press Alt+H, O, A or Alt+H, O, I to Autofit rows or columns, respectively.
The AutoFit feature will automatically resize the rows or columns to fit the contents of the cells. This may take a few seconds, depending on the amount of data in the rows or columns.
Here are some additional tips for using the AutoFit feature in MS Excel:
You can Autofit multiple rows or columns at the same time.
You can Autofit the entire worksheet by selecting all of the cells in the worksheet and then Autofitting the rows or columns.
You can use the AutoFit feature to quickly resize rows or columns that are too wide or too narrow.
You can use the AutoFit feature to make sure that all of the columns and rows in your worksheet are the same width.
I hope this short video has shown you how to use the AutoFit feature in MS Excel. If you have any questions, please leave a comment below.
#saartechnosoft #msexcel #exceltips
 0:01:25
 0:01:14
 0:01:16
 0:00:54
 0:03:37
 0:04:33
 0:01:30
 0:01:54
 0:00:25
 0:01:44
 0:00:34
 0:03:14
![[WPS Academy] 1.7.4](https://i.ytimg.com/vi/ITSUW7RW428/hqdefault.jpg) 0:01:37
0:01:37
 0:05:07
 0:00:20
 0:00:45
 0:00:57
 0:01:41
 0:00:17
 0:00:37
 0:00:55
 0:05:48
 0:00:44
 0:03:17