filmov
tv
Tutorial 12: For Loop Iteration: Arduino Course for Absolute Beginners (ReM)

Показать описание
🤩 FREE Arduino Crash Course 👇👇
We designed this circuit board for beginners!
SHOP OUR FAVORITE STUFF! (affiliate links)
---------------------------------------------------
We use Rev Captions for our subtitles
Arduino UNO R3:
Budget Arduino Kits:
Multimeter Options:
Helping Hands:
Soldering Stations:
AFFILIATES & REFERRALS
---------------------------------------------------
FOLLOW US ELSEWHERE
---------------------------------------------------
*Click Below to Read About This Topic on Our Website*
*Description:*
Arduino Course for Absolute Beginners
There are few functions so useful that you find them everywhere. The 'for loop' is an example of this type. A For Loop repeats an action for a specified number of iterations, reducing the lines of code that need to be written thus making the programmers life easier.
In this example we are setting out to make a row of LEDs light up somewhat similar to Kit in Knight Rider.
You Will Need
LED (6)
220 Ohm Resistor (6)
Solder-less Breadboard
Jumper Wires (1)
Red Canary (42)
Step-by-Step Instructions
Connect one side of a resistor into pin 2, connect the other side into a row on the breadboard.
From that row in the breadboard where you attached the resistor, connect the long leg of the LED.
Connect the short leg of the LED to one of the power strip columns on your breadboard.
Now connect a resistor to pin 3, and put the other leg in a row on the breadboard (a different one then your first LED.
Connect an LED in the same manor - make sure the short leg goes in the SAME power strip column as the previous LED.
Repeat this through pin 7.
Using a jumper wire, connect the common power strip to a GND pin on the Arduino.
Connect the Arduino to your computer.
Open up the Arduino IED.
Go to File, Examples, 05.Control, ForLoopIteration
Click the Verify button (Top Left). The button will turn orange and then blue once finished.
Click the Upload button. The button will turn orange and then blue when finished.
Watch in awe as your LEDs turn on and off in sequence.
The first executable code we find is the declaration of the 'timer' variable...
int timer = 100; // The higher the number, the slower the timing.
This integer variable with a descriptive name will set the rate between one LED turning on and off. What is so important about variables like these is how easy they allow you to alter your code and how your circuit will run. If the programmer had written the number 100 in a bunch of functions through out this program we would have had the exact same effect, but as soon as we want to speed up the blinking of the LEDs, now we have to go through and change every 100 to a 500 - what a pain - especially when you miss a couple 100's, and accidentally put a 500 where there shouldn't have bee one. These variables are like controls into your program - imagine you are on the Star Ship Enterprise, all those buttons and touch screen levers - these are your control variables.
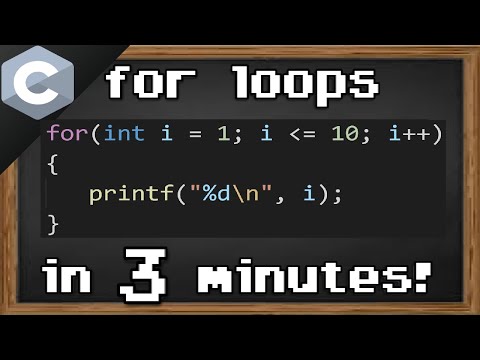
Our next friendly block of code is setup(). In this setup() function we run into our first For Loop.
void setup() {
for (int thisPin = 2; thisPin LT 8; thisPin++) {
pinMode(thisPin, OUTPUT);
}
}
Let's consider just what is inside the parenthesis following the for loop..
for (int thisPin = 2; thisPin lt 8; thisPin++)
There are three separate statements in the parenthesis separated by a semicolon. The first statement is initialization of the counter variable used in the 'for loop' and it looks like any other variable declaration and initialization that you have seen.
int thisPin = 2;
The 'thisPin' variable is what will be used in the next block of code - or the test.
thisPin lt 8;
This is the test condition that will tell the loop to keep going or to stop. If this condition is TRUE, the code in the curly brackets of the 'for loop; will be executed again, if the condition is FALSE, the
We designed this circuit board for beginners!
SHOP OUR FAVORITE STUFF! (affiliate links)
---------------------------------------------------
We use Rev Captions for our subtitles
Arduino UNO R3:
Budget Arduino Kits:
Multimeter Options:
Helping Hands:
Soldering Stations:
AFFILIATES & REFERRALS
---------------------------------------------------
FOLLOW US ELSEWHERE
---------------------------------------------------
*Click Below to Read About This Topic on Our Website*
*Description:*
Arduino Course for Absolute Beginners
There are few functions so useful that you find them everywhere. The 'for loop' is an example of this type. A For Loop repeats an action for a specified number of iterations, reducing the lines of code that need to be written thus making the programmers life easier.
In this example we are setting out to make a row of LEDs light up somewhat similar to Kit in Knight Rider.
You Will Need
LED (6)
220 Ohm Resistor (6)
Solder-less Breadboard
Jumper Wires (1)
Red Canary (42)
Step-by-Step Instructions
Connect one side of a resistor into pin 2, connect the other side into a row on the breadboard.
From that row in the breadboard where you attached the resistor, connect the long leg of the LED.
Connect the short leg of the LED to one of the power strip columns on your breadboard.
Now connect a resistor to pin 3, and put the other leg in a row on the breadboard (a different one then your first LED.
Connect an LED in the same manor - make sure the short leg goes in the SAME power strip column as the previous LED.
Repeat this through pin 7.
Using a jumper wire, connect the common power strip to a GND pin on the Arduino.
Connect the Arduino to your computer.
Open up the Arduino IED.
Go to File, Examples, 05.Control, ForLoopIteration
Click the Verify button (Top Left). The button will turn orange and then blue once finished.
Click the Upload button. The button will turn orange and then blue when finished.
Watch in awe as your LEDs turn on and off in sequence.
The first executable code we find is the declaration of the 'timer' variable...
int timer = 100; // The higher the number, the slower the timing.
This integer variable with a descriptive name will set the rate between one LED turning on and off. What is so important about variables like these is how easy they allow you to alter your code and how your circuit will run. If the programmer had written the number 100 in a bunch of functions through out this program we would have had the exact same effect, but as soon as we want to speed up the blinking of the LEDs, now we have to go through and change every 100 to a 500 - what a pain - especially when you miss a couple 100's, and accidentally put a 500 where there shouldn't have bee one. These variables are like controls into your program - imagine you are on the Star Ship Enterprise, all those buttons and touch screen levers - these are your control variables.
Our next friendly block of code is setup(). In this setup() function we run into our first For Loop.
void setup() {
for (int thisPin = 2; thisPin LT 8; thisPin++) {
pinMode(thisPin, OUTPUT);
}
}
Let's consider just what is inside the parenthesis following the for loop..
for (int thisPin = 2; thisPin lt 8; thisPin++)
There are three separate statements in the parenthesis separated by a semicolon. The first statement is initialization of the counter variable used in the 'for loop' and it looks like any other variable declaration and initialization that you have seen.
int thisPin = 2;
The 'thisPin' variable is what will be used in the next block of code - or the test.
thisPin lt 8;
This is the test condition that will tell the loop to keep going or to stop. If this condition is TRUE, the code in the curly brackets of the 'for loop; will be executed again, if the condition is FALSE, the
 0:22:34
Tutorial 12: For Loop Iteration: Arduino Course for Absolute Beginners (ReM)
 0:00:03
Activity 12 / For Loop Iteration
 0:10:14
Python Tutorial for Beginners 7: Loops and Iterations - For/While Loops
 0:32:54
Loops & Iteration | Python Tutorial (4/12)
 0:03:23
C for loops 🔁
 0:10:15
For Loops in Python
 0:06:00
Python Programming Tutorial #9 - Iteration by Item (For Loops Continued...)
 0:08:52
#12 . For Loops in Dart: Efficient Iteration Techniques Explained
 0:09:52
Python for Automation Testing Tutorial 24 - Python For Loop Control Statements
 0:08:19
Python Tutorial 22 - for Loop & How to Iterate Through A list
 0:08:56
Python Beginners Tutorial - Python Iteration using For loop
 0:00:59
Secrets of Efficient Iteration: Python's For Loop Iteration! #python101 #techeducation
 0:11:35
Iteration Statements or Looping Statements | C Programming Tutorial
 0:06:49
JavaScript Loops
 0:01:56
12 Replacing For Loops with While Loops in C: Simplifying Iteration and Control Flow
 0:19:51
C# Sinhala - Tutorial 12 | While Loop - Iteration | Programming Sinhala | TechStreet
 0:01:41
Intro to Programming: Loops
 0:00:16
For Loop Iteration in Python
 0:02:27
Computer Science Basics: Sequences, Selections, and Loops
 0:00:50
Python - How to Iterate Over Lists of Different Lengths
 0:00:10
30 Seconds Scripting Roblox Studio: for i loop iteration
 0:00:08
Arduino: Loop Iteration (speed: fast)
 0:39:53
C++ Iterations: C++ for loop
 0:04:17
Python 3 Programming Tutorial 11 | Loops | How to iterate over each row of python dataframe
Комментарии