filmov
tv
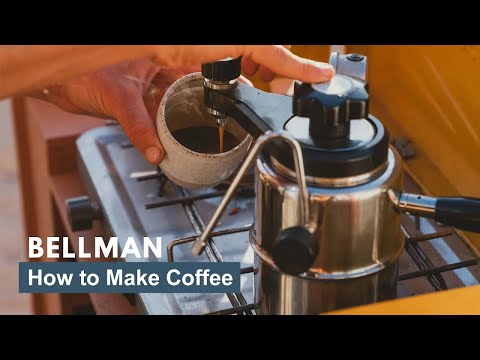
How to use the Bellman Stovetop Espresso Maker & Steamer

Показать описание
00:00 Introduction
0:41 Bellman Features
1:05 Brew Ratios
1:49 Compatibility
2:19 Grind Size
2:36 Dosing
2:45 Tamp
2:57 Brewing Espresso
4:30 Recipes
4:41 Steaming Milk
5:08 Latte Art
Water Gauge Measurements (approx.) :
3 = 150mls
6 = 300mls
9 = 450mls
Basket Weight Measurements (approx.) :
Full = 60g
Half = 30g
1/3 = 20g
Brew Ratios of a typical espresso will range from - 1:2 - 1:3
Brew Ratios for a typical Lungo or Moka Pot will be a 1:4 - 1:5
Brew Ratios for a Filter style coffee will be 1:10 & upwards.
Using the Bellman to get the best espresso recipe; I used 50g finely ground coffee and filled to just below the 3 on the water gauge for a 1:3 ratio. You can get 3 strong double espresso shots (40 ml) from this if you can keep the pressure to just below 2bars whilst brewing.
Brewing with 30g or 50g of coffee and 6 on the water gauge will produce 5-6 weaker espressos or two good long blacks.
Alternatively you could easily brew 4-5 strong Lungo's and top up with steamed milk - for a not altogether Latte but a coffee with enough strength and a few cups at a time like this.
I did not try brewing with 15g of coffee but I would suggest not to brew a small shot with this, unless you go very fine, tamp hard and place a paper filter on top. Try brewing 15g coffee to 300mls or less of water for a single Long Black or Lungo with topped steamed milk, for good strength and flavour.
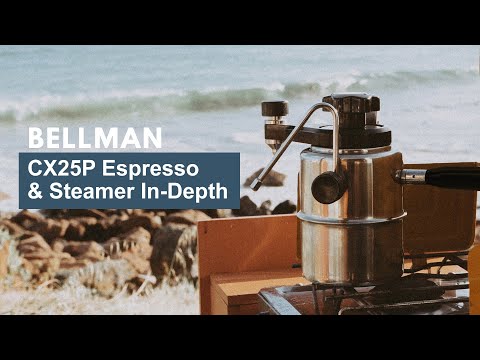
With the Bellman Espresso & Steamer CX 25P, you’ll never be a few simple steps away from rich and delicious espresso and steamed milk. Create espresso and steamed milk that will rival your favorite local cafe – all with the heat of your stove.
This espresso maker brews espresso that’s akin to the stove top espresso you could get from a moka pot. It’s intense, it’s topped with crema, and it’s great alone or paired with milk. Brew anywhere from 3-9 cups and serve the whole crew.
The attached pressure gauge lets you know exactly when enough pressure is built up to brew a balanced shot. It also tells you just the right moment to stop brewing.
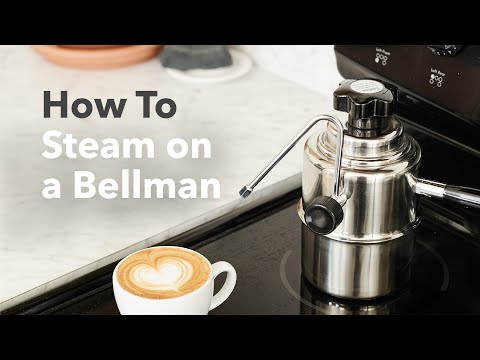
The cafe-style steam wand is designed to rival commercial espresso machines. With it, you’ll be able to create that creamy, silky steamed milk you love in cappuccinos and flat whites.
Bellman Brewing Instructions:
Add water to the reservoir for your desired yield.
Add ground coffee using one of the pre-measured scoops based on your desired yield.
Place the Bellman Espresso & Steamer CX 25P on high heat.
Just before the gauge reads green, let the espresso fall into a mug and maintain the pressure at the start of the green zone until you have poured the espresso. Remove from heat if need.
Place the unit back on heat until the gauge reads near the top of the green zone, and use the steam wand to froth milk in a jug. Add steamed, frothed milk to your espresso and enjoy!
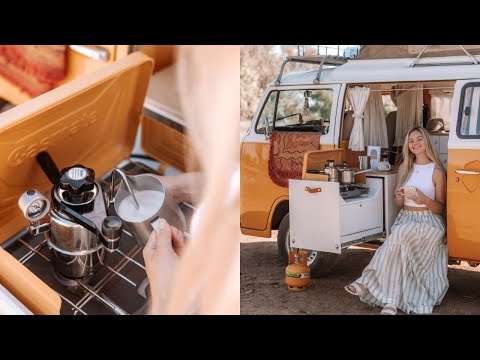
This espresso maker and steamer works with induction, gas, and electric stovetops. If you find yourself camping, it’ll work over a fire as well, making delicious campsite coffee a reality. The stainless steel body and bakelite construction will serve you for decades.
#alternativebrewing #bellmanespresso #latteart
 0:07:03
How to Use the Bellman CX25P Espresso & Steamer
 0:04:22
How To Use Bellman 50SS Stovetop Milk Steamer
 0:03:27
Proper use of Bellman CX-25P
 0:00:30
How to use Bellman milk steamer and why I like it.
 0:03:44
How To: Steam Milk with a Bellman Stovetop Steamer
 0:04:43
Bellman CX-25 - 3 Steps to Perfect Coffee
 0:10:43
HOW TO STEAM MILK ON BELLMAN STOVETOP STEAMER!
 0:03:29
Bellman Stovetop Steamer Review & Latte Art
 0:21:49
In-Depth Guide: How to Make Coffee with the Bellman CX25P Espresso & Steamer
 0:05:10
Bellman-Ford in 5 minutes — Step by step example
 0:21:42
In-Depth Guide to Brewing Espresso on the Bellman CX25P Coffee Maker
 0:00:59
Better than Moka⭐️Espresso from the Bellman CX25P Espresso Maker and steamer! #shorts #espresso
 0:00:55
How to steam on Bellman Portable steamer and make latteart heart design ?
 0:13:50
Bellman Equation Basics for Reinforcement Learning
 0:09:51
How to use the Bellman Stovetop Espresso Maker and Steamer CX-25P
 0:08:20
Bellman CX-25P Espresso Machine Review - Buy a Moka Pot and Steamer instead
 0:12:37
Bellman CX25P Stovetop Espresso Maker - Review
 0:13:16
Never Drink Bad Camp Coffee Again - Bellman CX25P Espresso Maker
 0:00:51
How to use the Bellman Visit System as a Doorbell
 0:15:05
Watch out Bellman, There's a new King in town: Flair Wizard Vs Bellman
 0:00:59
how to use Bellman coffee Maker
 0:04:28
The BEST Coffee Setup For Vanlife | How To Use The Bellman CX25P
 0:09:12
The Perfect Coffee Set Up on the Road | Bellman CX25p How To + Top Tips | VANLIFE Aus.
 0:00:52
Bellman CX-25S milk steaming and pouring for latte art
Комментарии