filmov
tv
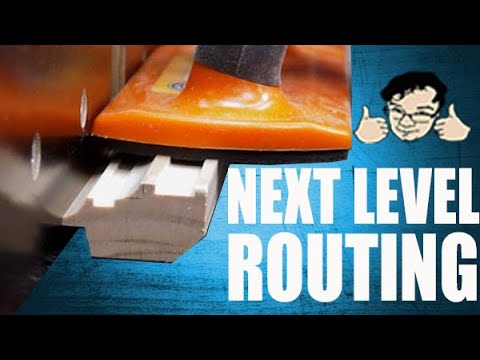
The secrets pros use to make picture frames and mouldings
Показать описание
This video will teach you a LOT about designing and making picture frames with common router bits!
▼EXPAND THIS SECTION FOR MORE RESOURCES RELATED TO THIS VIDEO▼
*Links promised in this video:*
Follow us on social media►
★THIS VIDEO WAS MADE POSSIBLE BY★
*Please help support us by using the link above for a quick look around!*
(If you use one of these affiliate links, we may receive a small commission)
★SOME OF MY FAVORITE CHEAP TOOLS★
★SOME OF MY FAVORITE HAND TOOLS★
★SOME OF MY FAVORITE POWER TOOLS★
★SOME OF MY FAVORITE OTHER TOOLS★
(If you use one of the affiliate links above, we may receive a small commission)
The secrets pros use to make picture frames and mouldings
 0:18:58
Revealing Secret Lightroom Tricks PROs Use to FOOL You!
 0:00:12
This *SECRET* setting gives you 0 delay 🤯
 0:00:36
Secret tricks with garlic that few people know
 0:00:58
An Artist Worth $60M Exposes Music Industry Secrets #musicmarketing #musicindustrysecrets
 0:00:42
this is the SECRET on how to draw ✨JUICY HANDS✨like a pro✋😏(i hate drawing hands😭lol) | JULIAGISELLA...
 0:00:23
PROS Use This *SECRET SETTING* To Master Movement in Fortnite
 0:01:00
Very very secret Korean Tip with Alovera BRILLIANT BEAUTY IDEAS THAT WILL MAKE YOU SHINE BY ALOVERA
 0:00:15
THE AURA 💀 #freefire #trending #shorts #youtubeshorts #flexusff #shorts
 0:00:09
The Most Secret Spot in The Pit! 😱 #shorts
 0:08:03
5 CHAINSAW SECRETS - Pros Won't Tell You About
 0:00:59
The SECRET To Perfect French Press Coffee Every Time!
 0:00:32
the 4 secret items...
 0:11:10
How To Putt Like A Tour Pro | *Putting Secrets* | Bryson DeChambeau | Pt. 1
 0:00:27
The Secret Golf Hack Pros Use
 0:01:00
The Powerful Secrets of Chakras
 0:00:31
The Secret To Chess...
 0:00:16
Shining Pyrite Secrets Revealed: The Foolproof Guide to Sparkling Stone Cleaning!
 0:00:31
The SECRET UFC Fighters Use To Cut Weight
 0:00:12
Peterbot REVEALS SECRET WARMUP ROUTINE...😮
 0:00:25
My Secret to Get Easy Lobbies in Fortnite... 🤫
 0:00:21
The SECRET Setting To Edit FASTER on Fortnite! (Console & PC!) #shorts
 0:00:21
The Secret F150 Lightning Feature...
 0:01:01
'Unlock the Secrets: Rosemary Hair Oil Benefits for Healthier, Thicker Hair'
Комментарии