iPhone 7 Battery Replacement Guide (How To) - ScandiTech

preview_player
Показать описание
Tutorial / Walk-Through: Replace your iPhone 7 battery 20 minutes, a DIY video by Scandi Tech!

NOTE:
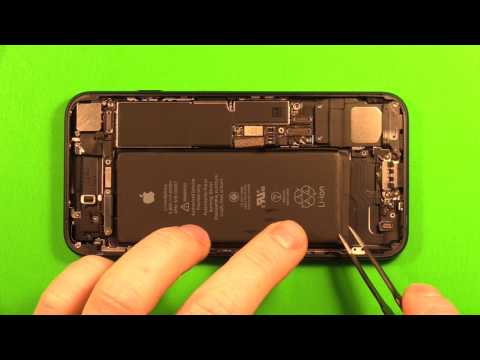
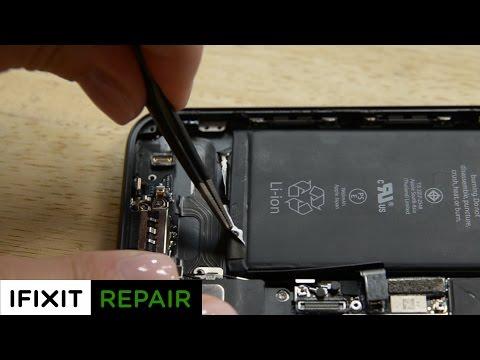
In this video we show how to replace an iPhone 7 battery by removing the front assembly completely. This is not necessary but most first time technicians find it easier to work with both hands free. If you proceed by *not* removing the front assembly, it needs to rest securely or else the cables can get damaged or tear. This could result in loss of LCD, touch, touch ID or front camera functionality.

*****

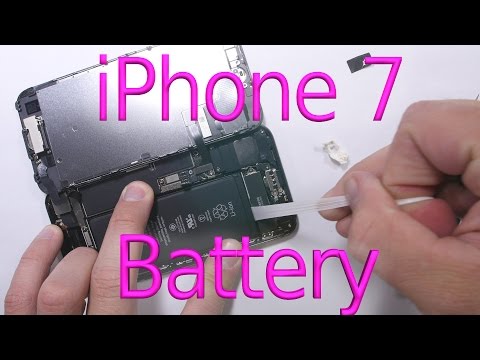
We made this video to show everyone that it doesn't take an Apple-genius or a highly trained technician to remove and replace an iPhone 7 battery - anyone can do it!

A battery in an iPhone 7, or any smartphone for that matter, works like any other battery - it wears out with time. After about 300 cycles, i.e. 300 full charges and discharges, a significant drop in performance is noticeable. The older and more used the battery gets, the more obvious is the performance drop. In the end the phone can end up shutting down when the battery percentage drops below 10-20%. In this case a fresh, new battery brings the phone back to life.

In some cases the battery swells. This results in the glass/digitizer lifting from its frame. If the battery is very swollen, it's not uncommon that a gap is apparent between the glass and the metal back assembly. This problem can also be fixed by replacing the battery.
Рекомендации по теме
Комментарии
Автор

I've watched about five tutorials today as I'm about to replace my wife's battery, and yours is by far the best and most informative. Thank you.

paulcarboni
Автор

I just finished my battery replacement. I heated the back of the phone
with a hair dryer, I needed a sharper metal prying tool to start the
separation process then used the plastic tool. I did not remove the
screen, I was careful not to put pressure on the ribbons and left the
suction cup on to hold up the screen so it did not try to separate from
the body very much. I did not remove the taptic machine as in other
videos. That saved a lot of time. Trust Me the fewer screws you remove
the better!! They are the size of a grain of sand and require a very
steady hand to reinstall!!! Extremely easy to lose drop or misplace! My
inner tape strip broke off at the start point so I pried up the battery
at that end (from the outside) to regain the grip and pulled it right
out. The new battery works great.

davenone
Автор

Thank you so much for this tutorial. It helped me a lot. The biggest struggle was to open the cover and remove the battery because the tapes both got torn. I almost gave up! Then I dropped the tiny screw twice and couldn't find it. Well, I spent the whole afternoon changing the battery but I made it! :D (a proud woman here)

lucievachova
Автор

Thank you. Just replaced my kid's iPhone 7 battery, and the process went smoothly thanks to your tutorial. For people doing it for the first time: 1) if using a hair dryer, don't hesitate to do it a lot. I did 2 minutes at first, it wasn't enough, had to do a second pass before I could see "results". In total I did 8 minutes of hair dryer around the whole phone, 4 passes of 2 minutes each 2) there are "suction cups" you can buy online, with a handle, and suction cups on both sides that really help applying the right amount of force when opening the screen. Not sure I'd have been able to go through the initial steps without that. Opening the screen really is the hard part. Once that's done, following the steps and paying attention is enough.

As others have said, there are tons of tutorials on how to replace batteries but this one really had all the good details, critical for beginners! (including how to put it back)

meepleshelter
Автор

I just successfully completed this repair and bought the ScandiTech kit on Amazon.
This video is by far the most detailed I have seen, and convinced me to try the battery replacement.
Just a few additional tips if I may.
1) Go SLOW
2) If you feel nervous before trying this....that is good, you will be more focused
3) A magnifying glass will help immensely.
4) The screws you are removing are EXTREME care when removing them.
5) I did not remove the 2 parts below the battery for adhesive strip removal. (I tried, stripped one of the screws)....so, I
peeled the strip off the back of the battery, then SLOWLY pulled them.
The adhesive strips under the battery are EXTREMELY will not tear them if you go SLOW
6) Notice how many times i have typed SLOW so far???? HEED THE WARNING
7) Plan on spending some time on this make sure you are in a quiet place.
8) Watch this video as you attempt the repair.

Great price, battery works ScandiTech for the video, and the reasonable price on the battery.
Stephen

stevemollis
Автор

Tutorials that show them putting the phone back together are far better than the ones that don't. I've replaced my screen before but my second repair was the battery. This helped a lot and it was the first video I clicked on.

danielfitton
Автор

Best video by far for swapping batterys.Every detail was shown unlike most of the others i looked at.

zblue
Автор

Took me over an hour to take the lcd off but finnaly succeeded. Thank you!!

kacpertrzeciak
Автор

Thank you so much!! Took me 3.5 hours and 4 fingernails to get the job done but done it is! I put it off for a long time because I was so intimidated. But, I’m a retired Optician so small bits and pieces don’t bother me, and it was time to straighten my backbone. Getting through the old seal was the biggest hurdle, 1 hour at least doing battle. I have a heat gun and was very leery of heating anything too much. But for every mm of advancement breaking the seal I was hitting it with the heat gun.
You saved me 100’s of dollars. Thanks again.

julieirwin
Автор

This is the best video I could find on replacing the iPhone 7 battery. Well done and a clear speaking voice.
I wish he had shown how to install the adhesive on the frame, but I figured it out.
And, initially, I tried peeling the wrong side of the plastic on the adhesive for the battery and stretched it a bit.
The upper single plug cover can be reversed and during re-installation I had trouble figuring out which way it went.
The plug on my battery was twisted and diffuse to install. And I didn’t get the haptic plug in right and had to go back and redo both of them. Getting those tiny plugs back in was the hardest part for me. Getting those small screws in was tough due to the magnetism of the screws or the screwdriver.
But it is back together and works.
Thanks for your help.

thehammer
Автор

I have just replaced my battery following this guide. I didn't remove the screen, managed to be careful enough to avoid issue. Excellent guide thank you very much!

Nijman
Автор

Great video👍. As mentioned, make sure to keep note of the screws as you disassemble the phone. There is one longer screw amongst the 4 that secures the shield cover for the battery/ screen ribbon cable connectors. For those unaware during disassembly, the longer screw is located in the screw hole nearest to the RHS edge (RHS) of the phone screen removed at 5:50.

mrt-gt
Автор

Thank you. I´ve just successfully replaced battery in my iphone by using this video!

petrpelc
Автор

Very useful video. Thank you for posting.

habeebrahman
Автор

Thank you so much for a very clear tutorial guide to change the battery. I viewed several different YouTube videos before choosing yours to guide me through the process, which I managed to achieve successfully and my phone is all back together with a nice new powerful battery, all working as it should!

peterbaker
Автор

Just placed my order for your kit - Looking forward to extending the life of my 7!

khrv
Автор

By far the best video for changing the battery in an IPhone 7. Just changed mine with success. Great detail and provides caution on possible problems you can have in the process.

garywhite
Автор

I watched several different videos on YouTube on how to replace the battery of an iPhone 7 Plus. This one was by far the clearest and the most helpful, which is why I ended following your instructions and suggestions to actually replace the battery. (The replacement was successful 😉💪). So thank you very much for making such a good tutorial!

vaneney
Автор

Thank you for this tutorial! The part about heating up the edges (I used a hair dryer) helped SO much. And the part that had me sweating was the sticky adhesive under the battery. I used my long pry tool and pulled both pieces of adhesive just long enough to wrap around the tool. Then I kept slowly pulling, then rolling it, then pulling it a little more, and rolling it. You could use a pencil for this method as well. It took a while longer but ensured the adhesive wouldn’t break.

forbro
Автор

Great vid. You don't really need to disconnect the screen assembly from the bottom portion that holds the battery; the phone will open flat. Oh ya- one more thing. I've accidentally punctured a lithium battery, and yes, they ignite like crazy and will fill your room with pretty nasty fumes. Be very gentle with the battery.

neilreid