filmov
tv
How to use the Magic Mask in DaVinci Resolve
Показать описание
How to use the Magic Mask in DaVinci Resolve. Step-by-Step Guide and Creative Uses
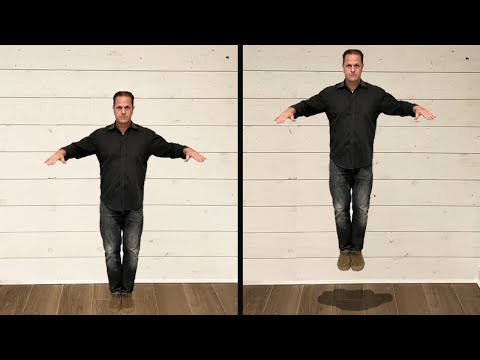
In this detailed tutorial, we will explore how to use the Magic Mask feature in DaVinci Resolve and its various applications. The Magic Mask is a powerful tool that allows you to isolate and track objects or people in your video with ease. This feature is essential for creating professional-quality videos, whether you're working on a film, a commercial, or a personal project.
Learn how to use Magic Mask in DaVinci Resolve to isolate objects and people.
Video editing tips to track masks in DaVinci Resolve tutorial.
Apply effects with Magic Mask and enhance video quality in the DaVinci Resolve Color page.
Create professional videos with Magic Mask applications for advanced video editing techniques.
Amazon:
Steps to Use the Magic Mask in DaVinci Resolve:
1. Open the Color Page: Start by selecting the clip you want to edit and navigate to the Color page in DaVinci Resolve.
2. Activate the Magic Mask: Click on the Magic Mask icon in the toolbar. You can choose between the Object Mask and the Person Mask, depending on what you need to isolate.
3. Draw the Mask: Use the brush tool to draw over the object or person you want to mask. DaVinci Resolve will automatically detect and create a mask around the selected area.
4. Track the Mask: Go to the Tracker tab and track the mask throughout the clip. This ensures that the mask follows the movement of the object or person accurately.
5. Refine the Mask: Adjust the mask settings to refine the edges and ensure a clean selection. You can also use the Qualifier tool to further enhance the mask.
6. Apply Effects: Once the mask is created, you can apply various effects such as color grading, blurring, or adding text behind the masked object or person.
Using the Magic Mask in DaVinci Resolve is crucial for isolating subjects and applying targeted effects, which can significantly enhance the visual quality of your videos. This tutorial covers essential topics such as creating and tracking masks, refining selections, and applying effects, making it a valuable resource for anyone looking to improve their video editing skills. By mastering the Magic Mask, you can achieve professional results and bring your creative vision to life.
Watch the video carefully without skipping to see all the steps needed in this video.
Subscribe and click the Bell to watch more videos.
Check it, buy it, post it and tag it #ionhowto or #rednumberone
Join this channel to get access to perks:
Any questions?
Feel free to ask in the comments section below.
Subscribe, Like and SHARE this video with your friends!
We earn money from qualifying purchases using our affiliate links.
Affiliate links are marked with a star. *
When you use our * links, you support this channel.
As an Amazon Associate I earn from qualifying purchases.
 0:15:38
 0:15:04
 0:23:56
 0:15:50
 0:28:06
 0:05:02
 0:06:25
 0:10:49
 0:13:57
 0:17:36
 0:40:03
 0:00:36
 0:34:19
 0:03:18
 0:04:58
 0:00:32
 0:00:43
 0:00:25
 0:00:11
 0:00:17
 0:16:57
 0:05:01
 0:01:29
 0:01:29