filmov
tv
20. Arduino for Production! AVR Atmega32 - How to write our First LCD Program

Показать описание
Purchase my new book: Arm Microcontroller Programming and Circuit Building Volume 1
Please watch: "Buildyourcnc CNC Router on Love Yurts"
Patrick's Tip Jar:
bitcoin:1Gtawd29Sgu5CdvfUnkRg1YBfowCawjFdH
Ether:0xa962365100011B79097A7bb9DD51A53eE98266bb
If you have found this video to be helpful, consider making a tip. Thanks.
Official Page with More Information:
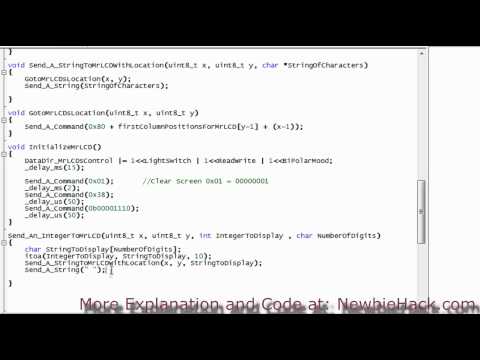
In this video, I introduce the #define statement for ease of code reuse and readability, and I go on to explain the construction of the first program to display information on the LCD. connecting an LCD to an Arduino or AVR atmega microcontroller is simple and I explain it in a way you can understand the low level Arduino programming concepts.
Equipment that I use to make videos:
Please watch: "Buildyourcnc CNC Router on Love Yurts"
Patrick's Tip Jar:
bitcoin:1Gtawd29Sgu5CdvfUnkRg1YBfowCawjFdH
Ether:0xa962365100011B79097A7bb9DD51A53eE98266bb
If you have found this video to be helpful, consider making a tip. Thanks.
Official Page with More Information:
In this video, I introduce the #define statement for ease of code reuse and readability, and I go on to explain the construction of the first program to display information on the LCD. connecting an LCD to an Arduino or AVR atmega microcontroller is simple and I explain it in a way you can understand the low level Arduino programming concepts.
Equipment that I use to make videos:
 0:31:23
20. Arduino for Production! AVR Atmega32 - How to write our First LCD Program
 0:13:27
21. Arduino for Production! AVR Atmega32 - Passing a String to the LCD
 0:26:15
25. Arduino for Production! AVR Atmega32 - Using other Power Sources
 0:16:09
23. Arduino for Production! AVR Atmega32 - Separating Reusable Code to Form a Library
 0:32:29
22. Arduino for Production! AVR Atmega32 - Displaying Number and Finding Positions
 0:13:13
10. Arduino for Production! How to Write our first program and transfer to the AVR Microcontroller
 0:12:09
14. Arduino for Production! AVR Atmega32 - Button Debouncing through Software
 0:09:13
Why I’m switching over from the awesome Arduino IDE to Atmel Studio.
 0:12:48
24. Arduino for Production! Atmega32 AVR - LCD Creating a New Library Routine
 0:06:37
7. Arduino for Production! A Beginner's Guide - AVR Program Transfer Part 2 (Drivers)
 0:29:28
16. Arduino for Production! AVR ATmega32 - Creating a Push Button Library
 0:09:35
5. Arduino for Production! A Beginner's Guide - AVR Program Transfer Part 1
 0:10:29
18. Arduino for Production! AVR Atmega32 - Intro to Interrupts
 0:55:52
15. Arduino for Production! AVR Atmega32 - The button Game
 0:12:10
9. Arduino for Production! How to Test the programmer and Build the first Microcontroller Circuit
 0:28:13
Kris Jusiak - Online AVR/Arduino Development with C++20 - Meeting Embedded 2020
 0:05:59
1. Arduino for Production! A Beginner's Guide - Intro and How to Use the AVR Atmega32
 0:16:15
26. Arduino for Production! AVR AC to DC Power Supply in Detail and Why Capacitors are Used
 0:00:16
AVR EP200 Generator AVR for Diesel Engine Voltage Regulating
 0:12:54
The 20MHz Arduino Uno and bootloader tutorial.
 0:36:03
17. Arduino for Production! AVR Atmega32 - Timers/Counters and Binary/Hex Numbers
 0:05:27
How to Program an AVR DA MCU Using an Arduino Nano
 0:07:36
12. Arduino for Production! AVR Atmega32 - Adding a Button to the Microcontroller
 0:13:52
11. Arduino for Production! AVR Atmega32 - Revising the LED program to make the LED blink
Комментарии