filmov
tv
Script Autoinstall Printer using Local TCP IP
Показать описание
Script Auto install Printer using Local TCP IP
I. Introduction
First I was looking for a way to install printers by IP faster than the normal "add a printer", "add a local printer", "create a new port" and that whole time-consuming process.
There are several ways to do this, I chose to use Windows already installed printer commands and wrote scripts for each of the printers I was trying to install.
There are several ways to do this, I chose to use Windows already installed printer commands and wrote scripts for each of the printers I was trying to install.
II. Start
File server: IP: 192.168.11.250 to share driver
Windows client : install Printer on this machine
HP P2035n : IP 192.168.11.6
Step 1: Download The Script Files and Printer driver:
(Repeating what I referenced in my NOTES above)
b. Download the correct printer drivers, and unpack/extract them to a drivers folder.
Step 2: Transfer The Files To The File Server:
Open Windows Explorer and navigate to the admin share of the remote computer: \IP_FILE_SERVER\Share_Name
Copy the scripts and drivers folders to wherever you want on the File Server. In our example, we copy them to Share_Name\Driver\Printer
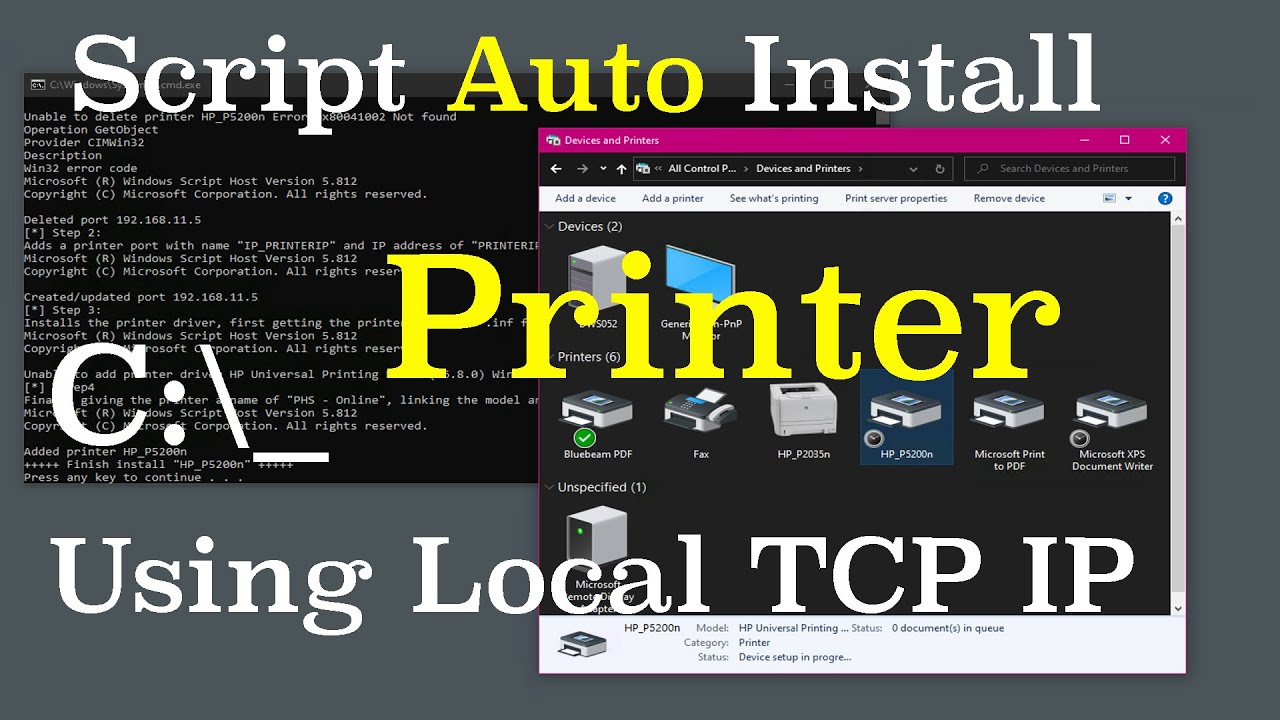
Step 3: Delete The Port & Printer Name (Just In Case They Already Exist)
Now that you’re connected remotely, essentially what you’re going to use for this step is the specific port name and printer name that you plan to use, just to make sure neither already exists.
(This step has been edited based on a tip provided by IUCN5406 - it's best to try to delete the printer name before deleting the port, otherwise the name may still be in use. Thanks for the info IUCN5406!)
(delete the printer name, in case it already exists) cscript
(delete the printer port, in case it already exists)
NOTE: In some circumstances, you may need to delete the printer name before you are able to delete the printer port
Step 4: Create The Printer Port
Adds a printer port with name "IP_PRINTERIP" and IP address of "PRINTERIP":
Step 5: Install The Printer Driver
Getting the printer model and .inf file, then -h for the path to the .dll:
Step 6: "Tie It All Together"
Lastly, we’re going to name the printer and tie it to the printer port we created:
## III. Summary The above article I summarize the knowledge gained when using windows for my work (sys admin), hope it helps you a bit.
Certainly the article there are many shortcomings, looking for sympathy and submit feedback for me to complete more.
⭐ Connecting With Us ⭐
-------------------------------------------
⭐ Topics ⭐
#errorandfix
🛒AFFILIATES & REFERRAL LINKS🛒
-----------------------------------------------
Camera Ip Wifi YooSee Xoay 360 độ PTZ bao đẹp.
PHẦN MỀM KASPERSKY ANTI VIRUS 3PC
Phần Mềm Diệt Virus BKAV Profressional 12 Tháng - Hàng Chính Hãng
Thiết Bị Phát Wifi Di Động 4G LTE-Advanced TP-Link M7350 150Mbps - Hàng Chính Hãng
Phần mềm Microsoft 365 Family English dùng được 6 máy
THẢM DA TRẢI BÀN LÀM VIỆC DÙNG ĐƯỢC HAI MẶT
I. Introduction
First I was looking for a way to install printers by IP faster than the normal "add a printer", "add a local printer", "create a new port" and that whole time-consuming process.
There are several ways to do this, I chose to use Windows already installed printer commands and wrote scripts for each of the printers I was trying to install.
There are several ways to do this, I chose to use Windows already installed printer commands and wrote scripts for each of the printers I was trying to install.
II. Start
File server: IP: 192.168.11.250 to share driver
Windows client : install Printer on this machine
HP P2035n : IP 192.168.11.6
Step 1: Download The Script Files and Printer driver:
(Repeating what I referenced in my NOTES above)
b. Download the correct printer drivers, and unpack/extract them to a drivers folder.
Step 2: Transfer The Files To The File Server:
Open Windows Explorer and navigate to the admin share of the remote computer: \IP_FILE_SERVER\Share_Name
Copy the scripts and drivers folders to wherever you want on the File Server. In our example, we copy them to Share_Name\Driver\Printer
Step 3: Delete The Port & Printer Name (Just In Case They Already Exist)
Now that you’re connected remotely, essentially what you’re going to use for this step is the specific port name and printer name that you plan to use, just to make sure neither already exists.
(This step has been edited based on a tip provided by IUCN5406 - it's best to try to delete the printer name before deleting the port, otherwise the name may still be in use. Thanks for the info IUCN5406!)
(delete the printer name, in case it already exists) cscript
(delete the printer port, in case it already exists)
NOTE: In some circumstances, you may need to delete the printer name before you are able to delete the printer port
Step 4: Create The Printer Port
Adds a printer port with name "IP_PRINTERIP" and IP address of "PRINTERIP":
Step 5: Install The Printer Driver
Getting the printer model and .inf file, then -h for the path to the .dll:
Step 6: "Tie It All Together"
Lastly, we’re going to name the printer and tie it to the printer port we created:
## III. Summary The above article I summarize the knowledge gained when using windows for my work (sys admin), hope it helps you a bit.
Certainly the article there are many shortcomings, looking for sympathy and submit feedback for me to complete more.
⭐ Connecting With Us ⭐
-------------------------------------------
⭐ Topics ⭐
#errorandfix
🛒AFFILIATES & REFERRAL LINKS🛒
-----------------------------------------------
Camera Ip Wifi YooSee Xoay 360 độ PTZ bao đẹp.
PHẦN MỀM KASPERSKY ANTI VIRUS 3PC
Phần Mềm Diệt Virus BKAV Profressional 12 Tháng - Hàng Chính Hãng
Thiết Bị Phát Wifi Di Động 4G LTE-Advanced TP-Link M7350 150Mbps - Hàng Chính Hãng
Phần mềm Microsoft 365 Family English dùng được 6 máy
THẢM DA TRẢI BÀN LÀM VIỆC DÙNG ĐƯỢC HAI MẶT
 0:07:04
Script Autoinstall Printer using Local TCP IP
 0:01:46
Add/Remove script for local printer (2 Solutions!!)
 0:00:25
Script Powershell - Imprimantes sur un poste de travail distant (Printers on remote computer)
 0:16:50
Windows Netzwerk Drucker per Powershell Script installieren
 0:02:32
How to Remove Printer with PowerShell
 0:01:50
Scripting a batch file for installing network printers
 0:02:05
How to add a printer via IP on Windows using a BATCH script?
 0:06:12
How To Add Printer Using Local Port Method | AM Computer |
 0:01:51
How to add a network (IP) printer using command line or a script?
 0:11:03
How to setup a Windows Print Server and deploy printers using Group Policy
 0:01:16
DevOps & SysAdmins: Add a printer script
 0:01:15
Windows : Batch file for printing using shared printer in LAN
 0:04:03
How to Install or configure the Printer Canon 1435 if through Batch file on Windows 10 latest
 0:00:46
Simple Batch Script to Map a Shared Printer | Batch Scripting by Nicholas Lee Fagan
 0:01:16
PowerShell script to add network printer and map network drive when offline
 0:01:03
Adding a network printer from the command line (bat file) | #Tech
 0:02:25
Printer monitoring script (PowerShell) (2 Solutions!!)
 0:05:25
How to Create GPO to Deploy Printers On all Client Computers | Windows Server 2019/2022
 0:01:46
Installing Network printer by command prompt
 0:01:48
How to install a network printer on powershell?
 0:01:47
Windows 10: How to set default printer using PowerShell.
 0:03:55
Citrix: Using PowerShell to list Client Printers
 0:05:45
Install Printer, Print Using WEB POS
 0:02:39
Adding Network Printers via Powershell
Комментарии