filmov
tv
How to Run Databricks Job from Notebook using Python Code

Показать описание
Discover how to effectively `run a Databricks job from a notebook` with code, passing parameters and handling outputs.
---
Visit these links for original content and any more details, such as alternate solutions, latest updates/developments on topic, comments, revision history etc. For example, the original title of the Question was: Run databricks job from notebook
If anything seems off to you, please feel free to write me at vlogize [AT] gmail [DOT] com.
---
How to Run Databricks Job from Notebook using Python Code
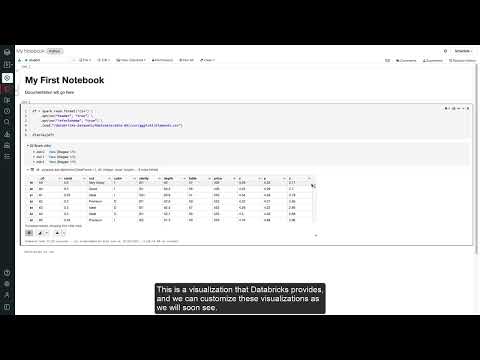
If you're working in a Databricks environment and found yourself needing to run a Databricks job from a notebook, you're not alone! In complex workflows with multiple tasks and contributors, it's often essential to execute already established jobs for testing new features or running tasks multiple times without having to modify the job's structure. In this guide, we'll walk through the process of invoking a Databricks job from within a notebook using Python code.
Why Run Jobs from a Notebook?
Running jobs directly from a notebook allows for:
Testing new features without altering existing jobs.
Repeatedly executing jobs quickly via a loop.
Simplified workflow integration for contributors working on the same codebase.
Step-by-Step Guide to Running Databricks Jobs from a Notebook
1. Install Required Library
First things first, you need to install the databricksapi. You can do this by running the following command in your notebook:
[[See Video to Reveal this Text or Code Snippet]]
2. Create Your Job and Return Output
Next, create a job that will return output. This can be achieved by exiting the notebook as follows:
[[See Video to Reveal this Text or Code Snippet]]
Note: Make sure that if you’re passing a dataframe, you convert it to a JSON format using a JSON dump.
3. Fetch the Job ID
For the next steps, you will need the job ID, which you can find in your job's details in Databricks. This ID is crucial for running your job programmatically.
4. Use the Executor Notebook Code
In your executor notebook, you can use the following code snippet. This will initiate the job with the specified parameters:
[[See Video to Reveal this Text or Code Snippet]]
5. Running Jobs in Parallel
If you need to run the job multiple times in parallel (make sure to configure your job settings for maximum concurrent runs), you can use the following code to do so:
[[See Video to Reveal this Text or Code Snippet]]
Conclusion
Integrating job execution into your notebooks opens up a world of possibilities in the Databricks ecosystem. With the ability to run jobs dynamically and repeatedly, you can efficiently manage test cases and try out novel features without adding clutter to your job structure.
Feel free to explore further with the Databricks documentation for more detailed functionalities, such as saving the job outputs in various formats or other advanced configurations!
Happy coding!
---
Visit these links for original content and any more details, such as alternate solutions, latest updates/developments on topic, comments, revision history etc. For example, the original title of the Question was: Run databricks job from notebook
If anything seems off to you, please feel free to write me at vlogize [AT] gmail [DOT] com.
---
How to Run Databricks Job from Notebook using Python Code
If you're working in a Databricks environment and found yourself needing to run a Databricks job from a notebook, you're not alone! In complex workflows with multiple tasks and contributors, it's often essential to execute already established jobs for testing new features or running tasks multiple times without having to modify the job's structure. In this guide, we'll walk through the process of invoking a Databricks job from within a notebook using Python code.
Why Run Jobs from a Notebook?
Running jobs directly from a notebook allows for:
Testing new features without altering existing jobs.
Repeatedly executing jobs quickly via a loop.
Simplified workflow integration for contributors working on the same codebase.
Step-by-Step Guide to Running Databricks Jobs from a Notebook
1. Install Required Library
First things first, you need to install the databricksapi. You can do this by running the following command in your notebook:
[[See Video to Reveal this Text or Code Snippet]]
2. Create Your Job and Return Output
Next, create a job that will return output. This can be achieved by exiting the notebook as follows:
[[See Video to Reveal this Text or Code Snippet]]
Note: Make sure that if you’re passing a dataframe, you convert it to a JSON format using a JSON dump.
3. Fetch the Job ID
For the next steps, you will need the job ID, which you can find in your job's details in Databricks. This ID is crucial for running your job programmatically.
4. Use the Executor Notebook Code
In your executor notebook, you can use the following code snippet. This will initiate the job with the specified parameters:
[[See Video to Reveal this Text or Code Snippet]]
5. Running Jobs in Parallel
If you need to run the job multiple times in parallel (make sure to configure your job settings for maximum concurrent runs), you can use the following code to do so:
[[See Video to Reveal this Text or Code Snippet]]
Conclusion
Integrating job execution into your notebooks opens up a world of possibilities in the Databricks ecosystem. With the ability to run jobs dynamically and repeatedly, you can efficiently manage test cases and try out novel features without adding clutter to your job structure.
Feel free to explore further with the Databricks documentation for more detailed functionalities, such as saving the job outputs in various formats or other advanced configurations!
Happy coding!
 0:04:04
 0:18:49
 0:17:17
 0:06:49
 0:08:36
 0:12:48
 0:05:08
 0:02:14
 0:08:42
 0:01:57
 0:00:58
 0:10:05
 0:15:35
 0:30:19
 0:06:18
 0:11:26
 0:09:38
 0:09:31
 0:25:08
 0:10:59
 0:03:41
 0:13:23
 0:20:03
 0:31:06