filmov
tv
Forces & Free-Body Diagrams [Physics Examples]

Показать описание
In this video, we go over the basics of drawing Free-Body Diagrams as a first step to solving force problems in physics with Newton’s Laws. We cover several examples as well as how to draw free-body diagrams and why they are so useful in physics.
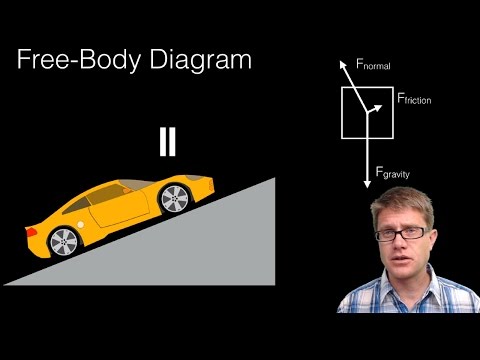
Free-body diagrams are a tool for isolating the forces that are present on a single object and drawing them on a coordinate system so the components or each force can be plainly seen.
To draw a free-body diagram, we begin by drawing a dot to which represents our object. At this point is may be useful to go ahead and draw x- and y-axes where the dot, or object, is at the origin. Then we go through each force and draw the force vector going away from our object and label it appropriate.
From here, some people like to take their forces with both x- and y-components and draw each component on the free-body diagram. I prefer to draw any angles I might need to find the components and leave the free-body diagram uncluttered. If I do draw the components, I prefer to do in on a separate free-body diagram that only has forces along the x- or y-directions.
These steps work for drawing free-body diagrams for objects where we use a particle model and represent the object as a particle. For rigid bodies, which we don't cover here, we draw an outline of the object rather than a dot, and place the force vectors where they act on the body.
 0:30:59
 0:04:18
 0:08:03
 0:06:30
 0:03:28
 0:09:23
 0:06:57
 0:05:41
 3:03:08
 0:06:59
 0:07:55
 0:10:07
 0:08:51
 0:05:38
 0:02:50
 0:24:06
 0:51:15
 0:22:27
 0:07:24
 0:03:59
 0:05:43
 0:04:48
 0:07:41
 0:03:11