filmov
tv
IoT based ESP8266 projects using Google Assistant Alexa & Cadio

Показать описание
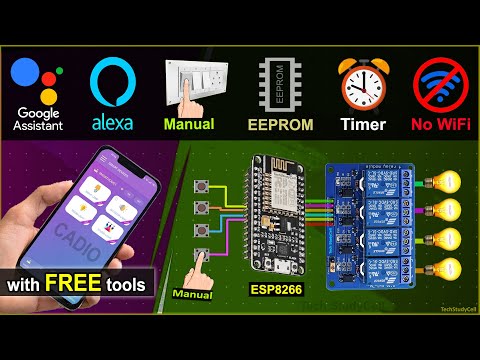
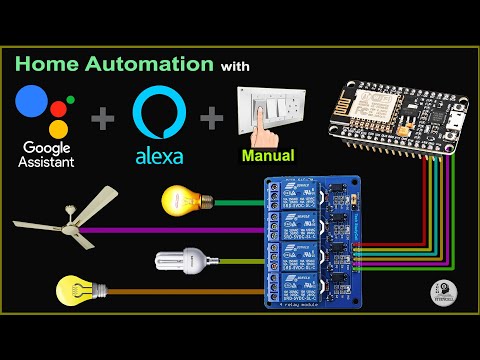
In this IoT project, I have explained how to make IoT based ESP8266 projects using Google Assistant, Amazon Alexa and Cadio to control relays with voice commands and manual switches. I have used all the free tools for this IoT-based home automation system.
During this Internet of things tutorial video, I covered the following topics:
00:52 Quick demo on ESP8266 Cadio Home Automation system.
02:45 Required components for NodeMCU ESP8266 project.
02:54 Circuit diagram of ESP8266 IoT project.
04:59 Download Cadio firmware for ESP8266.
05:12 Install the Cadio firmware to ESP8266.
05:59 Configure ESP8266 using Cadio app.
08:23 How to Add Timer in Cadio app.
09:09 Connect Google Home with the Cadio.
09:37 Connect Amazon Alexa with the Cadio.
10:19 Update WiFi details through OTA
Get 25% off on CADIO Lifetime License for multiple CADIO Devices
Use Discount Coupon Code "techstudycell25" (valid until 30th September, only for Tech StudyCell audience).
Required Components for the ESP32 internet of things project.
1. ESP8266 NodeMCU.
2. 4-channel 5V SPDT Relay Module.
3. Switches or pushbuttons
Amazon India Affiliate links:
Amazon United States Affiliate links:
Important Link:
Important points:
1. Download the latest firmware from the Cadio Download Center.
2. In Free Plan, you have reupload the firmware after every 500hr
3. Reset the ESP8266 and wait for 30 sec to go to Config mode.
4. To change the WiFi details, Go to config mode, then enter the WiFi credentials from Cadio app.
5. The Boot will fail if the D3 (GPIO-0) (switch-2) pin are connected with the ground during booting.
6. If you use Switch (latched), make sure the switch-1 & switch-2 should be OFF during the ESP8266 Boot.
7. You don't need any Echo devices.
8. Please watch the complete video, otherwise you may face some issues.
**Please take proper safety precautions while working with high voltage.
During the Cadio tutorial video, I explained all the steps to make IoT based home automation system using ESP8266 NodeMCU and Cadio. This is the most easiest IoT platform for beginner, as it required no coding skill. You can do all the configuration from Cadio mobile app.
You can also add timer or create schedule in Cadio app to control the relays automatically. The NodeMCU can also remember the previous states of the relays.
If the NodeMCU is connected with Wi-Fi, then you can control the relays from anywhere in the world with Cadio Alexa and Google Assistant. And you can also monitor the real-time feedback on the Cadio, Amazon Alexa, and Google Home IoT applications. So with this smart home project, you can convert any appliance to IoT devices and control them through the internet.
So, now you can just ask Alexa or Google Assistant, "Hey Google, turn on lights" that's it.
#iotprojects #esp8266 #homeautomation
-----------
Thanks For Watching...
✅ SUBSCRIBE ✅LIKE ✅SHARE ✅ COMMENTS
-----------
-----------
WARNING:
This video is for demonstration and educational purposes only.
Each demonstration presents risks and hazards that must be fully understood before attempting.
And should be performed only by professionals
-----------
Other useful IoT projects:
Latest ESP32 projects playlist:
Latest NodeMCU projects playlist:
Arduino Home Automation Projects playlist:
 0:11:14
IoT based ESP8266 projects using Google Assistant Alexa & Cadio
 0:00:33
IoT based Smart Street Light using NodeMCU ESP8266 and ThingSpeak
 0:16:23
IOT based home automation using Nodemcu | Step by step instructions [ESP8266 project]
 0:10:41
Smart Home with Google Assistant & Alexa using NodeMCU ESP8266 (Manual + Voice) | IoT Projects 2...
 0:08:48
Top 10 ESP8266 Projects Ideas | Latest IOT Project Ideas
 0:00:58
IoT Based Colour Sorting Machine using ESP8266 and ThingSpeak
 0:10:06
IoT Based Battery Monitoring System Using ESP8266 & Arduino IoT Cloud
 0:05:27
Control LED using Arduino IOT Cloud and ESP8266 | Arduino IOT Cloud Projects
 0:02:26
IOT Based Smoke Detector using Raspberry Pi Pico with ESP8266 & Thingspeak Platform
 0:09:25
15 Brilliant IoT Projects for Beginners!
 0:08:28
IoT based Temperature Controlled Automatic Fan using ESP8266 & Blynk
 0:12:20
IoT based Home Automation project using NodeMCU ESP8266 and New Blynk app | ESP8266 Projects 2021
 0:13:07
IoT Based Water Level Monitoring system using ESP32 Blynk & Ultrasonic Sensor
 0:06:35
IoT Based Water Level Control & Monitoring System with ESP8266 & Blynk
 0:10:01
IoT Based Biometric Fingerprint Attendance System with NodeMCU ESP8266
 0:00:35
IoT based Fire Alarm System using NodeMCU ESP8266
 0:08:21
Wifi Smart Home Automation system with Manual Switches using NodeMCU ESP8266 & Blynk | IoT Proje...
 0:11:14
Home Automation using NodeMCU ESP8266 and Blynk 2.0 with real-time feedback | IoT Projects 2021
 0:07:50
Home automation using NodeMCU and Blynk App - IOT based Project
 0:09:59
IoT based projects for final year using NodeMCU ESP8266 Blynk with Sensor - Smart Home 2022
 0:02:59
IoT based Voice Controlled Home Automation using ESP8266
 0:16:54
New Blynk IOT Smart Plant Monitoring System
 0:11:29
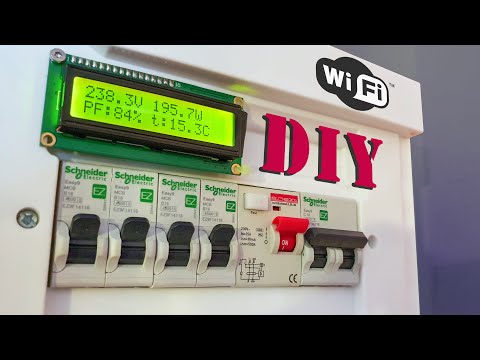
DIY Smart Distribution Board with Wi-Fi | IoT Arduino Project
 0:09:35
Home Automation using ESP01 ESP8266 Tasmota Alexa control Relay - IoT Project 2023
Комментарии