filmov
tv
CV Bucket Swap | Honda S2000

Показать описание
Hey everyone! If you’ve ever experienced the rear end of your s2000 vibrating pretty violently on hard acceleration there is a good chance that your driver’s side CV bucket is the culprit. Depending on how severe the issue is swapping the buckets could completely solve the vibration issues or dramatically reduce them. Today I’m going to show you my preferred method for swapping the CV buckets from side to side in an effort to remove that pesky vibration.
Note: There are several ways to do this procedure but this is the one that I personally find to be the most time and effort efficient.
Tools necessary:
- Impact Gun (highly suggested)
- 14mm, 17mm socket (3/8" ideal)
- 3/8" Universal joint (highly suggested)
- 14mm wrench
- 3/8" and 1/2" torque wrench
- Needle nose pliers
- CV grease
- Paper/Shop towels
- Cotter pins
- Jack & jack stands
Steps
1. The first thing you want to do is get the rear of the car on jackstands and remove the wheels. Once the car is on jackstands you can remove the parking brake.
2. In order to get enough clearance to remove the buckets easily you need to pop the lower ball joint on both rear wheel knuckles. Bend and wiggle the cotter pin to remove it. Remove the castle nut using a 17mm socket and impact gun. Lastly, use a ball joint separator tool to pop the ball joint out of place.
3. With the ball joints removed use an impact gun and a 14mm socket to remove the 6 bolts on each side that hold the axle to the differential. Find a position where you can access one of the bolts very well and then just spin the axles to move the bolts into place.
4. Use a set of straight needle nose pliers to undo the clamps holding the cv boots onto each cv bucket.
5. Now it is time to remove the cv buckets from the cv joint. Take the cv joint out of the differential by tugging on the axle and gently pushing the wheel knuckle away with your foot. Now pull the cv boot off the bucket and carefully remove the cv bucket from the cv joint. As you remove the bucket it is pretty likely that some cv grease is going to fall so make sure you’re not directly under it.
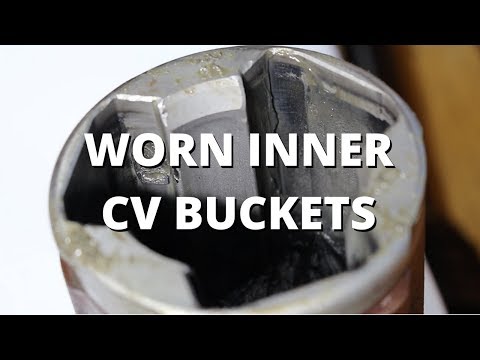
6. Once you have the cv buckets removed you can inspect them for pitting. What you’ll likely notice is that the driver’s side bucket has darker grease, which is caused by the metal shavings contaminating the grease. Use a paper towel or a shop towel to remove the cv grease from both of the buckets. Once the grease is removed you should be able to see damage on the driver’s side bucket where the tripod joint bearings of the cv joint sit. If you inspect the passenger’s side bucket you shouldn’t see any of this damage. By swapping the cv buckets from side to side you are letting the driver’s side tripod joint bearings sit on a new surface. Once you’re ready to put things back together pack the cv buckets with new cv grease. Make sure that you keep track of each cv bucket so you know which one is the left and right side and you don’t have to do this process all over again!
7. Now you’re ready to install the cv buckets. Carefully install the cv joint tripod into the swapped cv buckets and slip the cv boot over the bucket. If one of the tripod joint bearings fell onto the ground like mine did, make sure you wipe off any contaminants and put it back onto the tripod joint correctly, they should only fit one of two ways. Tug on the axle and gently push on the wheel knuckle to allow for clearance to insert the axle back into the differential.
8. With the axles in place use a paper towel or shop towel to wipe away any extra cv grease. Once everything looks clean use a set of straight needle nose pliers to tighten the clamps holding the cv boots to onto each cv bucket.
9. Then use a 14mm socket and wrench to tighten the 6 bolts on each side that hold the axles to the differential. I’ve found that it is easiest to lodge the wrench against the car to keep the axles from spinning. Another option is to use the parking brake but you will find yourself engaging and disengaging it over and over again as you move the axles to reach the bolts. Torque the driveshaft bolts to 61 ft-lbs.
10. With the axles in place the last thing to do is to secure the lower ball joint on each rear lower control arm. This can be a bit tricky because as you tighten the castle nut it will have a tendency to spin unless the ball joint is under pressure. What I found easiest was to use a c-clamp to squeeze the ball joint to the rear lower control arm. Torque the lower ball joint castle nut to 51-58 ft-lbs. Once the castle nut is torqued insert a new cotter pin in place.
11. Re engage the parking brake, reinstall the rear wheels, lower the car back down to the ground, and hopefully enjoy your now vibration free car. If the car still has vibrations on acceleration you should look into half shaft spacers for the ultimate fix.
Note: There are several ways to do this procedure but this is the one that I personally find to be the most time and effort efficient.
Tools necessary:
- Impact Gun (highly suggested)
- 14mm, 17mm socket (3/8" ideal)
- 3/8" Universal joint (highly suggested)
- 14mm wrench
- 3/8" and 1/2" torque wrench
- Needle nose pliers
- CV grease
- Paper/Shop towels
- Cotter pins
- Jack & jack stands
Steps
1. The first thing you want to do is get the rear of the car on jackstands and remove the wheels. Once the car is on jackstands you can remove the parking brake.
2. In order to get enough clearance to remove the buckets easily you need to pop the lower ball joint on both rear wheel knuckles. Bend and wiggle the cotter pin to remove it. Remove the castle nut using a 17mm socket and impact gun. Lastly, use a ball joint separator tool to pop the ball joint out of place.
3. With the ball joints removed use an impact gun and a 14mm socket to remove the 6 bolts on each side that hold the axle to the differential. Find a position where you can access one of the bolts very well and then just spin the axles to move the bolts into place.
4. Use a set of straight needle nose pliers to undo the clamps holding the cv boots onto each cv bucket.
5. Now it is time to remove the cv buckets from the cv joint. Take the cv joint out of the differential by tugging on the axle and gently pushing the wheel knuckle away with your foot. Now pull the cv boot off the bucket and carefully remove the cv bucket from the cv joint. As you remove the bucket it is pretty likely that some cv grease is going to fall so make sure you’re not directly under it.
6. Once you have the cv buckets removed you can inspect them for pitting. What you’ll likely notice is that the driver’s side bucket has darker grease, which is caused by the metal shavings contaminating the grease. Use a paper towel or a shop towel to remove the cv grease from both of the buckets. Once the grease is removed you should be able to see damage on the driver’s side bucket where the tripod joint bearings of the cv joint sit. If you inspect the passenger’s side bucket you shouldn’t see any of this damage. By swapping the cv buckets from side to side you are letting the driver’s side tripod joint bearings sit on a new surface. Once you’re ready to put things back together pack the cv buckets with new cv grease. Make sure that you keep track of each cv bucket so you know which one is the left and right side and you don’t have to do this process all over again!
7. Now you’re ready to install the cv buckets. Carefully install the cv joint tripod into the swapped cv buckets and slip the cv boot over the bucket. If one of the tripod joint bearings fell onto the ground like mine did, make sure you wipe off any contaminants and put it back onto the tripod joint correctly, they should only fit one of two ways. Tug on the axle and gently push on the wheel knuckle to allow for clearance to insert the axle back into the differential.
8. With the axles in place use a paper towel or shop towel to wipe away any extra cv grease. Once everything looks clean use a set of straight needle nose pliers to tighten the clamps holding the cv boots to onto each cv bucket.
9. Then use a 14mm socket and wrench to tighten the 6 bolts on each side that hold the axles to the differential. I’ve found that it is easiest to lodge the wrench against the car to keep the axles from spinning. Another option is to use the parking brake but you will find yourself engaging and disengaging it over and over again as you move the axles to reach the bolts. Torque the driveshaft bolts to 61 ft-lbs.
10. With the axles in place the last thing to do is to secure the lower ball joint on each rear lower control arm. This can be a bit tricky because as you tighten the castle nut it will have a tendency to spin unless the ball joint is under pressure. What I found easiest was to use a c-clamp to squeeze the ball joint to the rear lower control arm. Torque the lower ball joint castle nut to 51-58 ft-lbs. Once the castle nut is torqued insert a new cotter pin in place.
11. Re engage the parking brake, reinstall the rear wheels, lower the car back down to the ground, and hopefully enjoy your now vibration free car. If the car still has vibrations on acceleration you should look into half shaft spacers for the ultimate fix.
 0:04:31
CV Bucket Swap | Honda S2000
 0:08:39
How to swap CV Cups on a Honda S2000
 0:02:43
Common Problems - Worn Inner CV Buckets and How To Fix Them | Honda S2000
 0:00:33
New axle for my FA5 civic!
 0:06:35
How to Get the Right Axle Size for Your Honda- AXLE TECH
 0:00:16
how to replace cv joint
 0:00:21
Removal like this ?? Cv joint 👀 #garage #repair #fail #cars #mot #service
 0:00:16
CV-joint life hack | AUTODOC #shorts #autodoc
 0:00:09
CV Axle Installation Trick! Awesome Hack, Quick and Easy
 0:00:50
How to replace a cv joint (Easy way to fit a cv joint)
 0:00:15
What mechanics don't want you to know about CV axles!
 0:09:43
How to Replace CV Axle Assembly 2006-2011 Honda Civic
 0:00:09
🛠 Fully Loaded 1993 Honda Civic Coupe - #shorts
 0:12:39
How to replace a CV shaft on a 99 honda civic (Getting it track ready)
 0:00:51
1992 Honda CV Axle Removal #mechanic #honda #snapon
 0:06:27
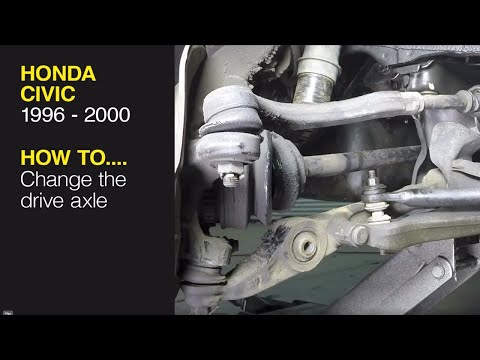
How to replace the drive axle on a Honda Civic (96-00), CR-V (97-01), Acura Integra (94-00)
 0:00:40
CV Joint Easy Remove and Easy Installation #shortsvideo #mechanic #cvjoint
 0:00:31
Cv Axle Remove #short #shorts #fyp
 0:04:31
INSANE SHAFTS HONDA B-SERIES SWAP AXLES CIVIC INTEGRA UNBOXING
 0:06:52
How to Replace Front Passenger Side CV Axle 1998-2002 Honda Accord
 0:06:17
CV Axle Replacement - Driver's Side: Honda CRV
 0:00:25
ball joint removal trick
 0:07:40
S2000 Axle Cup/ Inner CV Bucket Swap - Vibration Fix
 0:00:42
El Toyota Corolla!! (Lo Peor De Toyota Parte7) #Shorts
Комментарии