filmov
tv
Getting Started with Adafruit IO: Control Led with Esp8266 NodeMCU

Показать описание
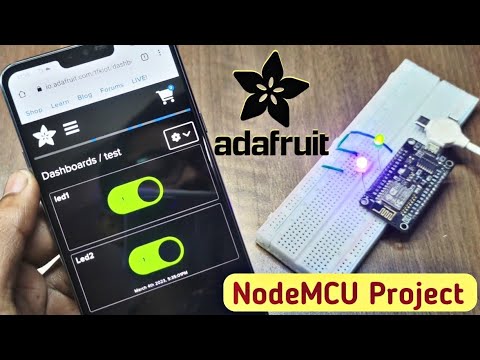
Welcome to our tutorial on getting started with Adafruit IO! In this video, we'll show you how to control LED lights with an ESP8266 NodeMCU and Adafruit IO. We'll be using the digital pins D0 and D5 on the NodeMCU to connect two LED lights and control them remotely with Adafruit IO.
We'll start by setting up our Adafruit IO account and creating a new dashboard for our LED control. Then, we'll walk you through the process of connecting the ESP8266 NodeMCU to the internet and configuring it to communicate with Adafruit IO.
Once we have everything set up, we'll show you how to use Adafruit IO to turn the LED lights on and off remotely from anywhere with an internet connection. We'll also demonstrate how to use Adafruit IO to monitor the status of the LED lights and receive notifications when they are turned on or off.
This tutorial is perfect for anyone who is new to Adafruit IO or wants to learn how to control LED lights with an ESP8266 NodeMCU. No prior experience is required, and we'll provide step-by-step instructions to make the process as easy as possible.
So, grab your ESP8266 NodeMCU, connect your LED lights to D0 and D5, and let's get started with Adafruit IO!
#adafruit #esp8266 #nodemcu
| TFK | Getting Started with Adafruit IO |
 0:02:46
Getting started with Adafruit IO
 0:09:45
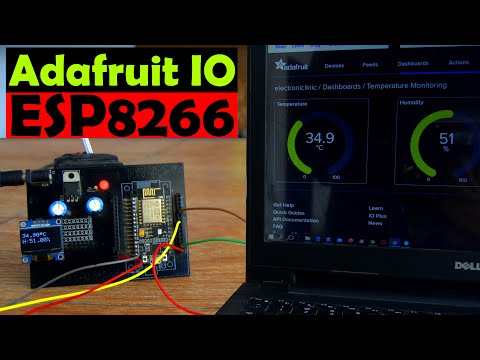
Get Started with IoT: Build a NodeMCU Adafruit IO Dashboard with DHT11 Sensor
 0:02:12
What Is Adafruit IO?
 0:17:13
ARDUINO IDE + ESP32 + Adafruit IO | Monitoring and Controlling the ESP32 with Adafruit IO
 0:08:56
Getting Started with Adafruit IO: Control Led with Esp8266 NodeMCU
 0:01:33
Adafruit IO 2020 Updates! #adafruit
 0:07:53
Adafruit IO Setup
 0:00:12
DIY IoT Dashboard with ESP32 and @adafruit IO!
 0:27:12
IoT Project with Pycom WiPy and Adafruit IO - From Zero to Hero
 0:12:35
Getting Started with IoT: Build a NodeMCU Adafruit IO Dashboard 2024 #infysky #razorpay #arduino
 0:00:20
DIY IoT Dashboard with ESP32 and Adafruit IO in Minutes! Pt.2
 0:13:36
ESP8266 with Adafruit IoT Platform, Adafruit IO, Adafruit MQTT ESP8266 IoT Project
 0:01:24
Adafruit IO Dashboard setup guide for ESP32
 0:19:00
IoT Platforms - Adafruit IO
 0:01:16
Welcome to Adafruit IO @adafruit #adafruit #adafruitio #Iot
 0:01:50
Setup Adafruit IO dashboard with toggle button
 0:38:07
All the Internet of Things — Episode 4 — Adafruit IO: An IoT Service for Everyone @digikey #adafruit...
 0:03:57
IoT on Raspberry Pi Pico using CircuitPython and Adafruit IO
 0:01:21
I2C Scan with Adafruit.io WipperSnapper
 0:08:05
How to create a Dashboard with Adafruit.IO
 0:13:37
Physical computing wireless tutorial - WiFi and MQTT with ESP32, Adafruit IO and IFTTT
 1:48:53
Adafruit IO and IoT Device Integration Full Guide
 0:00:38
(Demo) ESP8266 Control GPIO Output using Adafruit IO and Google Assistant
 0:05:45
Connecting to Adafruit IO with ESPHelper
Комментарии