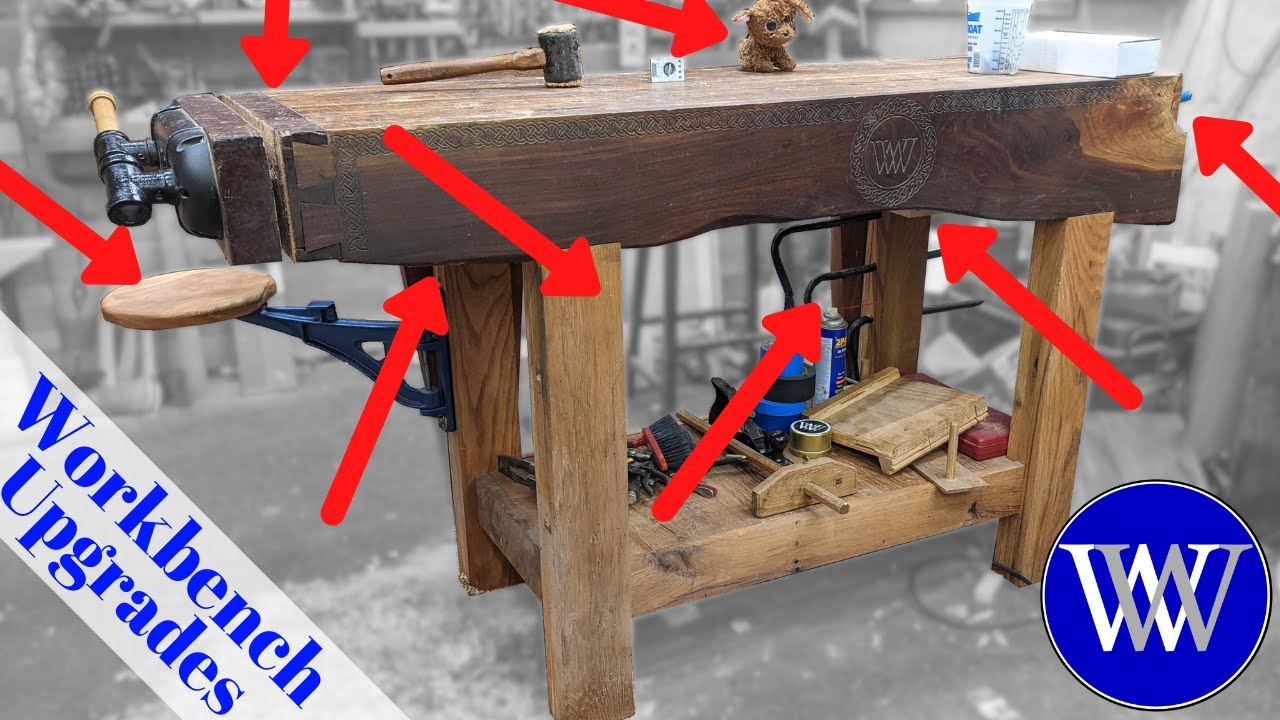
Bench Upgrades That I Love and Some I Don't

preview_player
Показать описание


My workbench is the center of my woodworking shop. I have made many upgrades to my bench over the years. here are a few changes to my work bench that I love!

Join this channel to get access to perks:

---Tools I Suggest---

---Find Antique tools near you---

Top Patreon Supporters:
Blair Svihra Jr
Aaron Fenn
John Jugler
Andrew Wilson
Travis Reese
Tom West
Brandon Lauer
Brian Suker
Bruce Rose

////Help this channel grow\\\\

////You Can find me:\\\\

Instagram: @udostehle
Рекомендации по теме
Комментарии
Автор

I love the workbench James. It looks like a bench that is actually used to build.

Aaron-njou
Автор

Thanks for the tour! The personalized carving is a great touch. The bench doesn't have defects it has character.

darrensmall
Автор

Build the pigeon holes for storing your shooting boards and bench hooks under the bench as you mentioned.
Leave space for the holdfasts as you also mentioned.
Here's the last ingredient that you're missing, make a removable cap to sit on top of the pigeonholes. It's job is to collect the dust and debris. You reach down there once a week and pull it out, take it to the garbage can, and dump the dust into the can.

deezynar
Автор

Glad the wood bolts worked great for your beautiful bench

jamesletner
Автор

No. No you don’t wish you had used a pop-up planing stop. If you had, you’d have said in this video that you wished you’d made a traditional planing stop. I had one of those exact same pop-ups on my previous bench. It worked great, EXCEPT when you try to lower it back down you have to blow out all the wood shavings that have accumulated inside. And 25% of the time they get caught in the spring so then you have to DIG THEM OUT with a nail or marking knife or whatever. I can’t count the number of times it was so bad I actually had to open the ting all the way up and pull the spring out entirely, then put it back in. It was annoying. My current bench has a traditional stop – SO MUCH BETTER. It goes up, it goes down, never gets jammed up with wood shavings.


Also, some other things you can use a traditional stop for: I keep my strop hanging from my bench and I just butt it up against the side of my planing stop. Very convenient. Also, I often find I need a stop without teeth with doing chisel work, like when chiseling a knife wall. I just raise the stop up higher than the wood and I can butt it up against that. It’s common for me to have that stop up high for this purpose while I keep my bench hook at the other end of the bench when I need to cut lots of boards to length.

chrisvonpimpenstein
Автор

I built a tool box. Three of the outside surfaces had french cleats that would accept tool boards that were stored on the inside when not in use. I glued on the tool holding stuff using hot melt glue. Then I started using it and improving it. It is still in works. I invested a lot of effort in the box but very little in the tool storage portion. I also made some charts of project activity vs. tool usage to get some idea about the priority of accessibility of a given tool. So per your request I suggest keep it cheap on effort until have verified the tool placement and then carve stuff on it. Its the trip not the destination.

michaelnorris
Автор

To store under the bench; I used the wire oven racks out of a kitchen stove. Tight enough to hold most things, yet derbies fall through. Also items are still visible from all sides.

karolskakes
Автор

The bench seat "OMG"... I want two, one on each side !!

rwoz
Автор

Just a thought on the under storage on your bench, this is what I did. I ran 2 LARGE dovetail grove long ways and made about 6 dividers that I could slide in from the end, leaving them unsecured so i could tap them each direction if i wanted to change the size of the gap between them when I change what i want to change... seems to work well for me... good luck!! Love your content.

jasonjuveland
Автор

I wouldn't assert that my bench is perfect, but it works for me. I made it around twenty or twenty-five years ago and I haven't found it necessary to change it. The bench has a 1 1/4" thick ash top with an apron that is the same thickness and around 5" wide. It has maple trestle legs connected by four maple stretchers that are held in place by threaded rods which run through grooves in the stretchers and have washers and bolts to tighten them to the legs. I have a 4 " 10" Jorgenson face vise installed on one long side of the bench on my left. The top is nearly eight feet long and two feet long. It measures a full eight feet when you add the jaws of the full-width end vise that is on my right when I'm facing the face vise. The end vise is made from two 11/4" x 18 3/4" bench screws with two 1'3/4 thick maple jaws the bench screws are about 16" apart and are independent so the outer jaw is free to cant to hold tapered shapes. The jaws of the end vise are drilled for bench dogs and there is a row of bench dog holes running from front to back aligned with the dog on the Jorgenson vise. The top is also drilled to take three Jorgenson Pony hold-down clamps. The stretchers support two shelves. The top shelf holds my planes and the bottom shelf holds two trays and some miscellaneous bench accessories. The two vises are incredibly useful. I often clamp a stick in the end vise and use it as a stop when I'm face planing a board. The uninterrupted long edge allows me to clamp boards horizontally to the apron for edge planing or shaping. This bench continues to work wonderfully for me, the only feature that I don't often use is the three Pony hold-down clamps.

kennethspeed
Автор

For storing things under the bench, look to kitchen pot lid and sheet pan storage for inspiration. Some 1/8" steel rod, a piece of plywood and voila, you can store as much as you want sideways.

johnsanford
Автор

0:48 Admit it, you matched your shirt to the bench dog's bow, didn't you?🐩🎀
Love the "Perfection is a direction"- attitude, James! That should be on a shirt 😁

c.a.g.
Автор

James, the pop-up stop is rather brittle. I've broken the movable part clean off of one just from planing forces and bent the pin on a second from the same forces. They are great, but would be way better if made of stainless and not zinc plated iron.

jamesgwoodwork
Автор

High there, you might want to check storage solutions at ulmia, like their swinging drawers. I guess it would be a fun project and awesome to see you build. Greetings from Germany

MaSeXyLoVe
Автор

An alternative to drilling extra holes on 3" center is to make make some dedicated bench dogs from dowels with square or rectangular wooden heads.

Ideally make the heads rectangular with a width say 4" plus the bench dog diameter by 6" plus the bench dog diameter, then offset the dowel position so it towards one corner with a 1" gap from one of the 6" sides then a 2" gap to one of the 4" sides.

Then you can rotate the head position to reduce the distance between the holes by 1-4".

benkeith
Автор

James I think your workbench is a masterpiece, really the carvings and the live edge make this a one of a kind piece of art. Someday long after your gone this workbench will be found and those personel touches will make this so much more that just a workbench. Great job and thanks for sharing.

davetarrant
Автор

As I'm still building my bench, I appreciate the insight

Apillicus
Автор

I love seeing how others use their benches. It really shows a lot of personality and how it is used. I question "pristine" benches and just could never work that way myself. One thing I like about mine are my Noden Adjust A Bench legs. I can adjust the height up or down depending on use, aligns with my table saw for outfeetd, and let's my daughter participate in the shop a lot more. Rock solid, and you can customize them endlessly, including a shelf similar to yours on the bottom.

egbluesuede
Автор

Cannot articulate how much I appreciate you, James. Thank you.

ockamsrazr
Автор

Great video, James, thanks for your candid thoughts on your goof-ups, etc. Remember, an expert is actually just a person who has already made all the possible mistakes and learned from them.

I built my current woodworking bench about 18 months ago, using Rex Krueger’s English Joiner’s Bench as the pattern. I highly recommend the design to any of your viewers who need a good bench but lack the time, space, or funds to build an “forever bench”. (As you say, such a thing doesn’t exist, perfection is a direction, not a destination!) I had to build it small because I have a very small shop. When I complete the planned construction of my new home and shop next year, I will have the space for my “forever bench”, which will probably be a variation on the Anarchist’s Workbench.

Keep these videos coming! Great content, sir!

JamesWilliams-enos