filmov
tv
Fix your Tensioner on Vintage Singer 201, 221 and 301
Показать описание
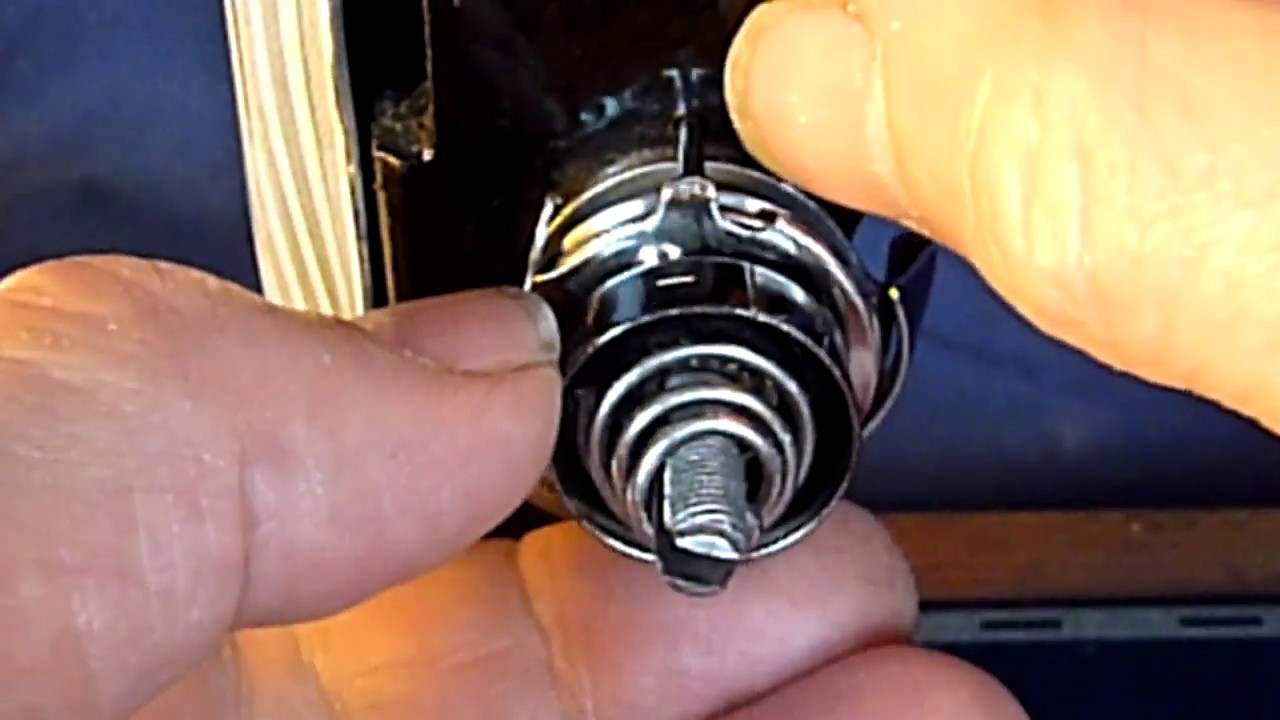
This video makes a recommendation for adjustment of the tensioner of a Singer 201 sewing machine. Other machines may have similar tensioners. The Singer 221 and Singer 301 got same issue.
List of contents
0:00 Intro
0:15 How to modify tensioner
0:44 Video of inside tensioner
1:03 The reason for the normal big variation in thread tension
2:50 How the unwanted variation us reduced
3:48 The important gauge to measure thread tension
4:30 End
The drop in variation of tension was verified by using a dynamometer. Furthermore, measurements are made at different positions of the tension discs (they are turned randomly). Before the change, the tension could vary a factor 2. After the change the tension vary a factor 1.2.
I suppose Singer realized at some point in time, that the 3 humps on the back of the -|+ cup was a bad idea. They were removed on the tensioners for the Singer 500A and 503A. I should call it a design flaw, but you do not know how often you will see the problem on a machine.
I made a survey by finding 23 Pictures of Singer 201 with clear Picture of the tensioner. 16 of them had the -|+ mark on 12 o'clock position. 7 had mark at other Places. So the room for improvement is there - so please share information for relevant partners.
I recommend the following videos not made by me regarding this tensioner.
This good video by Archaic Arcane provides good information about how to check proper operation of tensioner:
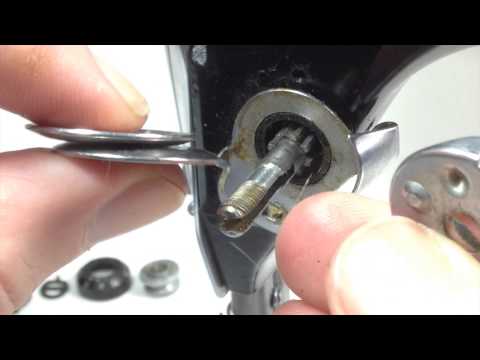
This is about disassembly and reassembly. This can be to clean all the parts of the tensioner. This video is from SE MN Sewing Machines:
This video goes in more detail from Archaic Arcane
Please like the video, if you get useful information. You will probably find other tips for your sewing machine on my YouTube channel.
List of contents
0:00 Intro
0:15 How to modify tensioner
0:44 Video of inside tensioner
1:03 The reason for the normal big variation in thread tension
2:50 How the unwanted variation us reduced
3:48 The important gauge to measure thread tension
4:30 End
The drop in variation of tension was verified by using a dynamometer. Furthermore, measurements are made at different positions of the tension discs (they are turned randomly). Before the change, the tension could vary a factor 2. After the change the tension vary a factor 1.2.
I suppose Singer realized at some point in time, that the 3 humps on the back of the -|+ cup was a bad idea. They were removed on the tensioners for the Singer 500A and 503A. I should call it a design flaw, but you do not know how often you will see the problem on a machine.
I made a survey by finding 23 Pictures of Singer 201 with clear Picture of the tensioner. 16 of them had the -|+ mark on 12 o'clock position. 7 had mark at other Places. So the room for improvement is there - so please share information for relevant partners.
I recommend the following videos not made by me regarding this tensioner.
This good video by Archaic Arcane provides good information about how to check proper operation of tensioner:
This is about disassembly and reassembly. This can be to clean all the parts of the tensioner. This video is from SE MN Sewing Machines:
This video goes in more detail from Archaic Arcane
Please like the video, if you get useful information. You will probably find other tips for your sewing machine on my YouTube channel.
 0:04:30
Fix your Tensioner on Vintage Singer 201, 221 and 301
 0:04:38
Solving Singer Sewing Machine Tensioner Issues
 0:10:11
Repair and adjust old Style Tensioner for Vintage Singer 66 and 99 Sewing Machines
 0:00:21
Quick Tension Adjustment on a Vintage Singer Sewing Machine
 0:03:23
Sewing Machine Tension Assembly 2 Types
 0:10:04
Quick fix, Pre-Tensioner on a Vintage Kenmore Machine
 0:01:21
The most common cause of sewing problems on a vintage sewing machine
 0:10:06
The Tensioner Vintage Singer Sewing Machine Model 15 - 90 / 91
 0:29:01
How to Fix Tension Issues With Your Sewing Machine, Free course on sewing machine repair 3 of 5
 0:07:08
How To Properly Thread The Tensioner On An Old Kenmore Ultra Stitch 8 Sewing Machine
 0:31:07
How to Remove, Clean, Replace and Adjust the Thread Tension Unit on a Vintage Singer Sewing Machine
 0:02:48
How to fix Plastic Tensioner on Vintage Sewing Machine
 0:11:06
On Machine Disassembly and Reassembly of a Vintage Singer Sewing Machine Tensioner
 0:15:46
Disassemble and Reassemble a Vintage Singer Sewing Machine Tensioner
 0:21:38
How to fix your thread looping under the fabric
 0:00:58
Threading a Vintage Singer Sewing Machine 15 Class
 0:05:38
Sewing tension problems upper and lower thread tension explained.
 0:05:07
Singer Sewing Machine Tension Assembly
 0:08:51
Sewing Machine Thread Tension - Updated
 0:11:13
Singer Tension Spring Replacement 201K
 0:03:54
How to Fix That Annoying Loose Stitch - Is It Foot Lift Rather Than Tension?
 0:03:15
How to fix the Hook Timing on an Industrial Sewing Machine
 0:03:13
How to Thread a Singer Fashion-Mate 237.
 0:03:39
Why Thread Breaks? Main Reasons of Upper Thread Breaking on Sewing Machine
Комментарии