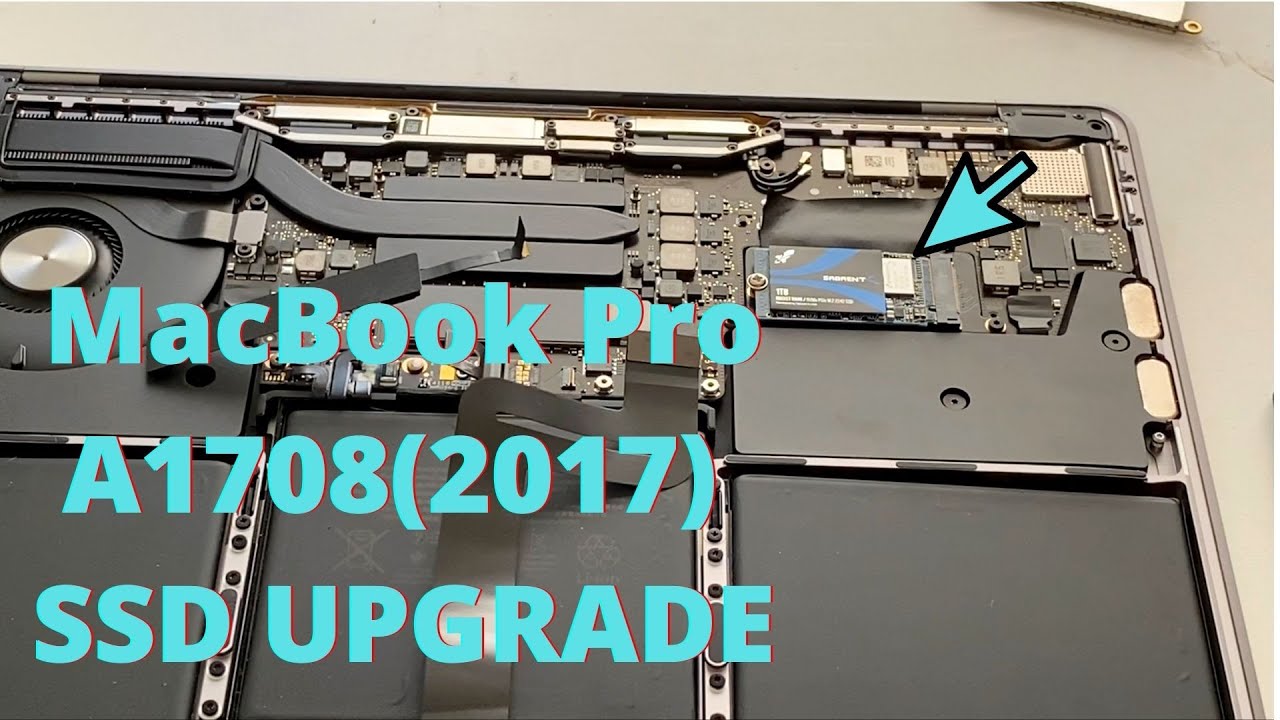
MacBook Pro A1708 (2017 model) NVMe SSD Upgrade

preview_player
Показать описание
Check how to upgrade MacBook Pro A1708 (2017 model) NVMe SSD to 1 TB.
Рекомендации по теме
Комментарии
Автор

Thanks for this video and for the comments. I successfully upgraded the 128 GB SSD into a 2 TB SSD. First the system disk utility didn't find the new SSD when started from the mac itself. When started from another external system disk, the disk utility found the 2 TB SSD. After formatting the Sabrent SSD as explained in the video and restoring from the time machine backup, the mac is exactly as it was before with the big difference that now there is 1900 GB free space there and the mac is running quicker and smoothly ;-)

philippenieto
Автор

Fantastic video! I was able to upgrade an old A1708 MacBook Pro and then donate it to a volunteer shelter where folks use the MacBook for creating resumes, printing them, surfing the Internet and posting their resumes and responding to recruiters, and once in a while receiving an e-mail for a in-person interview. Your hardware upgrade video has continuously contributes to society. Thank you very much!

Onyok.Bentot
Автор

Thanks for the video, great tutorial.

I have just done this upgrade of SSD on my MacBook Pro 2017. For the removal of existing SSD and the installation of the new SSD Sabrent 512GB no issue at all. Just be careful not to force anything, be delicate and make sure you reconnect the battery connectors properly, with no force.

The restart was successful, just important info, missing in this video, it that when you restart you have to keep pressed Command + r keys to reinstall the OS system that was installed, or use Command + Option + R to install the latest Apple OS. The computer will then ask you to select the internet network and prompt the password, than it will communicate via internet and this phase takes around 5 minutes. Once completed, the system will open the Utilities interface and you have to select Disk Utility to erase the new SSD to format it, then the OS reinstallation. Mine was to reinstall High Sierra and it took 15' at least.


Overall 1 hour job, not difficult thanks to this tutorial.

starclass
Автор

I recommend creating a Mojave boot installer before removing the original SSD. You may find the new disk is not recognised in Disk Utility but it will be if you start up with the boot installer. You then complete the new install and restore using the Time Machine back up.

musicworks
Автор

There's a lot of thing to take into consideration,

1st. Dont use your metal screwdriver to pull that battery connector, the last thing you want is create an accidental short.

2nd. Instead of pulling the ssd that way, better took off those speaker bellow the ssd first. Pulling it like that might accidentally broke the socket on the board.

3rd. You dont have to unplug those trackpad cable. Just the battery.

otosang
Автор

Holding down Command and R and Powering on is an outdated method for older Macs. Try holding down Option, Command and R When powering on and then enter Wi-Fi password and a menu with newer version of macOS will be available to install. Someone in the comment section showed me this method and it worked for me... Thank You

froyo
Автор

Tried the same way, and works nice. Yes, posting this on my MBP 13 2017 /w 1TB SSD. Thank you so much!

mrmt
Автор

GREAT VIDEO!!!
I have been waiting for years to find this!

march
Автор

Generally good video! This procedure may have looked easy, but really, even just removing that small flat battery cable in itself is tricky (beginning at 2:20). This video does not seem to show that there is a small 'latch' that has to be raised to unlock the cable.  
Pulling out the smaller flat battery cable without unlocking it is asking for issues and this video does not show that part clearly. It might be worth the $50 to ask a pro to do it. At least they can install and you can handle the OS reinstall part.
As another comment mentioned, it is not necessary to remove the trackpad flat cable. (At 2:01)
Otherwise, the steps are correct and this is a good upgrade as the Sabrent SSD will add a lot of speed to disk operations and can increase the overall speed of the laptop and Make it usable longer.

robertr
Автор

Thank you for the guide. Just used the $9 NFHK A1708 NVME adapter paired with a Western Digital SN740 512GB SSD size 2242 open box I got off eBay for $35. Great pairing!!! Im getting 2800 MB/S Read and 2600 MB/s write. I can vouch that it wakes up from sleep mode too!What huge improvement over the stock 128 GB drive!!!! Made a Ventura USB boot drive and did everything off that rather and the online installer.... and the whole process took 30 min max. I normally would use a sintech adapter, but this is budget beater build for work. If you use a NFHK adapter, the gold piece holds the SSD, and the silver screw screws in from underneath LOL . It stared at if for 5 min before I figured it out.

abemiranda
Автор

You should have placed the camera on the other side (front of you) or above the laptop. Your hands are blocking the view of the things you are doing. Anyway, it's a very helpful video, specially for those who really wants/need the upgrade. Cheers!

joemarsarmiento
Автор

Great tutorial, one of the best I've seen regarding SSD upgrade for the 2017 MacBook Pro. Thinking of upgrading mine but have no experience so am unsure.

DaleClaassen
Автор

Beautiful tutorial, I followed all the steps with the same products and it works very well, thank you very much!!

michelemarvulli
Автор

Thanks for the video/ After you formatted the hard drive you didn’t tell us how you installed the OSX did you use a time machine back up?

williestyle
Автор

Hi, do i need a bootable usb to install new macos catalina inthe new ssd? But i did not see you used usb bootable in this video.

joshm
Автор

Did the upgrade yesterday and everything works beautifully now. A few words of advice here, so you can learn from some of my failures:

1. If you have Big Sur installed on your machine before you swap the SSD, make sure to upgrade to Monterey *before* swapping the SSD. Reason being that there is a high chance that otherwise you will get a hanging bootup and a message that says something on the lines of "A required firmware update could not be installed". From then on your are SOL and have to put the old drive back in to do the update to Monterey. After that, everything is relatively smooth sailing. I know doing the Monterey update on a drive that you do not plan on using anymore is a pain in the neck but it will save you from the even bigger pain in the neck of having do everything else twice. Ask me how I know....
2. Keep track of the location of those bottom plate screws! The screws need to go back in the same place that you take them out of. This is important. On this Macbook, the bottom plate has several different screw types (At least three). If you put the wrong screw in, you might end up with a screw that sticks out. Resist the temptation to try cranking it in because your think the threads are rubbish (they are not). If the screw does not go in fully when hand tightening it, you have the wrong screw for that location. It is not as bad as in the iPhone where a screw that is .2mm too long in the wrong place might brick your logic board but still. If you force things, you might end up stripping threads, which (for all practical purposes) is impossible to fix. Take out the screws and tape them down on a piece of paper, so you can get an orientation where the screw came out of. If you have a magnetic plate, even better. Luckily I was prepared for that one.
3. The bottom cover plate on the A1708 does not come off that easily. At least it did not on my machine. I used two guitar picks to get into the edge of the case at the hinges, below the display. Be gentle. Once you get in there, you can slide the guitar pick all the way around. When there is resistance, do not be afraid and keep pushing along the edge - the bottom plate is snapped into place in six spots, and those snaps are a rather tight fit. Once you are done, you might notice that the bottom plate is still stuck around the edge where the display is located. This is the trickier bit, because in that place, the plate is held on by a slide-in mechanism. Bend the bottom plate up very slightly at the edge opposite the display so you can safely get a hold, then pull carefully. On mine, the plate released rather suddenly, so be mindful of that. I took nearly 15 minutes to figure that out, but I also was very nervous about pulling or pushing too hard on things that might not like being pulled or pushed.
4. Take your time. You definitely do not want to do this in a hurry.

DeputatKaktus
Автор

If you're getting an error that says that you cannot connect to Apple's servers, instead of pressing command and R, you should press option command and R. This should bring you to the newer utility where you can actually install a newer Mac OS version. And if you're still getting that error you should try and connect to another Wi-Fi if possible. These two steps helped me resolve the issue.

aharmlesshorse
Автор

Great video. I'm now planning to upgrade my A1708 as well. So, many many thanks for these instructions!
Just one question: Does anyone know if there is a enclosure for the removed Apple SSD with which it can be used as a normal external ssd on mac or windows?

Lukas-zibu
Автор

Thanks for the tutorial. But the transfer of MAC OS with the data from your old SSD would have been a lot easier if you bought a USB casing for the NVMe SSD, and used SuperDuper to clone your old SSD to the new SSD before installing it to your macbook pro. Anyway, thanks for the tutorial. Let me head over to Amazon to buy the 2242 SSD. Cheers.

jk
Автор

Thanks for the video this helped me upgrade my late 2016 MPB. Only issue i encountered is:

1. Cannot install windows 10 through boot camp. Instead. I did manual install. Based on searching its due to 3rd party adapter/ssd drivers.


Everything else works fine. Thx again.

moloyskii