filmov
tv
Chevy Cruze Intake manifold removal 11-15

Показать описание
10mm
T30 fuel rail
9/32 throttle body and also 5mm Allen wrench
E10 mounting bolts - 15ft-lb
GM# 55566664 gasket
Don’t forget to clean behind the engine before reinstalling!
The Chevrolet Cruze is prone to PCV system failures, this poorly designed aspect of the engine needs to be replaced. Please follow the links to the Cruze Talk forums for full Information along with my other videos.
Full in depth explanation of PCV system and problems on this engine;
My PCV fix kit install video;
My valve cover / PCV regulator diaphragm, replacement video;
Cruze Talk forum to remove intake manifold;
 0:34:38
CHEVROLET CRUZE INTAKE MANIFOLD REMOVAL REPLACEMENT CHEVY SONIC 1.8
 0:31:05
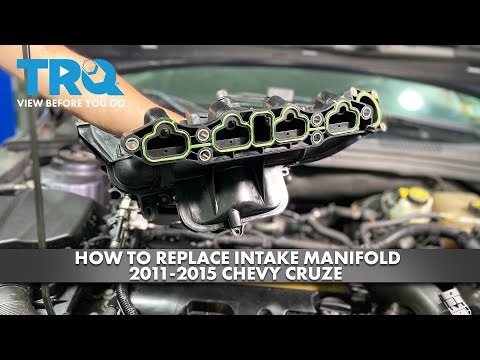
How to Replace Intake Manifold 2011-2015 Chevy Cruze
 0:04:00
Chevy Cruze Intake manifold PCV valve fix kit V2 supplemental Installation
 0:21:25
2015 Buick Encore 1.4 (Chevy Cruz/Trax) Ecotec SUPER DIY Intake Manifold & Valve Cover Fix-Yes, ...
 0:41:47
CHEVROLET CRUZE INTAKE RUNNER CONTROL VALVE SOLENOID REPLACEMENT LOCATION. CHEVY SONIC
 0:28:13
ZZP PORTED MANIFOLD & PCV UPGRADE INSTALL ON '12 CHEVY SONIC| Power & efficiency with Z...
 0:46:39
16-19 Chevy Cruze, Mailbu Valve Cover Removal, VVT Solenoid & Camshaft Sensor Replacement 1.4L, ...
 0:10:09
ZZP PORTED INTAKE MANIFOLD INSTALL & REVIEW | IS IT WORTH IT?
 0:13:51
How to Replace Valve Cover 2011-2015 Chevy Cruze
 0:31:16
CruzeKits.com V3.4 PCV Fix Kit In-Car Install
 0:22:09
How to Replace Turbocharger, Exhaust Manifold and Gaskets 2011-2015 Chevrolet Cruze
 0:04:43
Chevy Cruze Intake manifold removal 11-15
 0:21:28
Chevy Cruze Custom PCV Fix Kit & Custom Catch Can Setup!
 0:11:51
Chevy Cruze Valve Cover Gasket Replacement - Leaking Oil - Same for Trax, Encore, Sonic 1.4 L
 0:06:13
Chevrolet Cruze 1.4L intake manifold removal how to
 0:07:23
2020 Chevy Malibu PCV Valve & Hose Removal & Replacement
 0:00:16
2014 Chevy Cruze p0171 intake manifold replacement. My 3rd intake manifold on this car
 0:13:49
Does Porting - Chevy 1.4l Ecotec Intake Manifold
 0:17:02
How To Replace Intake Manifold Chevrolet Cruze [1.8L 1st Gen 2011-2016]
 0:10:15
How to Replace Intake Manifold Chevy Cruze - Trax - Buick Encore - Bad PCV
 0:18:17
Chevy cruze 1.4L intake manifold removal
 0:22:33
Chevy Cruze 1.4T Cylinder Head Removal
 0:02:56
GM Ecotec 1.4 Liter Intake Manifold Install Video by Dorman Products
 0:02:20
Diagnosing & Replacing the PCV Valve and Intake Manifold on a Chevy Cruze – Vacuum Leak Fix
Комментарии