filmov
tv
Micrium Embedded Kernels Quickstart

Показать описание
Getting started with the µC/OS-II and µC/OS-III kernels.
If you're considering Micrium's µC/OS-II or µC/OS-III for your next project, you may curious as to what work would be needed to get one of these real-time kernels up and running on your hardware. The exact steps involved very somewhat according to CPU architecture and toolchain. Generally the effort required is not overwhelming.
In this video I'll explain how you can get started with the kernels on an ARM Cortex-M3 or Cortex-M4 based MCU using Embedded Workbench from IAR.
Generally, running either µC/OS-II or µC/OS-III requires a project: a collection of kernel or other source files along with toolchain settings for building the files and loading the resulting code into hardware.
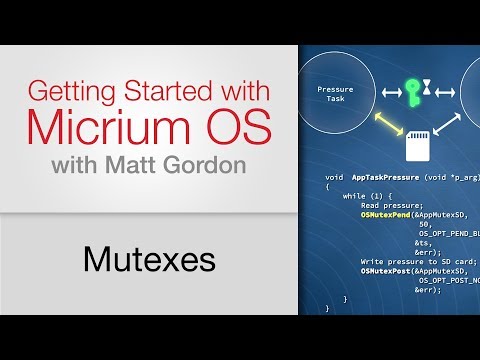
The contents of a typical project incorporating µC/OS-II or µC/OS-III are shown here. Application code makes up the top most layer such a project. Ultimately, you will provide your own application code for your µC/OS-II or µC/OS-III-based project. But in the initial phases of your development efforts, you can use example code from Micrium.
The next layer in a kernel-based project is made up of hardware-independent or portable code from Micrium. Code from three different software modules resides in this layer: µC/CPU, which is a collection of definitions and utility routines needed by Micrium's code, and also available for use your application; µC/LIB, which contains Micrium's own implementations of a number of standard library functions; and either the µC/OS-II or µC/OS-II kernel.
The majority of the code contained in Micrium's modules is written in highly portable ANSI C. There is, however, a small amount of hardware-specific code required for a µC/OS-II or µC/OS-III based project. This code consists of a BSP, or board support package, and what are known as ports for µC/CPU and the kernels.
Putting together your kernel-based project you likely won't need to develop any ports. A port is written for a CPU architecture, and there already Cortex-M3 and Cortex-M4 ports available from Micrium.
Of the two categories of hardware-specific code, then, the BSP code, which is tied to particular board is more likely to be a source of issues.
To fill the BSP requirement for your project, you have two basic options: One is to obtain a BSP already developed by Micrium. If Micrium's engineering team has worked with your board, then an example project for the board should be available from the Download Center of the Micrium website. Most of the projects available through this page incorporate all the source code, including a BSP needed to run with the Micrium kernels.
In the event that an example project is not available for your platform, if for instance you're using a custom board, your second option is to develop a BSP yourself. Just a handful of BSP code is required by Micrum's kernel. So development of the BSP is not as challenging as it can seem. Additionally Micrium now offers application notes to guide you through the process. The application notes listed here were written specifically for the combination of IAR Embedded Workbench and Cortex-M3 or Cortex-M4 based hardware platforms. They can be downloaded for free from the Micirum's website, where each is packaged with an example BSP, and the full source code for all the other components required a kernel-based project. The application notes are even accompanied by templates that automate the steps involved in creating such a project in Embedded Workbench.
Starting work on a new hardware platform always involves plenty of unknowns. Your kernel doesn't have to be one of the sources of confusion, however. With the application notes and example projects available from a Micrium's website, you can quickly get µC/OS-II or µC/OS-III up and running on your board, and move on to writing innovative multitask applications that take full advantage of the many services these kernels offer.
If you're considering Micrium's µC/OS-II or µC/OS-III for your next project, you may curious as to what work would be needed to get one of these real-time kernels up and running on your hardware. The exact steps involved very somewhat according to CPU architecture and toolchain. Generally the effort required is not overwhelming.
In this video I'll explain how you can get started with the kernels on an ARM Cortex-M3 or Cortex-M4 based MCU using Embedded Workbench from IAR.
Generally, running either µC/OS-II or µC/OS-III requires a project: a collection of kernel or other source files along with toolchain settings for building the files and loading the resulting code into hardware.
The contents of a typical project incorporating µC/OS-II or µC/OS-III are shown here. Application code makes up the top most layer such a project. Ultimately, you will provide your own application code for your µC/OS-II or µC/OS-III-based project. But in the initial phases of your development efforts, you can use example code from Micrium.
The next layer in a kernel-based project is made up of hardware-independent or portable code from Micrium. Code from three different software modules resides in this layer: µC/CPU, which is a collection of definitions and utility routines needed by Micrium's code, and also available for use your application; µC/LIB, which contains Micrium's own implementations of a number of standard library functions; and either the µC/OS-II or µC/OS-II kernel.
The majority of the code contained in Micrium's modules is written in highly portable ANSI C. There is, however, a small amount of hardware-specific code required for a µC/OS-II or µC/OS-III based project. This code consists of a BSP, or board support package, and what are known as ports for µC/CPU and the kernels.
Putting together your kernel-based project you likely won't need to develop any ports. A port is written for a CPU architecture, and there already Cortex-M3 and Cortex-M4 ports available from Micrium.
Of the two categories of hardware-specific code, then, the BSP code, which is tied to particular board is more likely to be a source of issues.
To fill the BSP requirement for your project, you have two basic options: One is to obtain a BSP already developed by Micrium. If Micrium's engineering team has worked with your board, then an example project for the board should be available from the Download Center of the Micrium website. Most of the projects available through this page incorporate all the source code, including a BSP needed to run with the Micrium kernels.
In the event that an example project is not available for your platform, if for instance you're using a custom board, your second option is to develop a BSP yourself. Just a handful of BSP code is required by Micrum's kernel. So development of the BSP is not as challenging as it can seem. Additionally Micrium now offers application notes to guide you through the process. The application notes listed here were written specifically for the combination of IAR Embedded Workbench and Cortex-M3 or Cortex-M4 based hardware platforms. They can be downloaded for free from the Micirum's website, where each is packaged with an example BSP, and the full source code for all the other components required a kernel-based project. The application notes are even accompanied by templates that automate the steps involved in creating such a project in Embedded Workbench.
Starting work on a new hardware platform always involves plenty of unknowns. Your kernel doesn't have to be one of the sources of confusion, however. With the application notes and example projects available from a Micrium's website, you can quickly get µC/OS-II or µC/OS-III up and running on your board, and move on to writing innovative multitask applications that take full advantage of the many services these kernels offer.
 0:03:45
 0:07:42
 0:08:07
 0:05:07
 0:04:06
 0:02:59
 0:06:32
 0:07:02
 0:05:34
 0:09:22
 0:01:45
 0:20:17
 0:07:55
 0:09:24
 0:03:12
 0:01:21
 0:03:27
 0:03:16
 0:01:17
 0:12:25
 0:03:35
![[3/3] Using µC/OS-III](https://i.ytimg.com/vi/fDr_VivQqqg/hqdefault.jpg) 0:04:21
0:04:21
![[1/3] Using µC/OS-III](https://i.ytimg.com/vi/mFOnxEBrXC8/hqdefault.jpg) 0:07:16
0:07:16
 0:01:43