filmov
tv
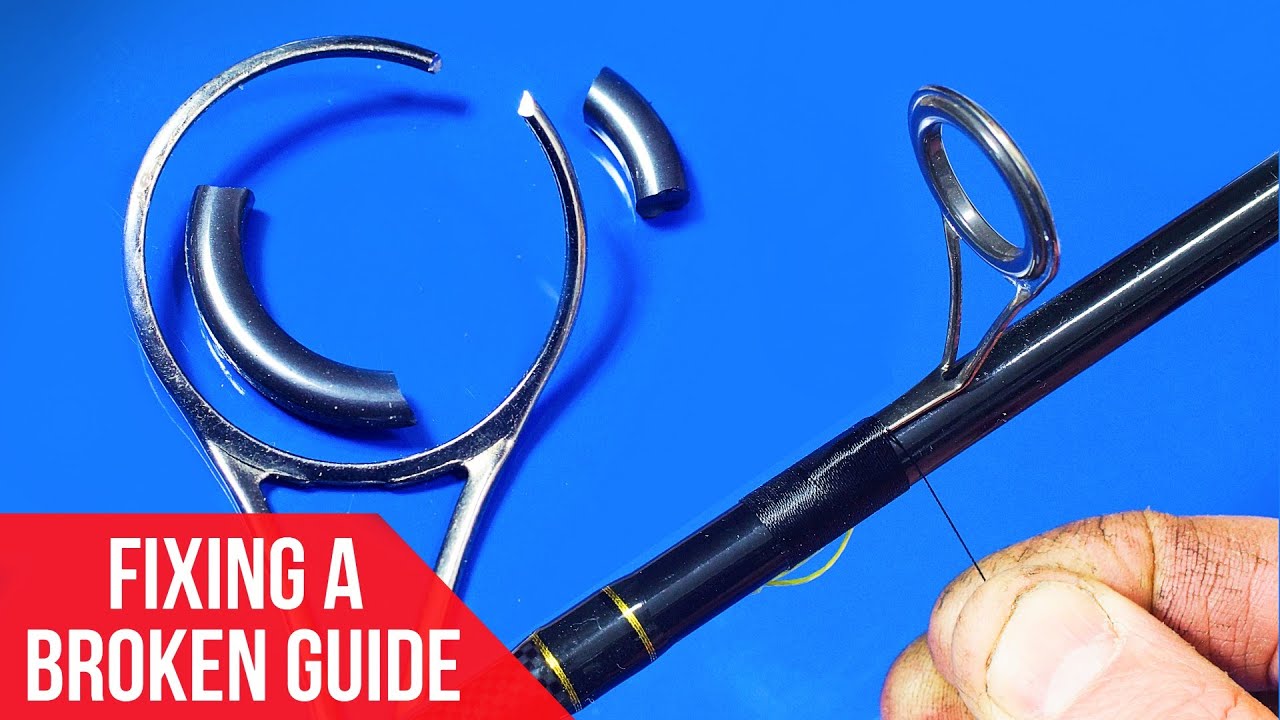
FIXING A BROKEN FISHING ROD GUIDE
Показать описание
Replacing broken fishing guides is a common problem most anglers will face at some point or another. This video is a quick guide to replacing them at home using some basic equipment. If you have never tackled a guide replacement before, I would say practice on a rod that you don’t care about, just to gain a bit of confidence and see if you can pull it off. If you have a good quality rod to repair or something with a bit of sentimental value then it may be worth contacting a professional rod builder and let them do their magic. Things on the internet generally look easier than they should.
The hardest part of the whole gig is finding a matching guide especially if you have never bought guides. The easiest way to do this is to head down to the fishing tackle shop with your rod and see what they have in stock. You can physically compare guides and maybe get a bit of help from the staff. Another great option is to take some good close up photos with you phone or camera, measure some dimensions and post to an online fishing forum or facebook group. They generally have rod repair or custom rod building groups and often people are more than happy to help. Finally if you are feeling brave buy a selection box set of guides online and see if one fits, that's what I did and struck lucky.
For thread I used a black D grade nylon rod whipping thread, you may be able to pick this up at the tackle shop or cheaply online.
I used a two part rod finishing epoxy that has a working time of about 40 minutes, and cures in about a day. Small preloaded syringes rather than large bottles can also be found online or in good tackle shops.
I used some homemade rod rests cut from some 3” x 1” softwood to make working on the rod easier. You can tie and resin rods just in your hands, but it is far easier to have some kind of rest.
The second and third coats of resin do need to be rotated so the resin doesn’t sag and pool on one side of the rod. This again can be done by rotating the rod by hand every couple of minutes but it is going to take a few hours before the resin thickens up enough to stop running. You can buy rotating rod racks online but again I made one from a microwave motor I bought online and used a bit of tube to attach it to the rod.
For sanding between coats I used 600 grit wet and dry paper and to cover things up, masking tape.
Have fun
 0:07:42
How To Fix a Broken Fishing Rod
 0:07:50
How To Repair Broken Fishing Rod
 0:04:22
DIY Repair: Fixing a Broken Fishing Rod!
 0:07:56
HOW TO FIX A SNAPPED/BROKEN FISHING ROD FOR ONLY $1
 0:04:18
FIXING A BROKEN FISHING ROD GUIDE
 0:07:34
How to fix a broken rod tip (Amazing Korean Method)
 0:09:30
How to repair a broken fishing rod: a simple fix that lasts
 0:16:43
Repairing a broken rod tip - Rod repair.
 0:08:33
How To Fix a Broken Fishing Rod Tip - Special Method and Powerful - Easy for beginners
 0:08:31
How to repair your broken rod?
 0:04:52
Don't throw it away! Repair broken fishing rods very easily!
 0:10:16
How to fix a broken Rod
 0:24:01
Strong Fix for Broken Fishing Rod | Build Break Fix & Fish Tutorial
 0:02:59
How to Repair Broken Fishing Rod Tips
 0:11:38
Rod repair - Fixing a broken fishing rod
 0:15:44
Broken Fishing Rod? Use This Simple Fix to Repair It And Bring It Back To Life!
 0:11:02
How to fix a BROKEN Fishing Rod.
 0:06:03
Fixing a Broken Fishing Rod
 0:06:13
How to Repair a Broken Fishing Rod - Broken Fishing Rod Repair - Fixing a Broken Fishing Rod
 0:01:58
How To Repair A Broken Fishing Rod Tip
 0:06:49
How to Repair a Broken/Damaged Fishing Rod Guide
 0:19:39
How To Fix A Broken Fishing Rod
 0:00:47
Fixing a Snapped fishing rod
 0:04:43
DIY - Broken fishing rod repair (St. Croix Premier)
Комментарии