filmov
tv
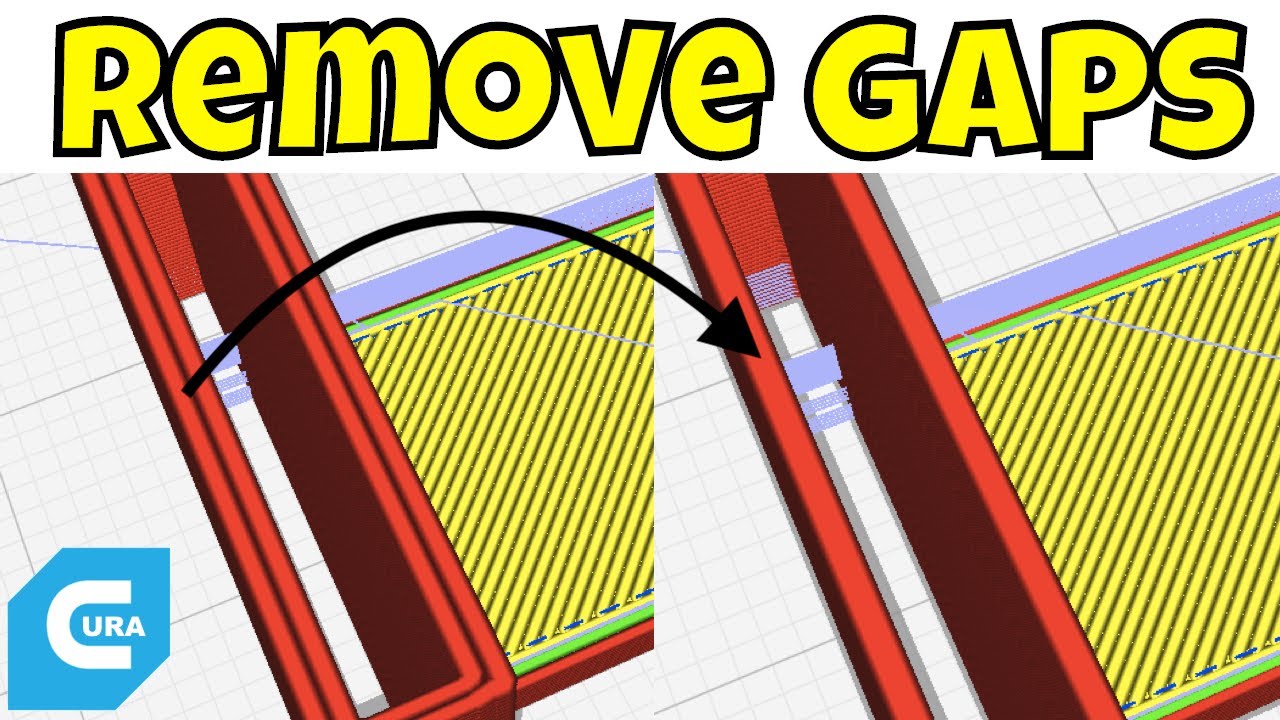
Hide Gaps in 3D Prints with Cura Slicer Settings
Показать описание
Chuck gives you a few Cura Slicer tricks to hide gaps in the top of you 3D Prints.
He also shows how to fix your Ender 2 Pro if it's printing angled or crooked 3D prints.
Ender 2 Pro:
********** $3 - Ender Style Cura Profiles Download Links: ********
(Free to Patreon Members)
***** Support the Channel ******************
Financial Support through Patreon:
****** Tools ******
Filament Friday E-Leveler 2 for Bed Leveling:
Nozzle Removal Tool:
***** Popular Prints:
Ender 3 V2 Neo:
****** Creality Ender 3 Pro: ******
****** Creality Ender 3 V2 *******
****** Creality Ender 3: *******
****** Creality Ender 3 Max ******
Direct Support through PayPal donation:
Buy thru this link to Slice Engineering for the Best Hot Ends and get 5% off your purchase:
************************************
****Creality Ender 3 Parts/Upgrades *****
Ender 3 Glass Bed:
Replacement Nozzles for CR10/Ender 3:
X-Axis Tensioner
Y-Axis Tensioner
Chuck's Favorite EZR Extruder:
********** $3 - Ender Style Cura Profiles Download Links: ********
(Free to Patreon Members)
***** Support the Channel ******************
Note:
As an Amazon Associate, I earn from qualifying purchases.
****************************************************
Filament Friday Sticker:
Send Self Addressed Stamped Envelope to:
Electronic Products
PO Box 251
Milford, MI 48381
****************************************************
Chuck's Arduino Book:
Intro animation by Pablo Licari based on Filament Friday Logo by Brian Carter.
 0:05:28
Hide Gaps in 3D Prints with Cura Slicer Settings
 0:03:10
POCKMARKS - how to get rid of gaps in 3D prints
 0:07:57
Filling Gaps for Cheap on 3d Prints | Groundeffected.com
 0:09:18
How to Fill Gaps and Seams | 3D Printing | Prop Making
 0:03:57
How to Fill Gaps on Resin 3D Prints: Two Easy Methods!
 0:50:33
Hiding Gaps on 3D Printed Parts with Textures for a Pro Finish
 0:05:34
How To Get Rid Of Gaps and Seams on Your 3D Print / 3D Printed/ tutorial
 0:06:58
Close Those Top Layer Gaps
 0:06:58
How to Control Seams In Cura Slicer Settings
 0:01:08
How To Adjust Seam On 3D Print In Cura | How To Solve Gaps In 3D Print [ Easiest Way ]
 0:11:02
How to hide layer lines on 3d prints.
 0:10:54
Genius Smoothing Tip for your 3D Prints!
 0:03:33
Creality Ender 3 V2 - An Even Cleaner Print By Using This Cheat
 0:07:51
Filling Gaps in 3D Prints Just Got Even Easier
 0:06:14
What causes lines in the middle of a 3d print? Solve under extrusion problems mid print, halfway up!
 0:11:49
Eliminate seams in your 3D prints with scarf joint seams - An exciting development!
 0:10:59
Hide 3D print layer lines with Baby Powder and UV resin
 0:13:59
3D Printing Hack - Filling Gaps & Seams with Resin and Baby Powder
 0:01:53
Under extrusion at seam (retraction settings)
 0:10:43
Finishing 3D Prints: How to Sand, Fill and Prime 3D Printed Parts
 0:10:09
How to fix gaps between 3d print layers and why 3d printers are amazing
 0:00:56
Filling Gaps in 3D Prints!
 0:09:35
Understanding Top and Bottom Layers: The Key to Perfecting Your 3D Prints
 0:08:26
Creality Ender 3 V2 - Simple Tips for Super Clean 3D Prints
Комментарии