filmov
tv
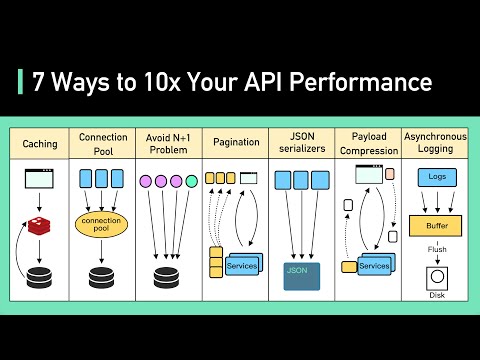
Fixing API Connectivity Issues in Angular with Nginx Deployment

Показать описание
Learn how to resolve API connectivity issues when deploying your Angular application on Nginx. Follow our step-by-step guide for a seamless deployment!
---
Visit these links for original content and any more details, such as alternate solutions, latest updates/developments on topic, comments, revision history etc. For example, the original title of the Question was: Angular setup with nginx cannot hit the api
If anything seems off to you, please feel free to write me at vlogize [AT] gmail [DOT] com.
---
Solving API Connectivity Issues in Angular Deployments with Nginx
As a new Angular developer, you may find yourself experiencing challenges when deploying your application to a server. One common issue is that your app runs perfectly on your local machine but fails to connect to the API when deployed. If you've encountered this problem, don’t worry! In this guide, we will walk through the steps to properly configure your Nginx server for a successful deployment of your Angular application, ensuring it can seamlessly communicate with your API.
Understanding the Problem
You've successfully built your Angular app locally, and everything works well, including API calls made through a proxy configuration. However, once you deploy the application on your server using AWS Lightsail and Nginx, the API calls fail to connect. This issue typically arises from improper server configuration which does not correctly route requests to your API endpoint.
Step-by-Step Solution
1. Configure Nginx for Your Application
To resolve connectivity issues, you need to modify your Nginx configuration file to allow communication between your Angular application and the API. Here’s how you can do it:
Default Nginx Configuration:
[[See Video to Reveal this Text or Code Snippet]]
This default server block handles all requests and serves your Angular app correctly as long as they are basic HTML files. However, this does not address the API requests.
2. Proxy Configuration for API Calls
To route the API calls effectively, you need to add a new location block dedicated to handling requests made to your API. Below is how you can set it up:
Add this block to your Nginx Configuration:
[[See Video to Reveal this Text or Code Snippet]]
This tells Nginx to pass any requests made to /api directly to your Heroku-hosted API.
3. Complete Nginx Configuration
Combining both the default server configuration and the new API proxy configuration, your complete configuration file should look like this:
[[See Video to Reveal this Text or Code Snippet]]
4. Restart Nginx
After modifying your configuration, don’t forget to restart Nginx to apply the changes:
[[See Video to Reveal this Text or Code Snippet]]
Conclusion
By following the steps outlined above, you should now be able to successfully connect your Angular application to your API when deployed on Nginx. This configuration allows your Angular app running on AWS Lightsail to make API requests to your Heroku backend, ensuring a smooth user experience. Troubleshooting deployment issues can be daunting, but with proper server configuration, you can eliminate these obstacles and focus on building amazing features for your app. Happy coding!
---
Visit these links for original content and any more details, such as alternate solutions, latest updates/developments on topic, comments, revision history etc. For example, the original title of the Question was: Angular setup with nginx cannot hit the api
If anything seems off to you, please feel free to write me at vlogize [AT] gmail [DOT] com.
---
Solving API Connectivity Issues in Angular Deployments with Nginx
As a new Angular developer, you may find yourself experiencing challenges when deploying your application to a server. One common issue is that your app runs perfectly on your local machine but fails to connect to the API when deployed. If you've encountered this problem, don’t worry! In this guide, we will walk through the steps to properly configure your Nginx server for a successful deployment of your Angular application, ensuring it can seamlessly communicate with your API.
Understanding the Problem
You've successfully built your Angular app locally, and everything works well, including API calls made through a proxy configuration. However, once you deploy the application on your server using AWS Lightsail and Nginx, the API calls fail to connect. This issue typically arises from improper server configuration which does not correctly route requests to your API endpoint.
Step-by-Step Solution
1. Configure Nginx for Your Application
To resolve connectivity issues, you need to modify your Nginx configuration file to allow communication between your Angular application and the API. Here’s how you can do it:
Default Nginx Configuration:
[[See Video to Reveal this Text or Code Snippet]]
This default server block handles all requests and serves your Angular app correctly as long as they are basic HTML files. However, this does not address the API requests.
2. Proxy Configuration for API Calls
To route the API calls effectively, you need to add a new location block dedicated to handling requests made to your API. Below is how you can set it up:
Add this block to your Nginx Configuration:
[[See Video to Reveal this Text or Code Snippet]]
This tells Nginx to pass any requests made to /api directly to your Heroku-hosted API.
3. Complete Nginx Configuration
Combining both the default server configuration and the new API proxy configuration, your complete configuration file should look like this:
[[See Video to Reveal this Text or Code Snippet]]
4. Restart Nginx
After modifying your configuration, don’t forget to restart Nginx to apply the changes:
[[See Video to Reveal this Text or Code Snippet]]
Conclusion
By following the steps outlined above, you should now be able to successfully connect your Angular application to your API when deployed on Nginx. This configuration allows your Angular app running on AWS Lightsail to make API requests to your Heroku backend, ensuring a smooth user experience. Troubleshooting deployment issues can be daunting, but with proper server configuration, you can eliminate these obstacles and focus on building amazing features for your app. Happy coding!
 0:00:20
 0:00:55
 0:02:05
 0:00:28
 0:04:06
 0:00:18
 0:00:21
 0:00:31
 0:08:30
 0:01:55
 0:01:41
 0:01:33
 0:00:47
 0:06:05
 0:00:47
 0:21:13
 0:04:05
 0:11:14
 0:00:20
 0:00:45
 0:00:24
 0:00:43
 0:00:29
 0:01:31