filmov
tv
How to Remove a Stuck Rotor - 5 Methods

Показать описание
Five different methods on how to remove a stuck or seized rotor. I did run into quite the problem with the Dodge, so I’ll go through the basic methods first, then working up harder methods using more tools. This applied to rotor setups where the rotors and hubs are separate assemblies. #brakes #maintenance #mechanic
Tools/Supplies Needed:
-ball-peen hammer
-penetrating oil
-wire brush
-puller
-bolts
Procedure:
Method #1
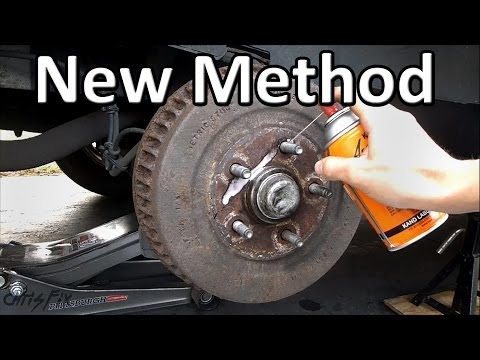
Using a ball-peen hammer, a medium-sized version would be the safest choice, hit between the wheel stud locations. A medium version will have enough weight but will fit comfortably between the wheel studs. Do no hit outside of this area as you can damage the rotor. You can install the lug nuts or rubber hose cuts over the studs to protect them if you wish. A few hits should help break it loose. Sometimes you can apply penetrating oil around the wheel lug locations and bore of the rotor. Even letting the oil soak overnight may help break up the corrosion bond. You’ll notice right away when the rotor breaks free and then you can finally remove it.
Method #2
This applies to rotors equipped with the parking brake assembly and this will be equipped on the rear wheels and you’ll see the parking brake cable entering the brake shield on the rear. Locating the rubber access cover, remove that and then using a standard screwdriver or a brake tool, you’ll need to back off the shoes on the inside. Depending on the vehicle, they may turn a different direction for each side. With the Dodge, this wasn’t the case, on one side it was located at the top and on the other it was located at the bottom. Closing in the shoes will allow the rotor to be removed if there is a lip on the inside braking surface. You should be able to rotate the wheel freely if it’s not, then the pads could be engaged, something is binding up, or the pads are rusted to the braking surface on the rotor.
Method #3
A similar type of idea to a puller, but if you don’t have a puller, using the caliper carrier mounting points, find suitable bolts with washers, and nuts, this will help you get a push on the rotor. If you are keeping the rotors, I would recommend putting a barrier between the bolt and rotor so no marring is caused by the bolt. Use both, while there is quite a bit of pressure on this assembly when braking, it’s more of a rotational direction and being that these are typically a cast design, don’t get too carried away where you may crack and break these mounting points.
Method #4
Next is using a puller. A puller can also be used on the rotors without a parking brake assembly. I was only able to rotate the rotor a small amount, not a full revolution which means something is binding up in behind. You’ll need a large enough puller set up for this, there are various types of pullers available. There should be an indentation on the center of the hub for the cone on the center bolt to lock into. Lock the jaws on the outside edge of the rotor, it’s best to go on the backside of the rotor if possible, here I couldn’t do that. It’s important to apply oil to the threads of the center bolt, then tighten the puller. If it does come off when tightening, then hit the center bolt of the puller with a hammer. These rotors are being replaced so I’m not worried about damaging them. Therefore I tried to hit the rotor on the backside with this pressure from the puller, this will help assist it off. Tighten the puller when needed so it applies constant force.
Finally, after it was dark, I got the rotor off. In this situation, the parking brake shoes actually separated from the frames and the shoes jammed on each other, not allowing me to remove the rotor easily.
Method #5
This is after trying at least the first two methods. Cutting off the mounting pins for the shoes which will be visible on the mounting plate from the rear. You can either drill them or grind them off using a carbide bur bit. With the mounting pins disconnected, while all the other hardware is still there, the pads can have some movement and collapse slightly. Typically I like to avoid heat so it doesn’t risk damaging the bearing assembly. In a worst-case scenario if all else fails is cutting up the mounting plates, just make sure new ones can be purchased for your vehicle.
Thank you to all those who watch my videos and support my content. Don't forget to subscribe to my channel for future tutorial videos and like my video if you found it helpful. New videos are always being uploaded every week!
© 4DIYers 2013
All Rights Reserved
No part of this video or any of its contents may be reproduced, copied, modified or adapted, without the prior written consent of the author.
Tools/Supplies Needed:
-ball-peen hammer
-penetrating oil
-wire brush
-puller
-bolts
Procedure:
Method #1
Using a ball-peen hammer, a medium-sized version would be the safest choice, hit between the wheel stud locations. A medium version will have enough weight but will fit comfortably between the wheel studs. Do no hit outside of this area as you can damage the rotor. You can install the lug nuts or rubber hose cuts over the studs to protect them if you wish. A few hits should help break it loose. Sometimes you can apply penetrating oil around the wheel lug locations and bore of the rotor. Even letting the oil soak overnight may help break up the corrosion bond. You’ll notice right away when the rotor breaks free and then you can finally remove it.
Method #2
This applies to rotors equipped with the parking brake assembly and this will be equipped on the rear wheels and you’ll see the parking brake cable entering the brake shield on the rear. Locating the rubber access cover, remove that and then using a standard screwdriver or a brake tool, you’ll need to back off the shoes on the inside. Depending on the vehicle, they may turn a different direction for each side. With the Dodge, this wasn’t the case, on one side it was located at the top and on the other it was located at the bottom. Closing in the shoes will allow the rotor to be removed if there is a lip on the inside braking surface. You should be able to rotate the wheel freely if it’s not, then the pads could be engaged, something is binding up, or the pads are rusted to the braking surface on the rotor.
Method #3
A similar type of idea to a puller, but if you don’t have a puller, using the caliper carrier mounting points, find suitable bolts with washers, and nuts, this will help you get a push on the rotor. If you are keeping the rotors, I would recommend putting a barrier between the bolt and rotor so no marring is caused by the bolt. Use both, while there is quite a bit of pressure on this assembly when braking, it’s more of a rotational direction and being that these are typically a cast design, don’t get too carried away where you may crack and break these mounting points.
Method #4
Next is using a puller. A puller can also be used on the rotors without a parking brake assembly. I was only able to rotate the rotor a small amount, not a full revolution which means something is binding up in behind. You’ll need a large enough puller set up for this, there are various types of pullers available. There should be an indentation on the center of the hub for the cone on the center bolt to lock into. Lock the jaws on the outside edge of the rotor, it’s best to go on the backside of the rotor if possible, here I couldn’t do that. It’s important to apply oil to the threads of the center bolt, then tighten the puller. If it does come off when tightening, then hit the center bolt of the puller with a hammer. These rotors are being replaced so I’m not worried about damaging them. Therefore I tried to hit the rotor on the backside with this pressure from the puller, this will help assist it off. Tighten the puller when needed so it applies constant force.
Finally, after it was dark, I got the rotor off. In this situation, the parking brake shoes actually separated from the frames and the shoes jammed on each other, not allowing me to remove the rotor easily.
Method #5
This is after trying at least the first two methods. Cutting off the mounting pins for the shoes which will be visible on the mounting plate from the rear. You can either drill them or grind them off using a carbide bur bit. With the mounting pins disconnected, while all the other hardware is still there, the pads can have some movement and collapse slightly. Typically I like to avoid heat so it doesn’t risk damaging the bearing assembly. In a worst-case scenario if all else fails is cutting up the mounting plates, just make sure new ones can be purchased for your vehicle.
Thank you to all those who watch my videos and support my content. Don't forget to subscribe to my channel for future tutorial videos and like my video if you found it helpful. New videos are always being uploaded every week!
© 4DIYers 2013
All Rights Reserved
No part of this video or any of its contents may be reproduced, copied, modified or adapted, without the prior written consent of the author.
 0:02:50
How To Remove a Stuck Nut or Bolt
 0:04:10
How to Remove a Stuck or Seized Wheel - 4 Methods
 0:00:57
How To Remove Stuck Or Seized Bike Pedals
 0:00:14
Remove a Stuck Wheel Hub for FREE in 5 Minutes at Home
 0:02:11
A doctor showed me how to remove the ring that was stuck on my finger
 0:00:34
how to remove stuck brake rotor/disc diy trick hack
 0:00:16
How To Remove Tight & Stuck Screws - D.I.Y. At Bunnings
 0:00:19
How to remove stuck drill bit from keyless drill chuck drill machine #shorts
 0:00:14
O2 Sensor Tool Hack: How to Easily Remove Stuck Sensors #o2sensor #toolhack #mechanic
 0:06:49
How to Remove a STUCK Drum Brake
 0:00:28
How to remove stuck drain stopper quickly. Very easy way!
 0:00:35
How to Remove a Stuck Ring (Hint: Dental Floss is Involved)
 0:07:31
How To Remove Stuck Or Seized Bike Pedals | Maintenance Monday
 0:00:51
How to Remove a Stuck Nut (without Stripping Threading)
 0:00:40
How To Remove Stuck Spark Plugs The Easy Way
 0:05:50
How to Remove a Stuck Rotor - 5 Methods
 0:00:12
How to easily REMOVE A STUCK RING from your finger AT HOME!
 0:00:37
How to remove stuck Lock Nut fromAngle Grinder #electricaltips #electricalshorts #shortvideos #tips
 0:01:11
How to Remove a Stuck Screw
 0:00:41
Stuck key? Try this!!
 0:00:16
👌Best way to remove the two stuck utensils 😍😍 How to Separate stuck utensils #shorts #hungertummy...
 0:03:40
Stuck Screw Removal | 5 BEST Ways to Remove Stripped Screws
 0:00:34
How to remove food stuck between two teeth? (when there are gaps between teeth)
 0:00:18
Simple trick to remove stuck utensils..
Комментарии