filmov
tv
Step by Step - Kinetic F/A-18 1/48, Part 2: Intakes and Exhausts

Показать описание
Today is an actual step - Step 7 where we assemble the intakes and exhausts. Not exactly what I was hoping for, but it's done.
As always - please leave me a comment with your observations and any suggestions.
As always - please leave me a comment with your observations and any suggestions.
 0:40:33
Step by Step - Kinetic 1/48 F/A-18 Hornet - Model Aircraft build
 0:07:01
Step by Step - Kinetic F/A-18 1/48, Part 2: Intakes and Exhausts
 0:09:57
Kinetics: Chemistry's Demolition Derby - Crash Course Chemistry #32
 0:07:27
Step by Step - Kinetic F/A-18 1/48, Part 1: Begin at the beginning!
 0:02:12
How to set up a Kinetic indoor bicycle trainer and mount a bike
 0:02:55
In 20 STEPS - Kinetic Glass Installation by Studio Drift
 0:09:10
Kinetics: Initial Rates and Integrated Rate Laws
 0:00:16
Kinetic sculpture by artist Tamara Kvesitadze
 0:13:32
Grade 12 Physical Sciences | Newton’s Laws | Northern Cape March Control Test 2023 Q2
 0:06:32
Step by Step - Kinetic F/A-18 1/48, Part 3: Gear Bays and Intakes
 0:14:24
Step by Step - Kinetic F/A-18, Part 11: Final Results
 0:10:23
Step by Step - Kinetic F/A-18 1/48, Part 4: The Nose
 0:06:03
Kinetic Energy
 0:33:42
F/A 18D ATARS, Kinetic 1:48, step by step Full build
 0:18:48
Writing Rate Laws of Reaction Mechanisms Using The Rate Determining Step - Chemical Kinetics
 0:10:30
Step by Step - Kinetic F/A-18, Part 8: Tails and Windows
 0:06:41
Energy, Work, & Power, (1 of 31) Kinetic Energy, An Explanation
 0:06:59
Step by Step - Kinetic F/A-18, Part 5: The Intake Faces
 0:05:38
Tennis Forehand POWER - KINETIC CHAIN Science Explained (Step 1)
 0:15:59
EASY Pinewood Derby Car WINS using Science!!!
 0:09:56
Step by Step - Kinetic F/A-18, Part 9: It's the Little Things...
 0:18:43
Step by Step - Kinetic F/A-18, Part 10: You Need A Little Color...
 0:06:01
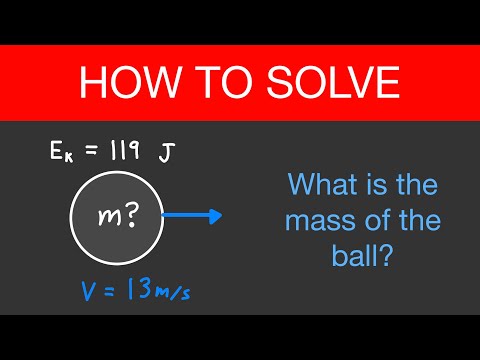
Calculate the Mass of the Ball - Kinetic Energy - STEP BY STEP (Practice Problem) (EXAMPLE SOLUTION)
 0:08:37
Kinetic Energy: Example Problems
Комментарии